Summary
- An iCloud+ subscription offers free encrypted HomeKit Secure Video storage at no extra cost.
- HomeKit Secure Video doesn’t count towards iCloud storage quota and has additional features such as motion detection and notifications.
- You’ll also need a smart home hub like a HomePod or Apple TV and cameras that are compatible with HomeKit Secure Video.
If you have an iCloud+ subscription, it includes access to HomeKit Secure Video. This allows you to securely store recordings from compatible cameras and video doorbells in iCloud, at no additional cost. Let’s take a look at how to add cameras to the Home app to take advantage of HomeKit Secure Video.
Why Use HomeKit Secure Video?
One of the main reasons for using HomeKit Secure Video is important enough for Apple to include in the feature’s unwieldy name: security. Your video camera stream and recordings are end-to-end encrypted by default. This means that no one other than you or people who have permission in your Home app can view the footage, including Apple or the company that makes your cameras.
Another major benefit is that if you already have an iCloud+ subscription, which can start from as little as $0.99 per month, you don’t need to pay anything more to store your footage in iCloud. Many brands require a subscription to store or view your recordings, with popular brands such as Ring charging a minimum of $4.99 per month.
Footage stored via HomeKit Secure Video doesn’t count against your iCloud storage quota, so you don’t have to worry about filling up your iCloud with video footage. The feature will automatically store the last 10 days of recordings, even if your iCloud storage is full.
There are also additional useful features, such as people, animal, vehicle, and package detection, activity zones, and face recognition for people you’ve identified in the Photos app.
What You Need to Use HomeKit Secure Video
As already mentioned, you’ll need an iCloud+ subscription to use HomeKit Secure Video. The cheapest option is $0.99 per month, which gives you 50GB of iCloud storage and allows you to connect one camera. The 200GB plan is $2.99 per month and lets you connect five cameras, and the 2TB plan is $9.99 per month with unlimited cameras.
You also need an Apple device to act as a home hub. This device is the link between your camera and the Home app, allowing you to connect to your camera feed even if you’re away from home. You can use an Apple TV 4K, a HomePod mini, a HomePod (second-generation), or an iPad as your home hub.

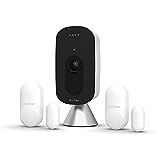
ecobee SmartCamera & Sensors
The final thing you’ll need is a smart home camera or video doorbell that’s compatible with HomeKit Secure Video. Many brands offer compatible cameras, such as the Logitech Circle View camera and doorbell, the Eve Cam Secure Indoor Camera, and the Ecobee Smart Camera. However, even if your camera doesn’t support HomeKit natively, there are still ways that you can integrate your camera with HomeKit Secure Video.
Not all HomeKit-compatible cameras will work with HomeKit Secure Video. You should check that products specifically support HomeKit Secure Video if you want to use the feature.
Connecting the Home App to iCloud
Before you can use your cameras with HomeKit Secure Video, you need to ensure that the Home app syncs with iCloud.
Go to Settings > [Your Name] > iCloud. Tap “See All” in the “Saved to iCloud” section. Scroll down and ensure that “Home” is toggled on. The Home app can now store video footage in iCloud.
Adding Cameras to the Home App
The next step is to add a camera to your Home app. Once you add a video camera or video doorbell, you can then set it up to save footage from the camera to iCloud.
Open the Home app and click the “+” (plus) icon at the top of the screen. Select “Add Accessory.” Your camera should have a QR code that you can use to scan to add it to the Home app. Some devices also allow you to add them to the Home app by holding your iPhone near the accessory. Give your camera a name and assign it to a room if you want. Your camera should now appear in the “Cameras” section of the Home app.
By default, your camera will be set up to stream to the Home app, meaning you can view the live feed directly in the app. One of the major benefits of HomeKit Secure Video is the ability to save recorded video in iCloud, but you’ll need to change some settings to make this happen.
Tap and hold on the camera in the Home app and select “Accessory Settings.” Scroll down and select “Recording Options.” Tap “Stream” next to “When Home” and select “Stream & Allow Recording.” Repeat the process for “When Away” if you want the camera footage to be recorded when you’re away from home.
Now tap “More Options.” To record video when any motion is detected, select “Any Motion is Detected.” To limit recording to specific types of motion, select “Specific Motion is Detected” and toggle on the types of motion that you want to trigger recordings. Toggle “Record Audio” to choose whether audio is recorded with your video.
Your camera is now set up to record video whenever the motion you have selected is detected. The video is stored in iCloud and is only accessible via the Home app.
Viewing Live and Recorded Video in the Home App
Once you’ve set up your cameras to record, you can view both the live stream from your camera and the recordings within the Home app.
Open the Home app and tap the camera that you want to view. The live feed from that camera should be displayed. At the bottom of the screen, you should also see a timeline of all the recordings from the last 10 days. You can swipe through the timeline to see all the recordings from the past 10 days. You can also tap the date at the top of the screen to see the recordings for a specific day.
If you want to keep a recording for longer than 10 days, you can tap the Share icon to share or save the recording.
Setting Up Notifications for Cameras and Doorbells
You can also set up notifications for motion events detected by your cameras. This will provide a notification when motion is detected, along with a snapshot from your camera if you want one.
Tap and hold the camera you want notifications for, and tap “Accessory Settings.” Select “Status and Notifications.” Toggle “Activity Notifications” on. Tap “Time” if you want to set specific times to receive notifications, and select “People” if you want to limit notifications to when you’re home or away.
If you’ve already set up the types of motion you want to record, select “A Clip is Recorded” to match those settings. To receive notifications for any type of motion, select “Any Motion is Detected.” If you only want notifications for specific types of motion, such as people or animals, tap “Specific Motion is Detected” and choose the type of motion you want alerts for.
To see a still image from your camera with your notification, toggle “Allow Snapshots in Notifications” on.
Adding Activity Zones for HomeKit Secure Video
If you’re getting too many notifications, you can add activity zones to your camera so that motion will only be detected within specific parts of the camera view. This is useful if you’re getting unnecessary notifications as people walk past your home.
Tap and hold the camera and select “Accessory Settings.” Tap “Select Activity Zones.” Tap the corners of the zone you want to define in order, and then tap the first corner again to complete the shape. Motion will only be detected in the zone you’ve created.
If you want motion to be detected everywhere except that zone, tap “Invert Zone.” To remove an activity zone, tap it and select “Clear.” Add further activity zones if you want, and tap “Done” to save your changes.
Granting Access to Recordings to Other People in Your Home
If you have other people in your household that you’ve added to the Home app, they will automatically be able to stream the live view from your cameras when they’re at home. However, if you’re assigned as the owner in the Home app, you can decide which other people who are assigned as residents in the Home app have access to recordings.
Tap the three-dot menu icon in the top-right corner of the Home tab. Select “Home Settings” and tap the name of the person you want to grant access to. Tap “Cameras” and select “Stream and View Recordings.” They will now be able to view all recordings from the Home app on their own devices.
If you already have an iCloud subscription and compatible smart home cameras, adding them to HomeKit Secure Video is a no-brainer. You get cloud storage at no additional cost, and your recordings are all end-to-end encrypted to keep your footage secure.
If you’ve yet to invest in a camera setup but already use Apple devices, HomeKit Secure Video is a compelling reason to choose Apple Home for your smart home ecosystem.


