

Knowing how to take a screenshot on Windows 11 is really useful for sharing information, troubleshooting problems, or just grabbing a snapshot of something in your favorite game or TV show. But whatever you want to take a screenshot for, there are a few different ways to do it in Windows 11.
Many of them will be familiar to anyone who knows how to take a screenshot in Windows 10, but there are some new ones too.
How to take a screenshot in Windows 11 with Print Screen
The quickest and easiest way to take a no-frills screenshot in Windows 11 is to use its built-in keyboard shortcut.
Step 1: Press Windows key > Print Screen. Note, if your Print Screen key has multiple functions (most common on laptops) then you may also need to press the FN key simultaneously.
Step 2: The screen should dim slightly to show you that a screenshot has been taken. It will automatically save as a fullscreen PNG image of whatever is on the screen at the time.
Step 3: Navigate to This PC > Pictures > Screenshots to locate your screenshot(s).
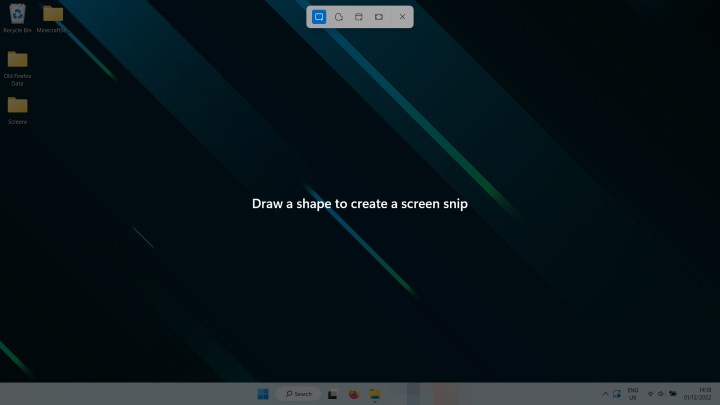
How to take a screenshot in Windows 11 using the Snipping tool
The Snipping Tool is a Windows 10 carryover that features a versatile method for taking screenshots in Windows 11.
Step 1: Press Shift > Windows Key > S to launch the Snipping tool.
Step 2: The box that appears at the top of the window gives you a few different options:
- Rectangle Snip: Select this, then use your mouse to draw a rectangular section of the screen you want to screenshot.
- Freeform Snip: Select this, then use your mouse to draw any kind of shape to take a screenshot.
- Window Snip: Select this, then select the particular window on screen that you want to take a screenshot of.
- Fullscreen Snip: Select this to take a screenshot of your entire screen as it appears without the Snipping tool overlay.
Step 3: When you’ve taken your screenshot, a notification will appear in the bottom right letting you immediately select and edit the image, if you want. Alternatively, you can find the image in This PC > Pictures > Screenshots.
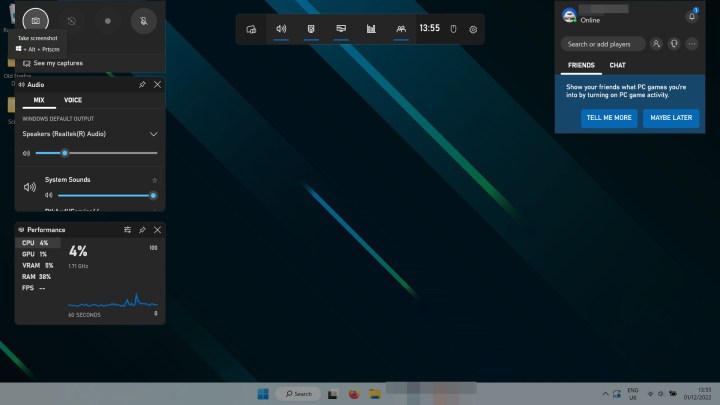
How to take a screenshot in Windows 11 using the Xbox Game Bar
Even if you don’t use the Xbox Game Bar for any of its gaming-focused features, it is still a useful tool for taking screenshots in Windows 11.
Step 1: Press the Windows key + G keys to bring up the Xbox Game Bar.
Step 2: Click the 8Screenshot (Camera) icon8 in the top-left within the Capture window. Alternatively, you can press Windows key > Alt > Print Screen.
Step 3: You’ll be able to find the image in This PC > Videos > Captures.
Editors’ Recommendations


