


Jacob Roach / Digital Trends
Even if you own one of the best SSDs, it will fail one day, and that’s a fact. Because of how SSDs work, each has a finite number of read and write cycles that it can complete before it dies, and every such cycle contributes to the degradation of NAND flash memory. At some point, it’ll be beyond saving. The good news? It’s nearly impossible to use up all of these read/write cycles. The bad news? Your SSD may still fail even if you’re far from hitting that limit.
Signs of a failing SSD include crashes, blue screens of death (BSOD), slow performance, data loss, and inability to write new files to the drive. When things are going south for your SSD, it’s important to know and act as soon as possible — you might still have time to back up your data. Check out the best ways to test your SSD to make sure your data is safe.
Monica J. White / Digital Trends
Check your SSD in Windows Settings
For a very basic check, you can just head straight to Windows Settings. Remember that this is not an in-depth test, so if you suspect your SSD might be failing, try out the other options on this list when you’re done with this one.
Step 1: Start by entering the Storage section of Windows Settings. You can do this by either pressing the Windows and I keys on your keyboard, then navigating to System > Storage, or by typing Storage into the Windows Search and selecting Storage Settings.
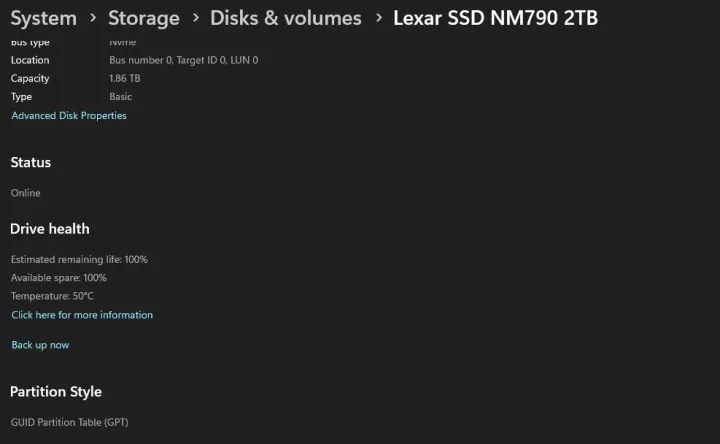
Step 2: Once you’re there, scroll down to find Advanced storage settings, then Disks & volumes.
Step 3: Pick your SSD from the list and click on Properties. Scroll down past some basic information about your SSD and look at Drive health. Windows will give you an estimate of your SSD’s remaining life, available space, and the temperature of your drive. Unfortunately, that’s all the information you can get from this utility.
Monica J. White / Digital Trends
Use Windows Command Prompt
This is another simple “yes or no” type of test. Using the Command Prompt (CMD) in Windows, you can check whether your SSD is healthy. If it isn’t, that’s a big red flag that you should back up your data while you still can.
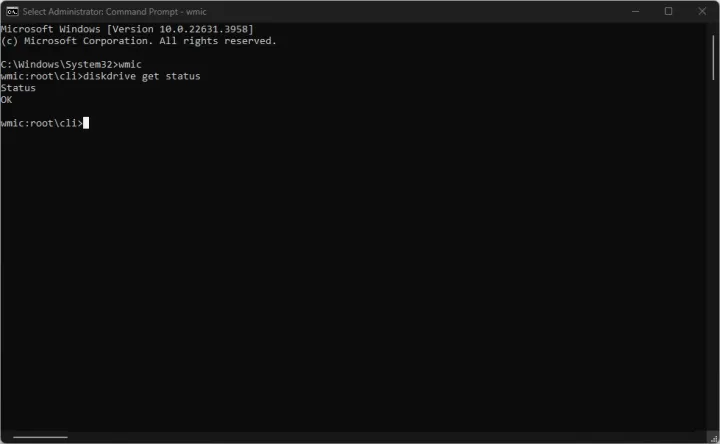
Step 1: Click on the Start Menu and type in Command Prompt. Then, right-click the result and select Run as administrator.
Step 2: Run the command as follows: wmic diskdrive get status and press Enter.
If the tool says that your SSD is “OK,” you’re in the clear. However, if you encounter “Pred Fail,” you should rush to back up your data (and then proceed with some more in-depth testing).

Monica J. White / Digital Trends
Use Windows PowerShell
Windows PowerShell can provide you with a bit more information than the Command Prompt can, and there are a couple of different commands you can run to learn more about your SSD.
Step 1: Start by launching Windows PowerShell. Enter the Start Menu and search for Windows PowerShell. Then, right-click it and Run as administrator.
Step 2: Once in PowerShell, you can try the following commands (you can just copy and paste them in):
- Get-PhysicalDisk — This will tell you the operational status of your SSD and whether it’s healthy or not.
- Get-PhysicalDisk | Get-StorageReliabilityCounter | Format-List — This drastically expands the amount of information you’ll get on your SSD. You’ll see the current and maximum temperatures, whether your SSD has encountered any read or write errors, or how long your SSD has been in use.
If the columns are empty, you may need to use a more advanced tool — more on that below.
You can also modify the second command: Get-PhysicalDisk | Get-StorageReliabilityCounter | Select [insert value here] and replace “[insert value here] with the specific information you might want to see. For example, to see write errors, use Get-PhysicalDisk | Get-StorageReliabilityCounter | Select WriteErrorsTotal.
Monica J. White / Digital Trends
Use Optimize Drives in Windows
This is yet another option that will just tell you whether your SSD is healthy. However, you can also use the Defragment & Optimize Drive utility to optimize your SSD if there’s anything wrong with it.
Word of warning: Don’t bother defragmenting your SSD. Just use this tool to check your SSD health and optimize it.
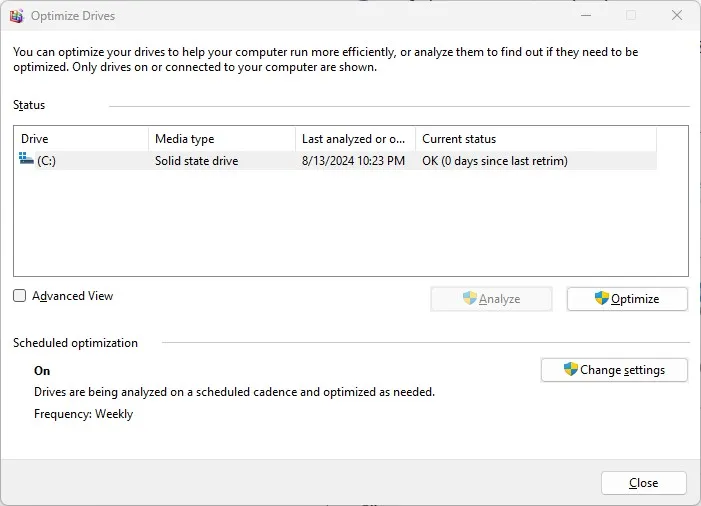
Step 1: In the Start Menu, search for Defragment & Optimize Drive. Next, launch the tool.
Step 2: You’ll immediately be met with a list of all your drives. In the Current status column, you’ll be able to see whether your SSD is doing fine.
The utility will also tell you how long it’s been since the last “retrim.” This refers to a process that reclaims unused space on your drive by essentially telling your SSD which blocks of data aren’t needed anymore. No matter if your SSD is healthy or not, you can press Optimize to run a retrim. The tool performs retrims in the background, so if it’s been done recently, there’s no need to re-do it.

Monica J. White / Digital Trends
Use CrystalDiskInfo
When it comes to getting some more comprehensive information about SSD health, CrystalDiskInfo is the go-to tool. It’s free to use and easy to follow. It’ll give you all the most important data on your SSD, from its power-on count and power-on hours to whether it’s healthy.
Step 1: First, you need to download CrystalDiskInfo. We recommend getting it directly from its official website, which you can find here. Once the download finishes, install and run the tool.
Step 2: CrystalDiskInfo doesn’t have many hidden caveats that you need to keep in mind — what you see is what you get. It monitors your SSD health by checking SMART, which stands for Self-Monitoring, Analysis, and Reporting Technology. You’ll be able to tell at a glance whether your SSD is doing well.
Run the tool and check out the health of your drives. Some of the most important info to look at, apart from the percentage value under Health Status, includes Power On Count, Power On Hours, and Total Host Writes.

Monica J. White / Digital Trends
Use AIDA64 Extreme
AIDA64 Extreme is not a free tool, but you can use it for free for 30 days to test your PC. Unlike CrystalDiskInfo, AIDA64 can provide you with useful information on the rest of your PC, too, including your processor, motherboard, and RAM. Remember that if your SSD is fine but the rest of your PC may not be, we have a comprehensive troubleshooting guide to give you a hand.
Step 1: Start by downloading the AIDA64 Extreme tool directly from the manufacturer’s website. Pick the latest version available and download the trial from here. Go through the quick installation process and select Launch AIDA64 before it’s done.
Step 2: You’ll be met with a screen that lists a number of PC components and software on the left. To check SSD health, the one that you want to click on is Storage. Next, click on SMART to locate your SSD.
This is where you’ll get all the useful information about your SSD. The extent of data is similar to what you’ll find in CrystalDiskInfo because AIDA64 also reports the SMART data from your SSD. You’ll see SSD health, lifetime writes (written in a different format than in CrystalDiskInfo), and the total power-on time.

Monica J. White / Digital Trends
Monica J. White / Digital Trends
Use HWiNFO
HWiNFO is a useful tool for monitoring your PC’s health and performance. It has a separate utility for sensors, which can tell you all about your CPU and GPU temperatures and clock speeds, among other things. It also can provide you with quite a lot of information about your SSD.
Step 1: Begin by downloading HWiNFO from the official website. You can either choose the installer, which will create a persistent version of HWiNFO on your PC, or you can use the portable version that doesn’t require an installation.
Once downloaded, either install the program or launch it. Don’t tick any of the boxes (sensor only or summary only) — just press Start.
Step 2: You’ll see two windows pop up — the system summary and the main HWiNFO window. The summary gives you a brief overview of your system, and in the bottom-right corner of it, you’ll see a quick indicator about your SSD health. There’s much more to dig into, though.
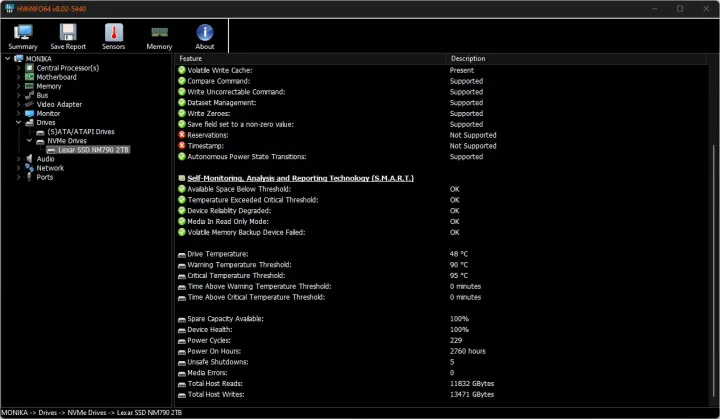
Close or minimize the system summary window and tab into HWiNFO. On the left-hand side, click on the little arrow next to Drives. In the drop-down menu, select NVMe Drives and pick your SSD from the list.
Step 3: Click on your SSD and scroll through all the pertinent information. Like the other tools on this list, HWiNFO reports on device health, spare capacity, power cycles, and errors.
You can also click on Sensors at the top. There will be a bunch of other (interesting, but unrelated) sensors at first, so simply scroll down until you reach S.M.A.R.T. followed by your SSD model. This is where all the interesting metrics sit, such as real-time temperature and read/write totals.

Samsung
Use vendor-specific tools
Some storage manufacturers offer their own tools that you can use to scan your SSD with. Some of those are similar to the ones we’ve described above and don’t really provide anything extra, but there are a couple that let you run additional tests depending on the exact SSD model that you have.
Using these tools is fairly simple. You’ll usually just have to install them and browse through your SSD health. If there are extra tests to run, they’re visible at a glance.
Here are some tools to check out:
-
Seagate SeaTools — This tool also works with drives from other vendors. You can use it to run additional diagnostic tests.
-
Samsung Magician — This tool will only work if you have a Samsung SSD. It also includes features that can help you optimize your SSD’s performance.
-
Western Digital Dashboard — Similar to all the other tools, the WD Dashboard also lets you upgrade your firmware and check SSD health. Only works with WD and SanDisk SSDs.
-
Crucial Storage Executive — Made only for Crucial SSDs, this tool includes performance optimization and firmware updates.
-
Kingston SSD Manager — Provides SMART data and usage statistics, secure erase, and firmware updates for Kingston SSDs.

