How do you create a rock solid development environment on Ubuntu? I’ll show you how to do it in just a few minutes with VS Code and Docker Desktop.
What we are going to create is an isolated development environment where you can set things up any way you need or like without worrying about problems or conflicts with the Ubuntu operating system itself. The end result will be a re-creatable containerized environment that is completely independent of the rest of your system. That means that changes to your programming environment won’t harm Ubuntu, and changes to Ubuntu won’t hurt your development environment.
To create this environment we’ll be using the VS Code IDE and the Docker container development system. Follow along and you’ll have your first development container set up in just a few minutes.
Installing Visual Studio Code
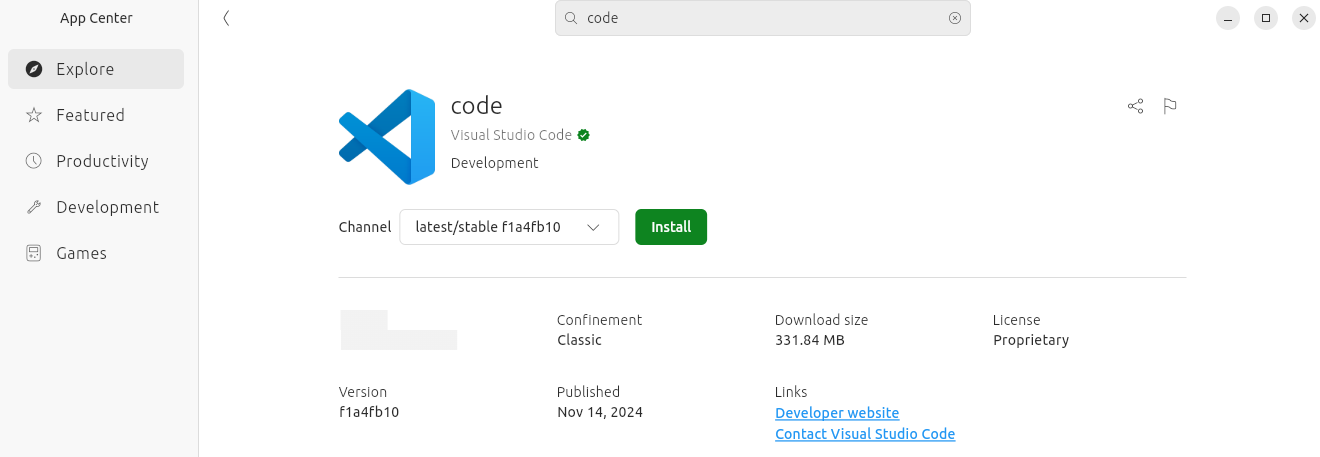
On Ubuntu, installing VS Code is a breeze. It is available directly from the App Center. Just open the App Center and type code in the search field and it should be the first result you see. Click on “Install,” and it will be ready for use in a few moments. When the installation completes, we’ll need to install some extensions for working with containers, so go ahead and launch Code.
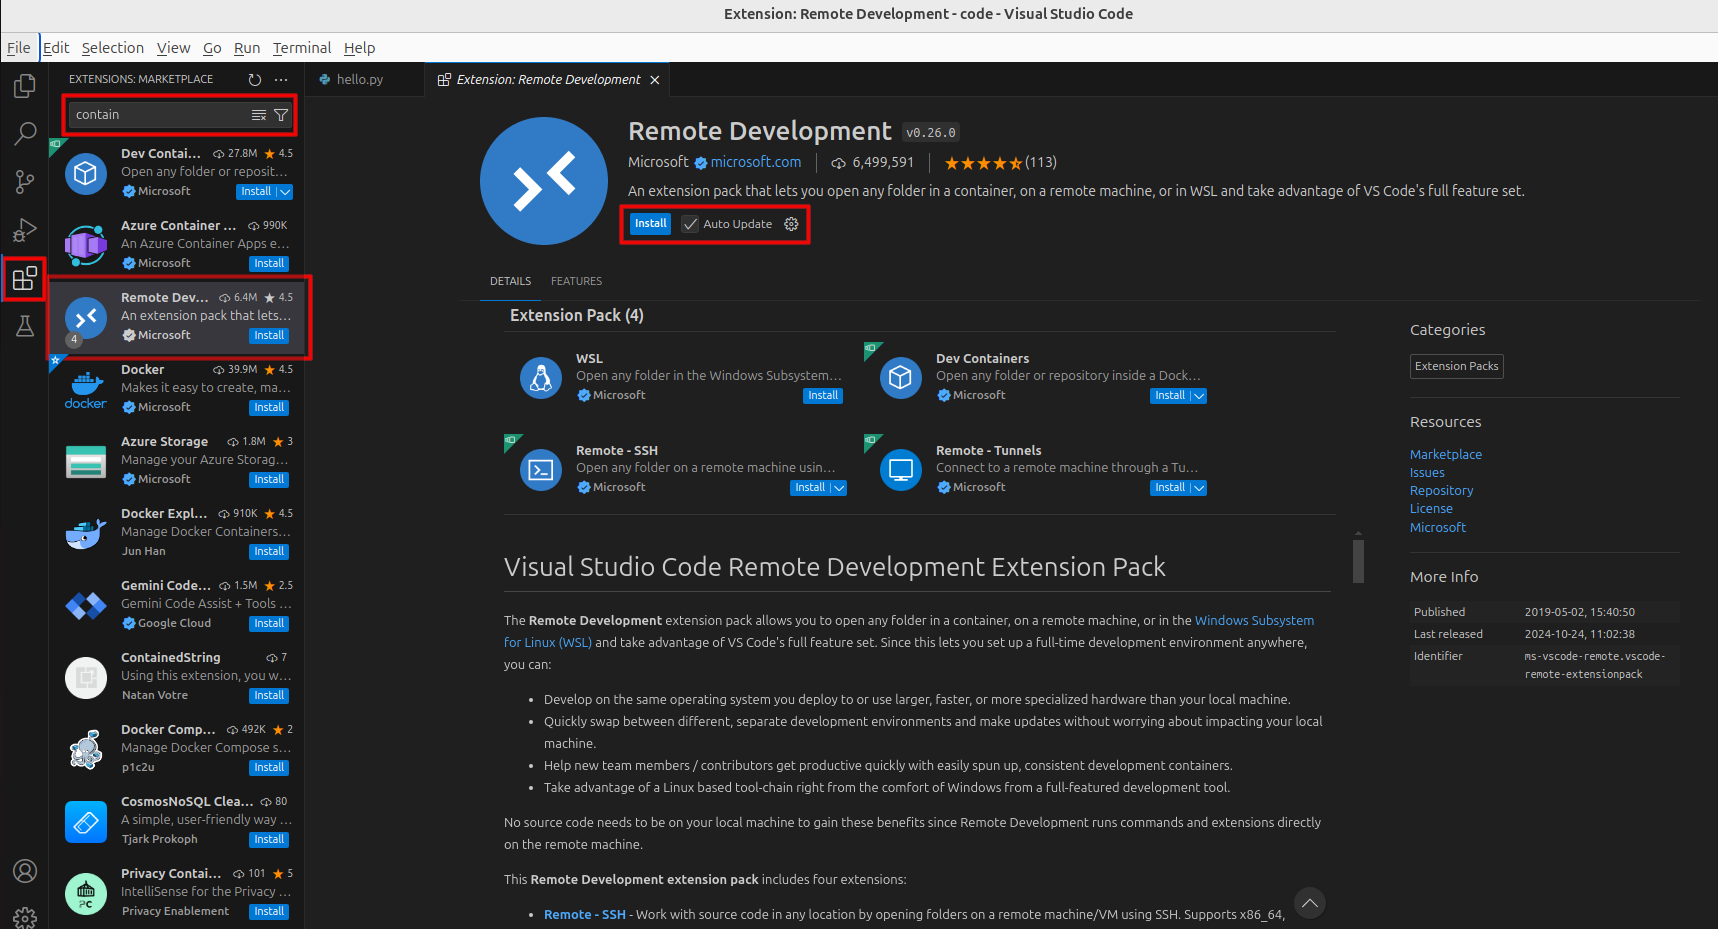
When VS Code opens, go to the extension marketplace by clicking on the icon on the left side panel that looks like 4 small blocks. It should be the fifth from the top. This will open a list of extensions with a search field at the top. In the search field, type containers. On top, or close to the top, of the list you’ll see an extension pack called “Remote Development”. Click on that selection and then click the blue “Install” button.
This will install four extensions that enable Code to work with remote and containerized development environments. It should only take a few moments for the extensions to install. We’re done with VS Code for now, but we’ll come back to it in a few minutes.
Installing Docker Desktop
Docker Desktop is a combination of the Docker container engine and a desktop app to help you manage containers manually when needed. This one is not available in the App Center, but installation isn’t very difficult. First we’re going to enable the Docker APT repository so that Docker will update itself along with the rest of your software. Then, we’ll download and install Docker Desktop. It might look like a lot of commands, but the whole process only takes a minute or two. You’ll need to open a terminal and enter the commands below.
We’ll start by installing the Docker GPG key to make sure all future downloads are secure. Enter the following commands at a terminal prompt, one at a time, in order:
        sudo apt-get update
sudo apt-get install ca-certificates curl
sudo install -m 0755 -d /etc/apt/keyrings
sudo curl -fsSL https:
sudo chmod a+r /etc/apt/keyrings/docker.asc
With the GPG key installed, we’ll now enable the repository. The following is a single command on multiple lines. You should copy and paste the entire command into your terminal and then press enter.
        echo \
  "deb [arch=$(dpkg
  $(. /etc/os-release && echo "$VERSION_CODENAME") stable" | \
  sudo tee /etc/apt/sources.list.d/docker.list > /dev/null
Now enter the following command to update apt with the information for the Docker repository.
sudo apt-get update
You should see a few lines of output as your package manager updates. If everything above worked correctly, you will see two lines in the output with the docker.com domain name.
With the repository enabled, we can now install Docker Desktop. To do so, first download the Docker Desktop either using this DEB package direct download link or, if it doesn’t work, by visiting the official download page. Next, back at your terminal, switch to the directory where you saved the package file and enter the following commands to install it (assuming you saved to your “Downloads” directory):
        cd ~/Downloads
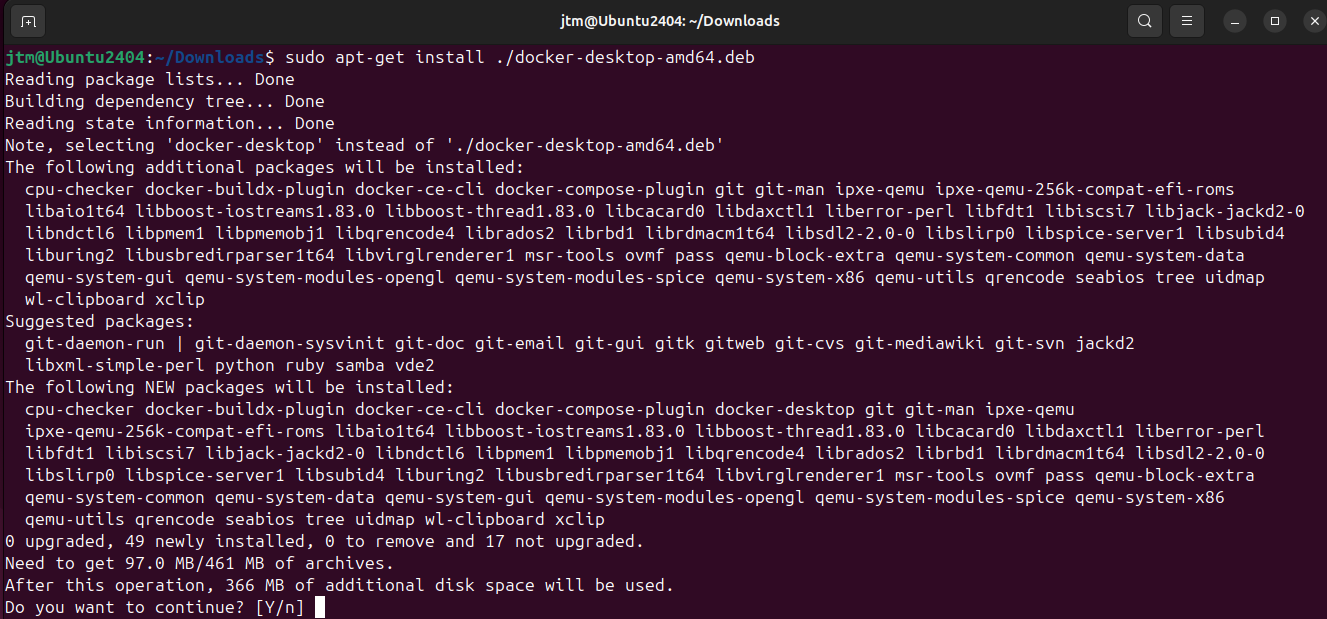
sudo apt-get install ./docker-desktop-amd64.deb4
The Ubuntu package manager will present you with a list of packages that need to be downloaded and installed and ask you if you want to continue. You should, of course, say yes.
You’ll see quite a bit of output as your system downloads and installs all the necessary packages. Depending on the speed of your connection and computer, the installation can take anywhere from a few moments to a few minutes. The installation process will finish with a warning message. This is normal and you can safely ignore it.
Now you should see Docker Desktop in the app launcher. We won’t need to actually do anything with the Docker Desktop app right now, but you will need to launch it to start the Docker container engine. So, go ahead and launch it and just let it run in the background.
Building Your First Container in VSCode
Now back to VSCode! With Docker up and running, the extensions we previously installed in VSCode will allow us to build any number of containers with whatever tools we need for different development projects. For this example, we’ll create an Ubuntu-based container with some common development tools and the Java Development Kit (JDK).
To get started, open VSCode and move to a directory where you’d like to set up your code and create your environment. Then, press Ctrl+Shift+P to open the command palette. In the search box at the top, type in the word container. You should see several options starting with the words “Dev Containers.” Select “Add Dev Container Configuration Files“ (you may have to scroll down to find it).
You’ll then be asked if you want to add the configuration to your workspace or to your user data directory. In most cases, adding it to your workspace will be the right choice. If you share your work with others through systems like GitHub, the container configuration will be saved along with your code, making it possible for others to easily replicate your development configuration. Selecting the user data folder option will separate the configuration from your code so that it doesn’t get pushed out to any shared repositories.
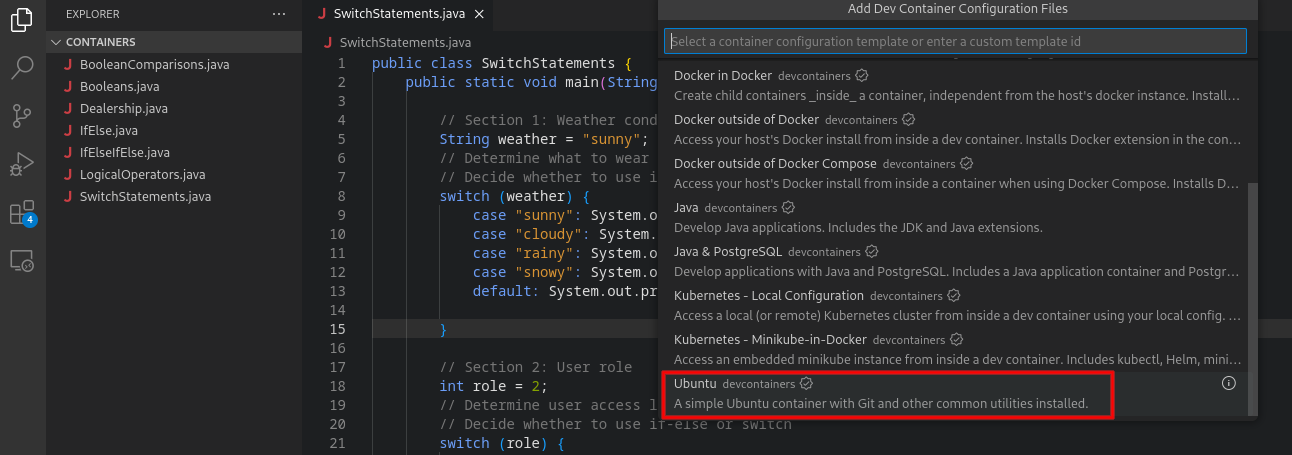
Next, you’ll be shown a series of templates you can choose from to create your base container. At the end of the list you should see an option for a basic Ubuntu container.
After selecting Ubuntu, you’ll be presented with a short list of the latest versions to pick from. At the time of writing, the latest LTS version of Ubuntu is Noble Numbat, so we’ll pick “noble” from the list.
You’ll then be given the opportunity to select additional tools or programs that you might require for your dev environment. For our demonstration, type java into the search bar and select the check box for “Java (Via SDKMan)“. Then, click the blue “Ok” button.
Next you’ll be asked if you want to use the default configuration or customize it. For the sake of simplicity, keep the default configuration, and just click on “Ok” to go through the next few options that will ask if you want to install any special Java tools.
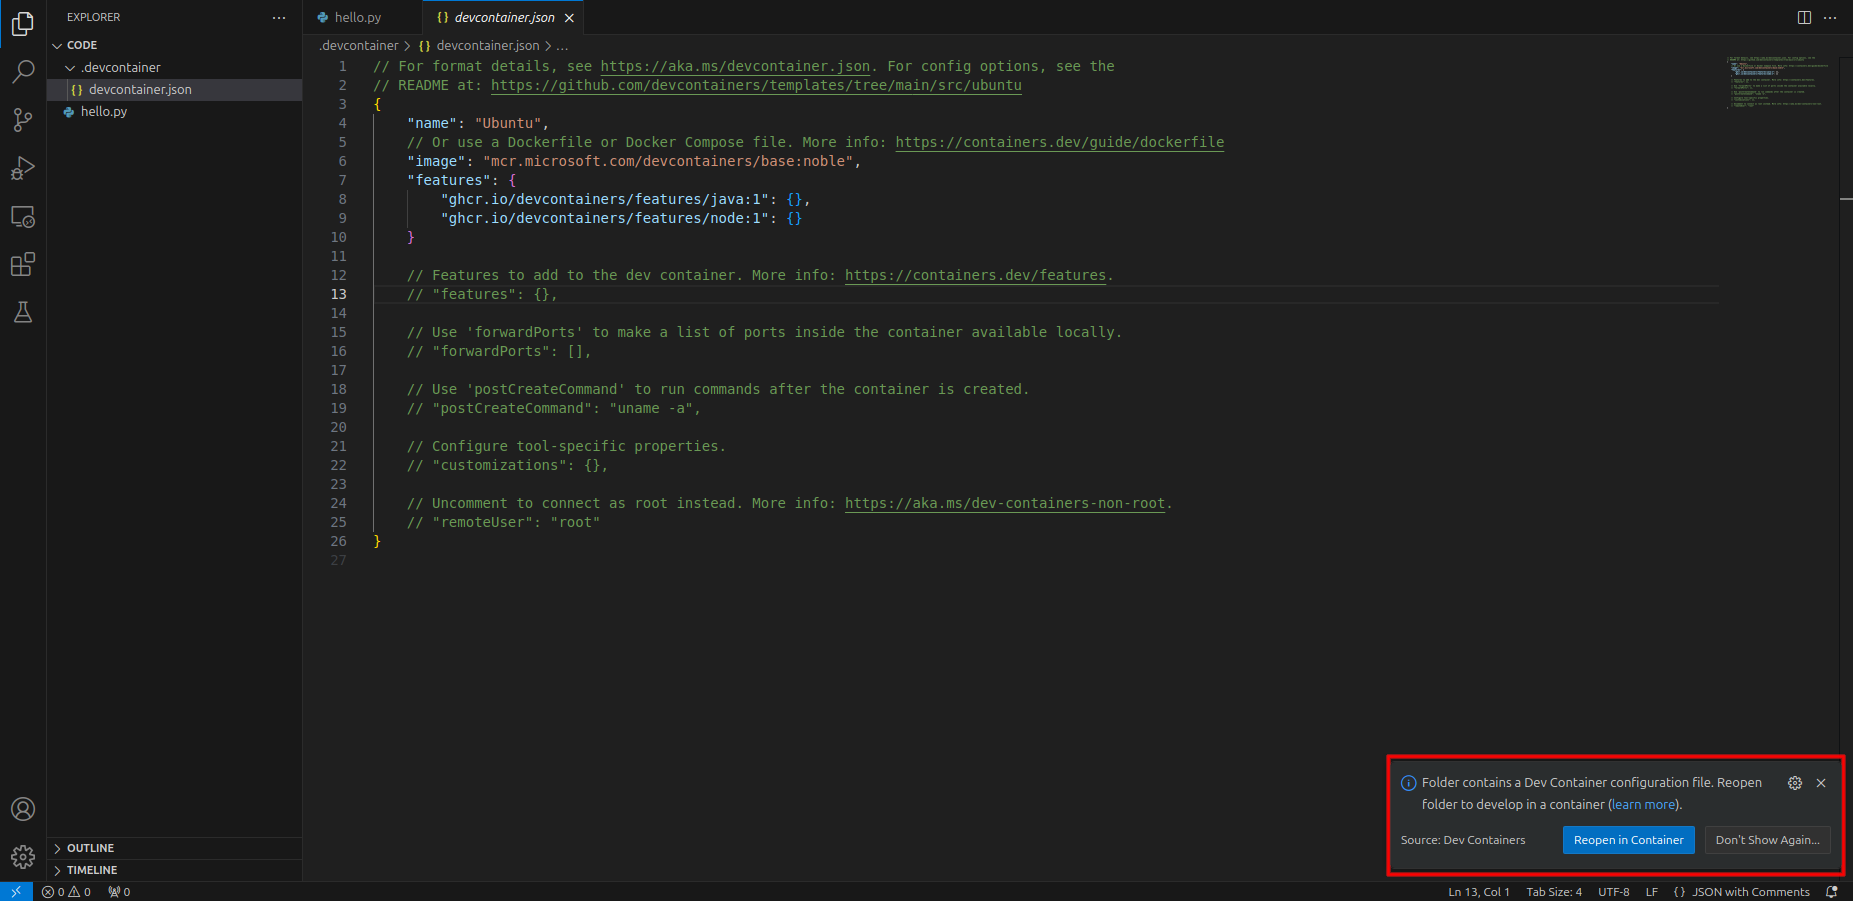
When you’ve made all of your configuration choices, VSCode will ask you if you want to reopen your project in the container that you just configured. Click the blue button and VSCode will begin building the container for you.
This process will take several minutes. Don’t worry, though. Once the container is built, you’ll be able to start it up and get to work in just a few seconds.
The “Reopen in Container” dialog will disappear after a few seconds if you don’t click on anything. If you miss the dialog, press Ctrl+Shift+P to open the command palette, type container in the search bar, and select any of the options that say open in or build container.
A window will open in the lower right of your screen saying “Connecting to Dev Container” as the container is built. If you click on “Show Log,” you can watch the build process in the terminal.
And that’s it! When the build process is complete, you will have your first development container. Your code will be saved in the directory where you opened VSCode and your environment will exist inside the container. When you want to work with your container(s), just launch Docker Desktop to start the Docker Engine, then open your project in VSCode. Once you’ve created a container, Code will automatically start it when it’s needed and shut it down when it’s not.
You can open the command palette and explore more options by typing container in the search bar. You can create new containers, modify existing ones and delete any that are unused. You can now create the exact development environment you need for any and all of your programming projects without fear of creating dangerous conflicts on your Ubuntu system. And, perhaps even better, you can update Ubuntu with confidence, knowing that your development environment won’t break down.


