

If you have a silicon Mac, you’ve likely purchased it for its utility in productivity, capabilities in demanding creative tasks like video editing, and extended battery life. But remember, the power doesn’t stop there—these machines are even great for livestreaming.
And the best part is that thanks to the energy efficiency of Apple Silicon devices, this setup uses significantly less energy than a traditional desktop PC stream setup. So how does it work? Read on, and we’ll walk you through it step by step.
What Do You Need to Stream on Your Apple Silicon Mac?
This article is not a comprehensive tutorial for setting up OBS, comparing hardware, or other deep-dive setup guides. Instead, here we’ll include a basic overview of what you’ll need to use your Apple Silicon system as a dedicated streaming machine, and we’ll delve into some unique quirks these devices have in that setup process. If you’re currently looking into an Apple Silicon device, make sure to pick the right Mac model for you.
We tested this on a 14″ M1 Max MacBook Pro with 24 GPU cores and 32GB RAM, but we had plenty of headroom in all specs, so even the 2020 M1 MacBook Pro would suffice in certain configurations. However, the only device line we wouldn’t recommend for this is the MacBook Air, as it lacks active cooling for the extended time under load that streaming puts on the system.
We will provide recommendations for most hardware through this article, but here’s a quick checklist:
- Start with a gaming console or PC, as it’s what you’re capturing—you probably already have this if you’re thinking about using an Apple SIlicon MacBook for streaming.
- Next will be a capture card, which allows you to capture the game while you play.
- If you don’t have one already, grab yourself a microphone and webcam, so your viewers can hear and watch you.
- Consider a USB 3.0 (or higher) or Thunderbolt hub to support all the devices you’re connecting and to add USB-A connectivity, as most Macs are limited to USB-C ports.
- Finally, download OBS Studio or Streamlabs OBS for free recording software so all of this equipment works together seamlessly.
What Capture Card Should You Buy?
You’re going to need to get a capture card if you plan to use your Mac as a dedicated streaming machine—that is, capturing content running on another device. For example, if you are using your Mac to stream while gaming on a separate device like a Windows PC or Nintendo Switch, you need a capture card. If you’re already getting lost, read more on what capture cards are and how they work.
But which capture card is right for you?

The most important factor is whether the capture card supports UVC protocol (which is a USB video class protocol). Most USB capture cards from reputable vendors support this, but it may require some digging in the product specs to confirm.
One of the best capture cards for Mac computers is the AVerMedia Live Gamer ULTRA. The AVerMedia Live Gamer ULTRA supports input up to 4K, with plenty of resolution and frame rate configurations, so it has all the features you need for high-quality streaming.
The Elgato HD60X has similar specs with the addition of VRR (variable refresh rate) support, but the ULTRA will be more than enough for most users while at a significantly lower price point. If the model isn’t available in your region, then we recommend checking out some alternatives such as Elgato Game Capture HD60S+ or EVGA XR1 Lite. Just make sure whatever card you install is external (USB) and follows UVC protocol—almost all USB capture cards from reputable vendors do.
What Webcam Should You Buy?
If you’re adding a webcam to capture your face, the same applies as well—it must be UVC. This standard is the norm for webcams, so chances are any webcam you select will fall under UVC protocol. Many new creators use the often-recommended Logitech C920, but you can get equal or better quality through the Razor Kiyo Pro, Logitech Brio, Elgato FaceCam, and AVerMedia PW513.
Additionally, if you already have a camera that supports HDMI out, consider a capture card like the Elgato Cam Link 4K or AVerMedia Live Streamer CAP 4K to use your camera as a webcam. Make sure to add some lighting for better quality, then let’s move on to audio.
What Microphone Should You Buy?
If you’re planning on streaming with an Apple Silicon device, we recommend you get some kind of USB microphone for better sound quality. While the internal mics on most M1 Macs are fine for casual use, they’re nowhere near the quality of most dedicated mics for creative purposes. Some affordable options to consider are the Audio Technica AT2020+ or the Elgato Wave Series.
The AT2020 is as simple as a USB mic gets, whereas the Elgato is packed with features to explore in its WaveLink software. If you want to search beyond these two options, find the right mic for you from a podcasting perspective.
While most audio interfaces and mics should work fine with an Apple Silicon device, be prepared for some issues to overcome when it comes to capturing audio from headphones or speakers.
Do You Have Additional Audio Output Sources?
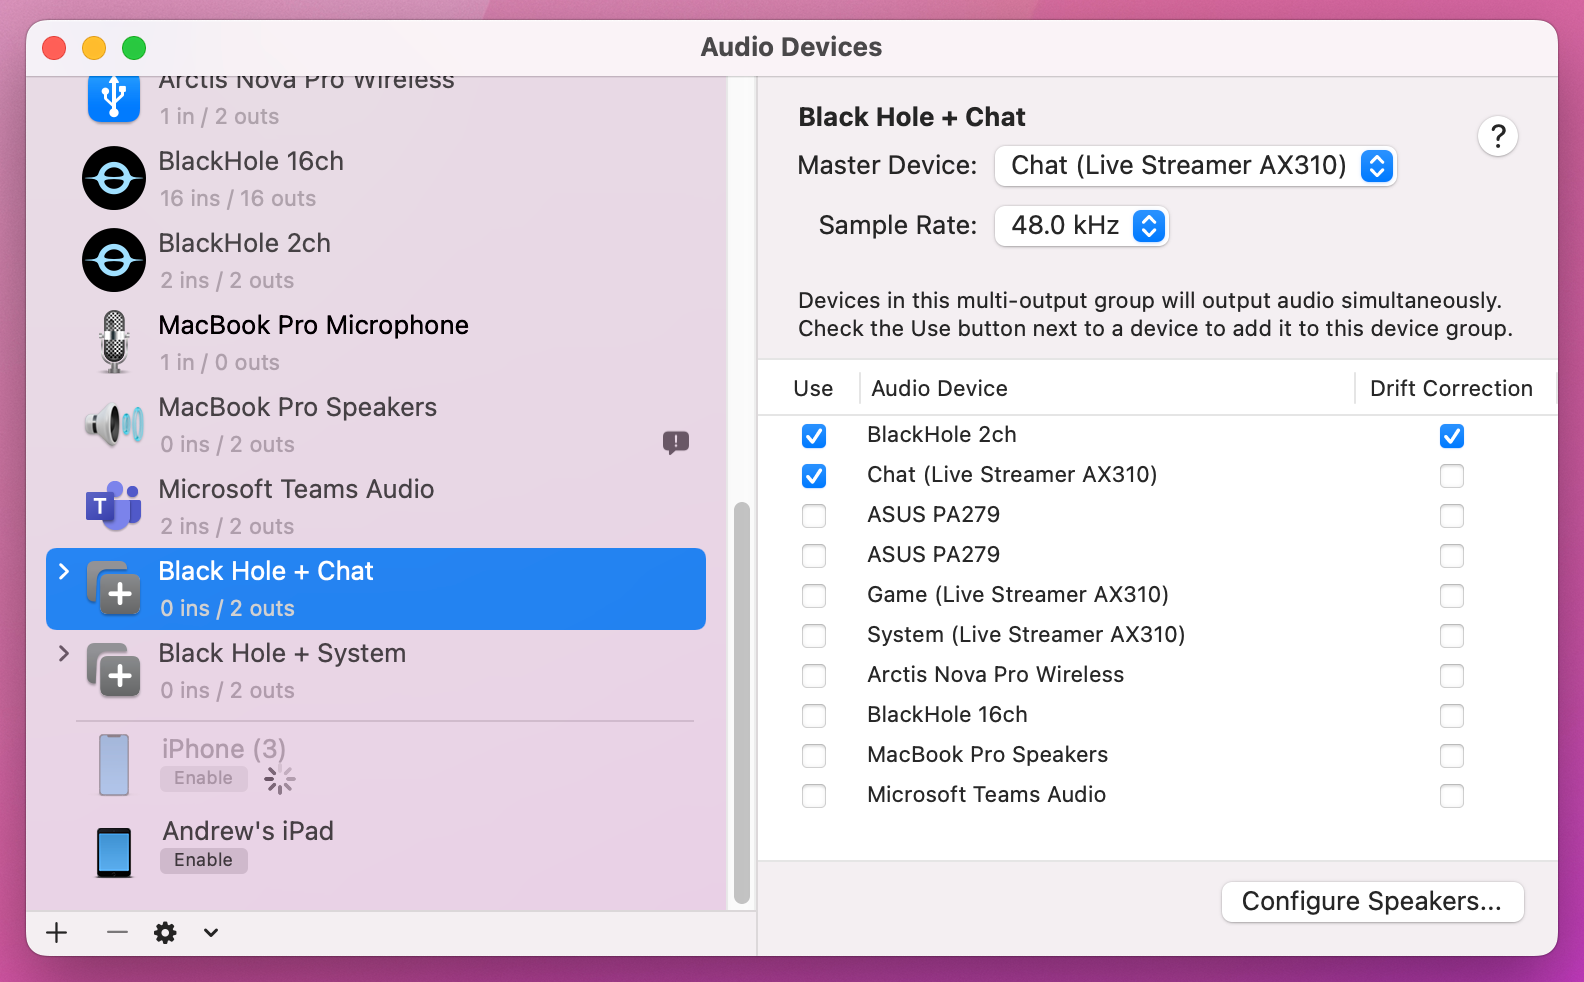
If you have any additional output sources—like headphones or speakers connected to your laptop—they won’t be able to play back through your preferred streaming software without workarounds. One such workaround is Existential Audio’s BlackHole, a driver which adds dummy audio sources. It requires an email signup to download, but it’s the best free workaround for audio capture on M1 devices.
For additional assistance, follow the steps on BlackHole’s download page to install if you need it (if you’re just capturing your mic and your capture card audio, you don’t), and start capturing system audio like Discord chat or music from Spotify. Basic instructions are below:
- Sign up your email to receive a download link for BlackHole.
- Download and install BlackHole2ch.
- Open Audio Midi Setup (use Command and Space for a Spotlight Search)
- Click the + symbol to the bottom left and select Create Multi-Output Device.
- In this device, select your speakers/headphones of choice and BlackHole, then enable Drift Correction for BlackHole.
- Select this Multi-Output Device as your system’s audio output, then do the same in OBS (which we’ll explain below).
How to Configure OBS to Stream on Your Apple Silicon Mac
Once everything is installed, it’s time to set everything up in OBS.
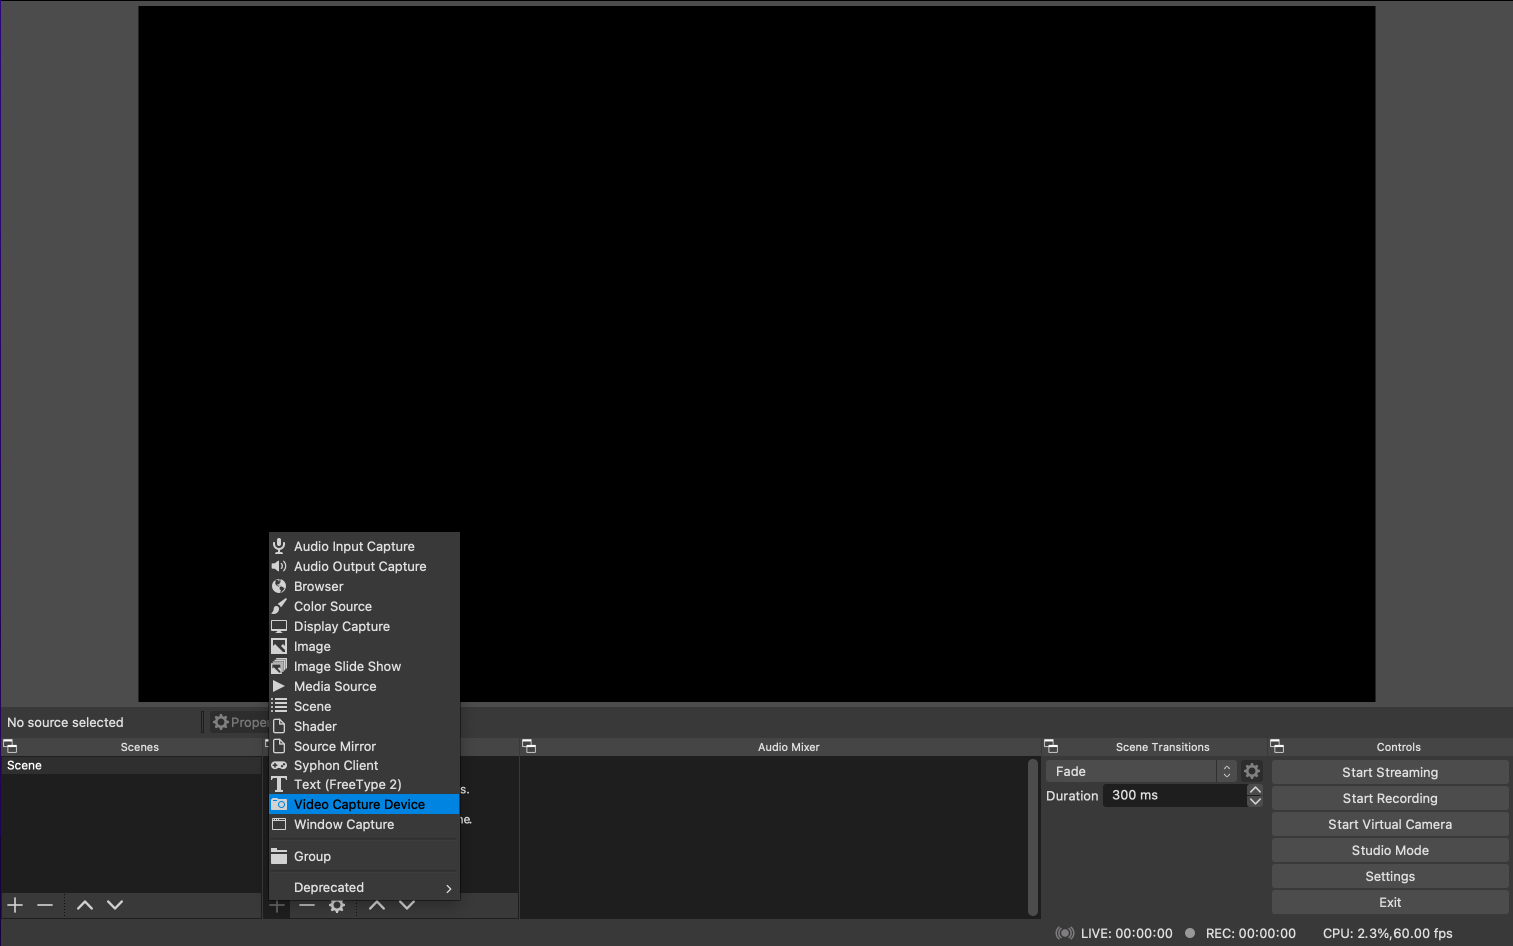
- Add your capture card and webcam as a Video Capture Device in OBS. To do this, click the + icon within the Sources pane.
- Additionally, from the same menu, you may need to add the capture card’s audio as an Audio Input Capture in your scene. The audio input should be the same name as your capture card.
- Open Settings in the bottom-right menu.
- In the Output section, for Encoder select Apple VT H264 Hardware Encoder for best performance.
- In the Audio section, add your mic as an input. If you’re capturing any system audio sources like Discord or Spotify, add your BlackHole multi-input device as an output.


By this point, you should have overcome all the unique quirks M1 devices have for streaming. If you’re a beginner or need a refresher on the basics when it comes to setting up OBS, follow our guide on the basics of setting up OBS Studio (most steps apply regardless of operating system)
Is Your Apple Silicon Stream Setup Ready?
Streaming from your M1-based Mac is much easier than it seems. Start with hardware including your Mac of choice, a capture card, the PC or console you’re capturing, a webcam, a mic, and, if needed, a USB hub. It requires some workarounds, especially with audio, but that’s par for the course with many niche workflows on Apple Silicon devices.
Once it’s set up, it’s as easy as hitting Start Streaming in OBS. Make the most of your hardware, and best of luck creating.


