Amazon Prime Day will happen on July 12 and 13 this year, and during these two days, the online retailer is expected to offer big discounts across all categories. However, since sellers update their prices constantly, you want to use the Keepa extension to ensure you get a worthy deal.
Keepa is a popular freemium service that tracks Amazon prices over time. Once you install the extension in your browser, you will notice a new section that displays the price history of the Amazon product that can help you make a more informed decision.
You can use the extension without an Amazon account, but you will need a Prime subscription to get the deals, which costs $139.99 per year (or $14.99 per month). In addition to accessing the Prime Day 2022 sales event, you get access to many other benefits, including free and faster shipping, Prime Video, music, gaming stream services, and more.
If you’re not sold on the subscription service, Amazon offers a 30-day trial (opens in new tab) that you can use to shop during Amazon Prime Day. After 30 days, you can continue or cancel the subscription.
This guide will walk you through the steps to get started with Keepa to view the price history of Amazon products.
How to install Keepa on Edge, Chrome, Firefox
Keepa is available for all major browsers, including Microsoft Edge, Google Chrome, and Mozilla Firefox. You can follow the instructions below to install the extension on your default browser.
Keepa for Microsoft Edge
To install Keepa on Microsoft Edge, use these steps:
- Open Edge.
- Open the Edge Add-ons store to install Keepa (opens in new tab).
- Click the Get button.
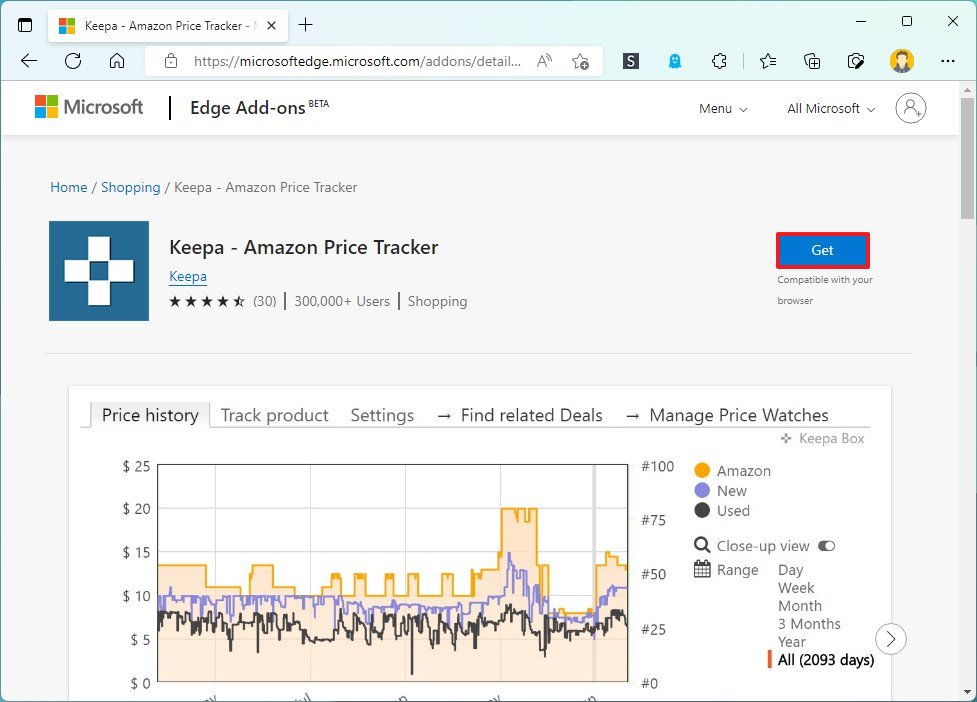
- Click the Add extension button.
Keepa for Google Chrome
To add Keepa to Chrome, use these steps:
- Open Google Chrome.
- Open the Chrome Web Store (opens in new tab).
- Click the Add to Chrome button.
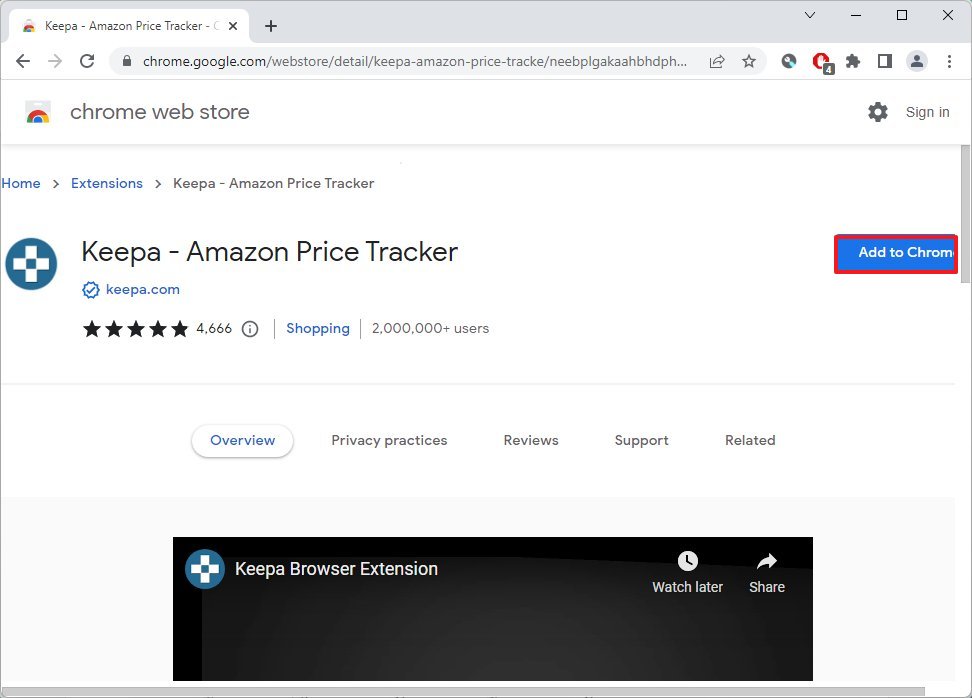
- Click the Add extension button.
Keepa for Mozilla Firefox
To install Keepa in Firefox, use these steps:
- Open Mozilla Firefox.
- Open the Firefox Add-Ons store (opens in new tab).
- Click the Add to Firefox button.
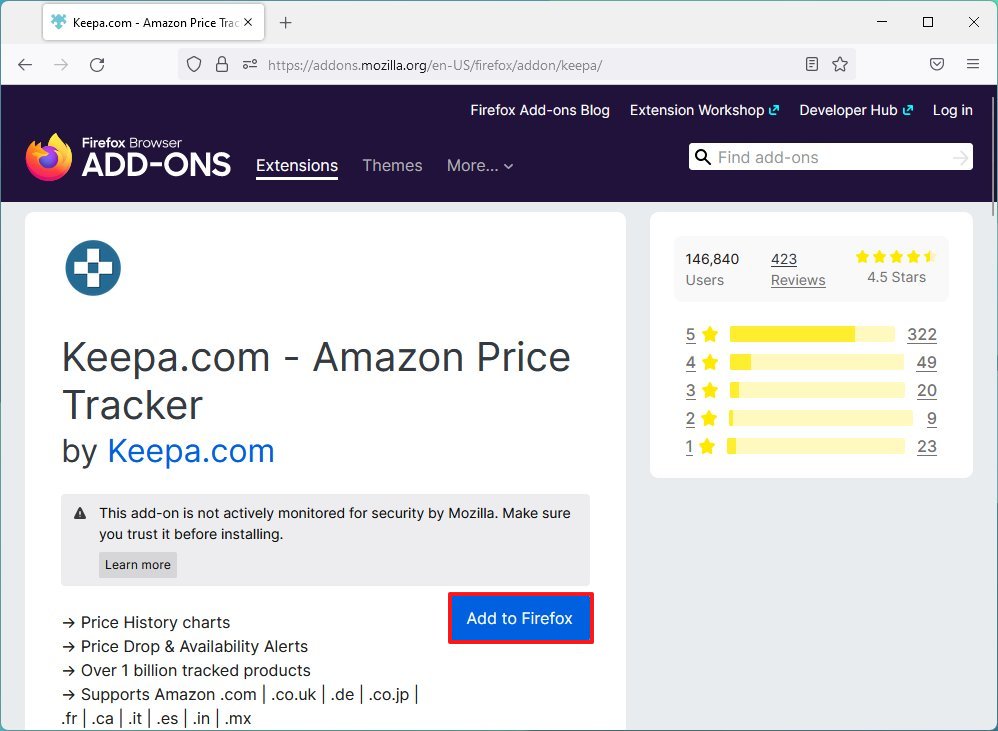
- Click the Add button.
Once you complete the steps, Keepa will be available in the browser to start checking prices during the Amazon Prime Day 2022 sales event.
While we outline the steps for the three most popular browsers for Windows, the extension is also available for other browsers, including Safari and Opera.
How to use Keepa to check Amazon price history
To check Amazon products prices history with Keepa, use these steps:
- Open Amazon in your browser (opens in new tab).
- Sign in with your Amazon account (if applicable).
- Open the product page during Prime Day.
- Check the Keepa embedded information block below the product description.
- Click the Price history tab.
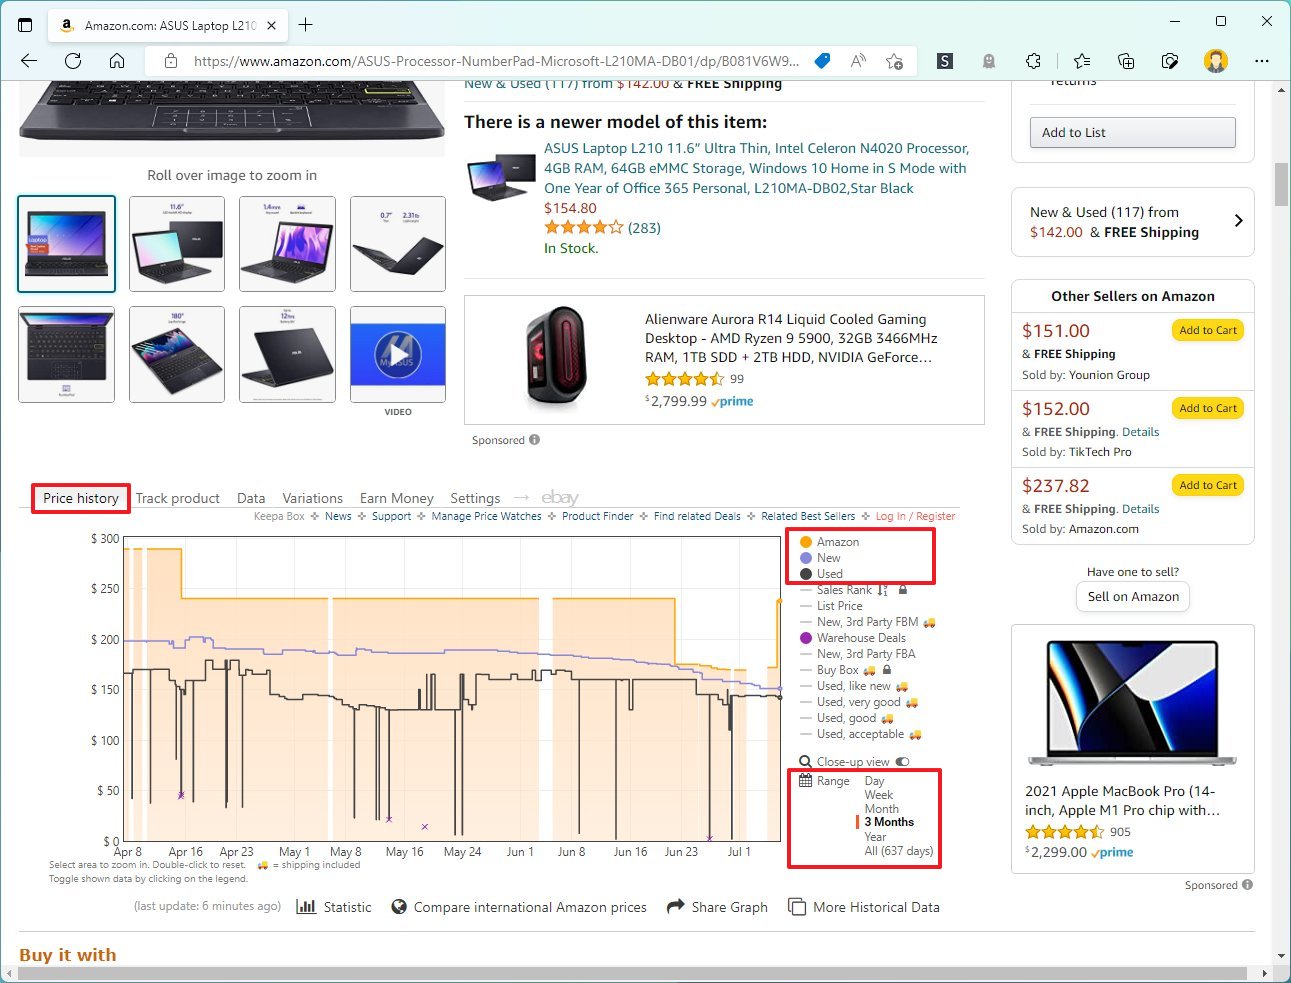
The Price history tab shows a graph with the product’s price history from Amazon and third-party sellers. Usually, you want to focus on the orange chart, which is the information sold and fulfilled from Amazon.
The light chart shows the price history of third-party seller products, and the dark chart displays the price for used items from Amazon or third-party sellers.
You can always use the options on the right-pane to toggle the views to focus on the price history from a specific type of seller.
On the right pane, at the bottom, you will also find the option to change the range for the price to a “day,” “week,” “three months,” and “all” to view the historical data for a specific product.
After reviewing the data, you can make a more informed decision about the product. For example, the data will help you discover whether the price was recently increased and lowered shortly after to make it seem as if you are getting a significant discount. Or the deal is compared to the original price, but the historical data shows that a similar price can be found regularly.
How to use Keepa to track Amazon prices over time
It’s possible to use Keepa without an account with the service, but it’s recommended to create trackers and get alerts for price drops.
Create an account
To create a Keepa account to track prices during the Amazon Prime Day event, use these steps:
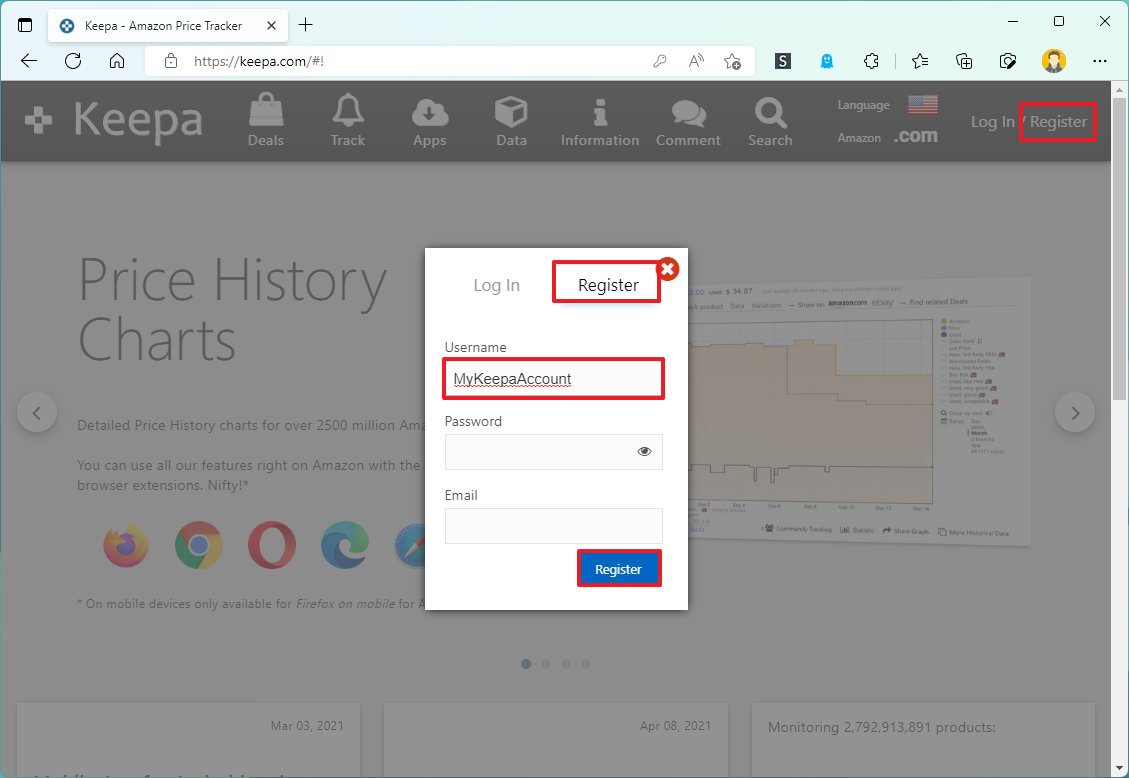
Once you complete the steps, you can create trackers for any product available on Amazon.
Create a tracker
To track Amazon product prices with the Keepa service, use these steps:
- Open Amazon on the web (opens in new tab).
- Sign in with your account information (if applicable).
- Search for a specific product on Amazon.
- Click the Track product tab just below the product description.
- Select the Advanced option for the tracking mode at the bottom.
- In the orange box, confirm the price you want to pay for the product sold and fulfilled by Amazon.
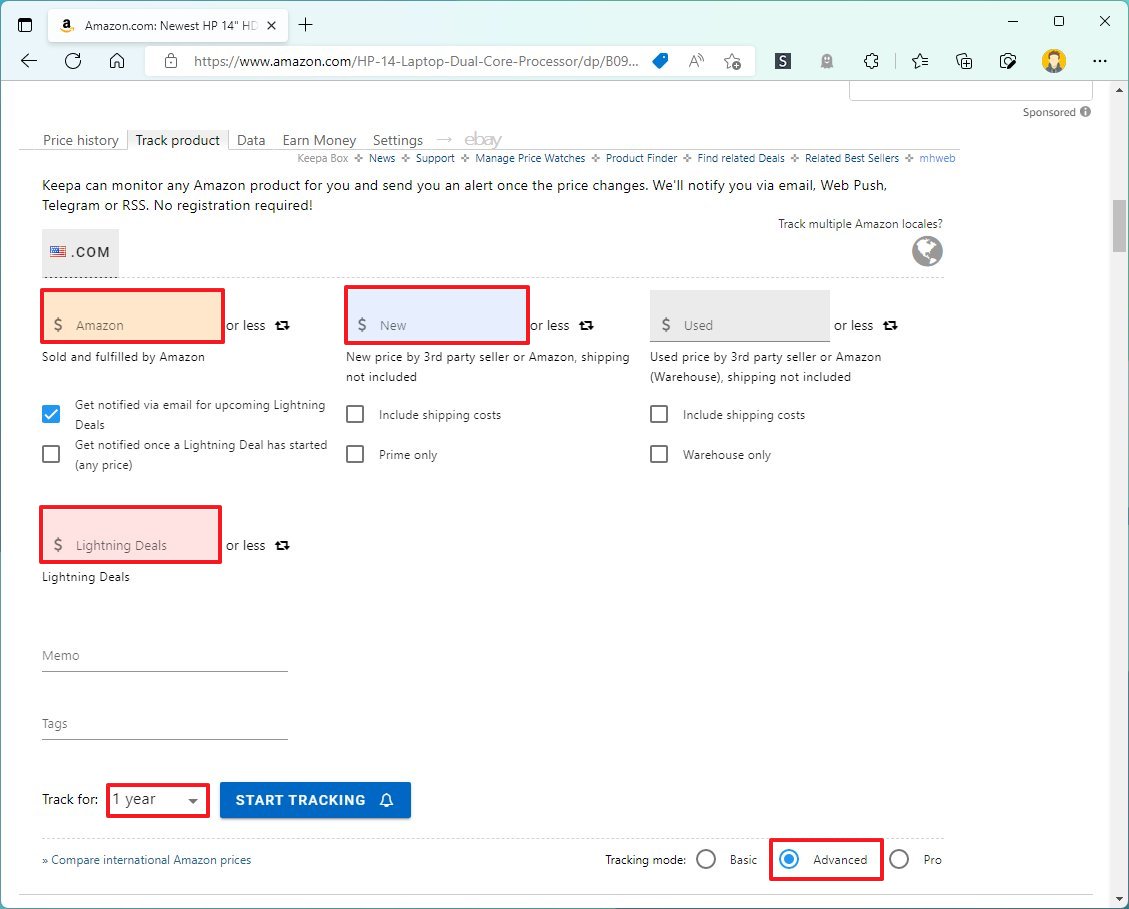
- In the purple box, confirm the desired price by a third-party seller.
- (Optional) In the gray box, confirm the price for a used item.
- In the pink box, specify your desired price for a lightning deal.
- Quick note: A lightning deal is a promotion that provides a limited number of offers for a limited period. Usually, during Prime Day, Amazon places many lightning deals. As a result, it is recommended to use this option.
- Use the Track for drop-down menu and select the period to track the product price.
- Quick tip: If you want to track only Amazon Prime Day 2022 deals, select the “2 weeks” option. After that date, the tracker will be deleted.
- Click the Start tracking button.
After you complete the steps, Keepa will start tracking the product’s price, and you will receive an alert as soon as it reaches your desired amount.
You will have to repeat the steps to track additional items if you want to see the products you are tracking if you don’t log into your Keepa account (opens in new tab) on the web.
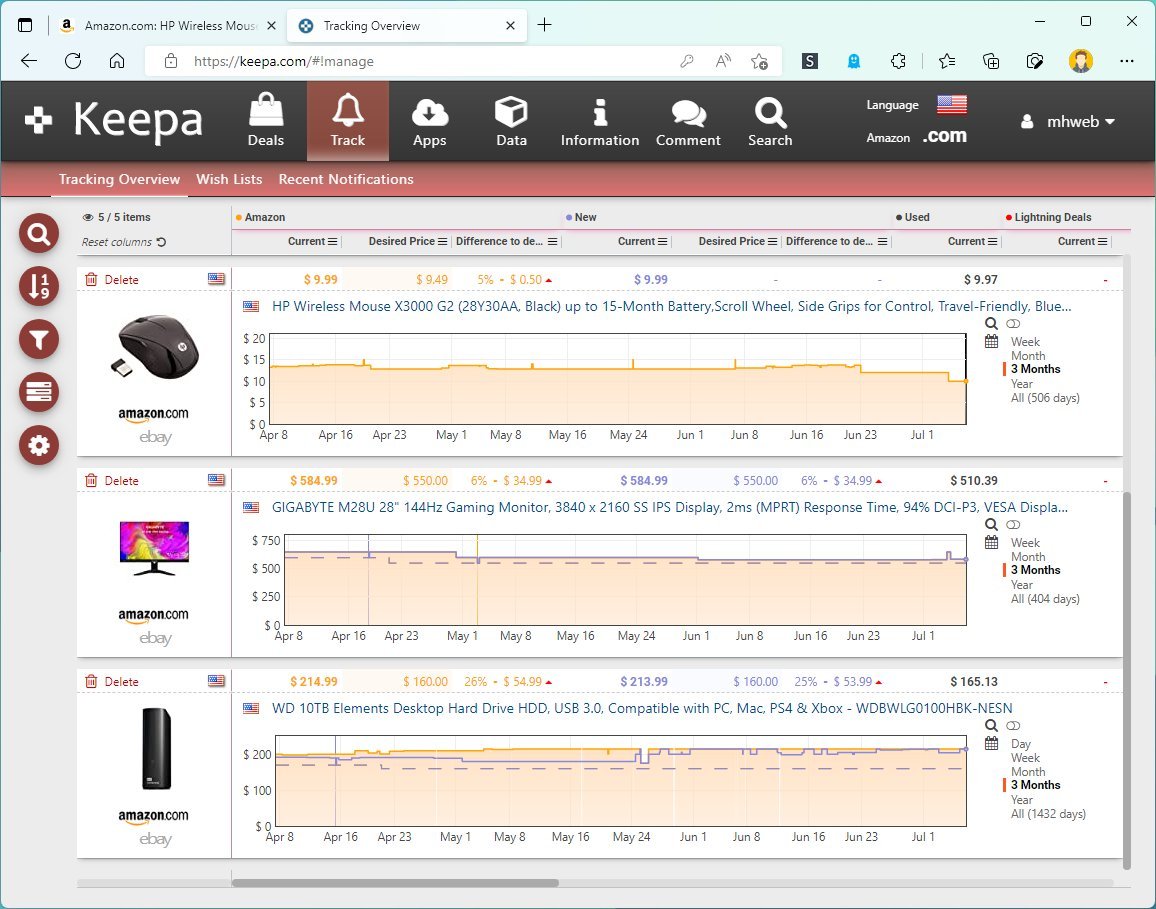
In your account, you can view all the trackers. You can sort and filter items and customize the view from the left pane. You can also delete those trackers you no longer need.
How to change Keepa settings to track Amazon prices
You can also adjust some personalization settings in the Keepa account.
To change the Keepa extension settings, use these steps:
- Open Keepa on the web (opens in new tab).
- Sign in with your account details (if applicable).
- Click the user account menu in the top-right and select the Settings option.
- Click the Website tab.
- Under the “Chart appearance” section, use the settings to customize the experience:
- Graphs to show — Specifies which sellers to see in the “Pricing history” tab by default.
- Range — Sets the default time range for the price history.
- Filter extreme values — Removes extremely high prices from the historical data.
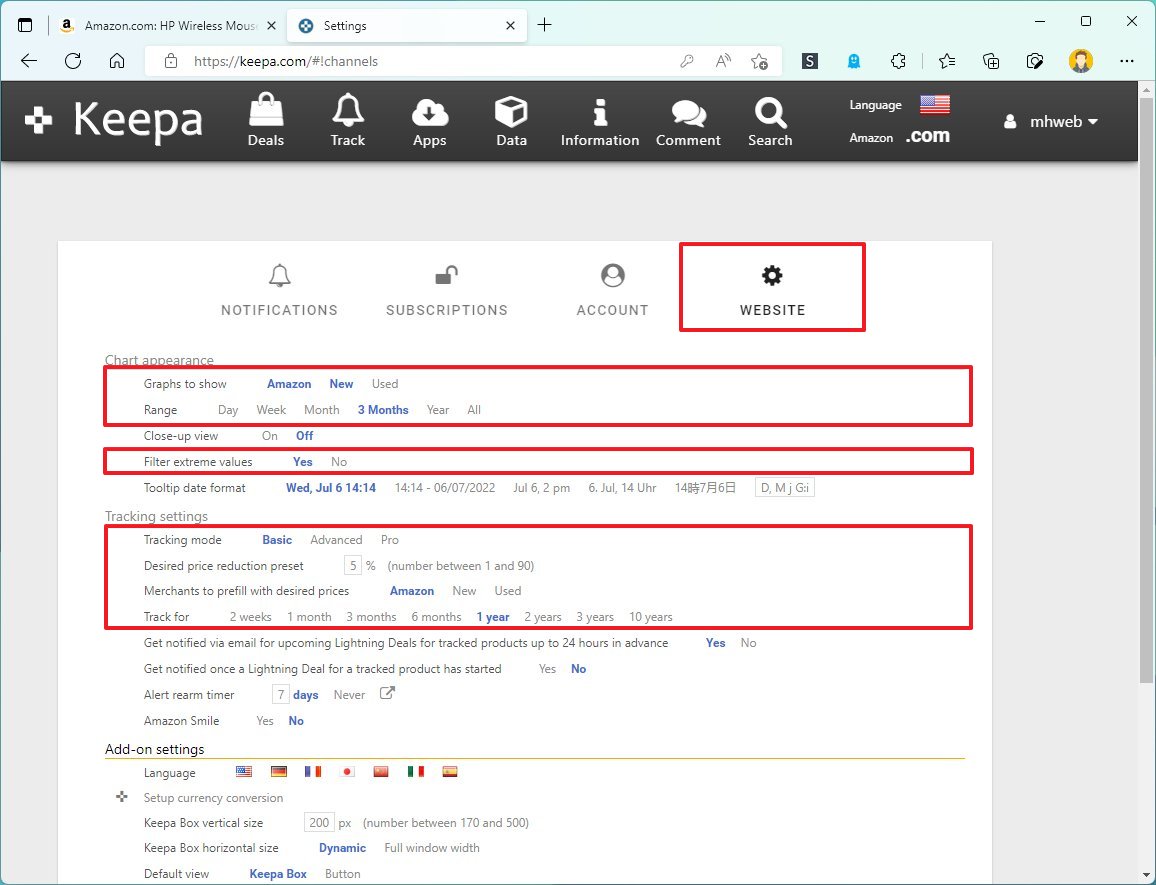
- Under the “Tracking settings” section, you will find several tracking settings:
- Tracking mode — Changes the mode to “Basic,” which only tracks prices. The “Advanced” option enables you to set additional monitoring settings.
- Desired price reduction preset — Specifies the default percentage reduction price when creating a tracker.
- Merchants to prefill with desired prices — Automatically set the costs based on the desired price reduction preset.
- Track for — Specifies the default time range when creating a new tracker.
- Alter rearm timer — This allows you to receive alerts after the price already reaches the lower price.
- (Optional) Under the “Add-on settings” section, you can customize various style aspects of the extension, such as vertical and horizontal sizes, default view, and more.
- Click the Notifications tab.
- Select the options to get notified about price alerts — for example, email, telegram, web push notifications, or RSS feed.
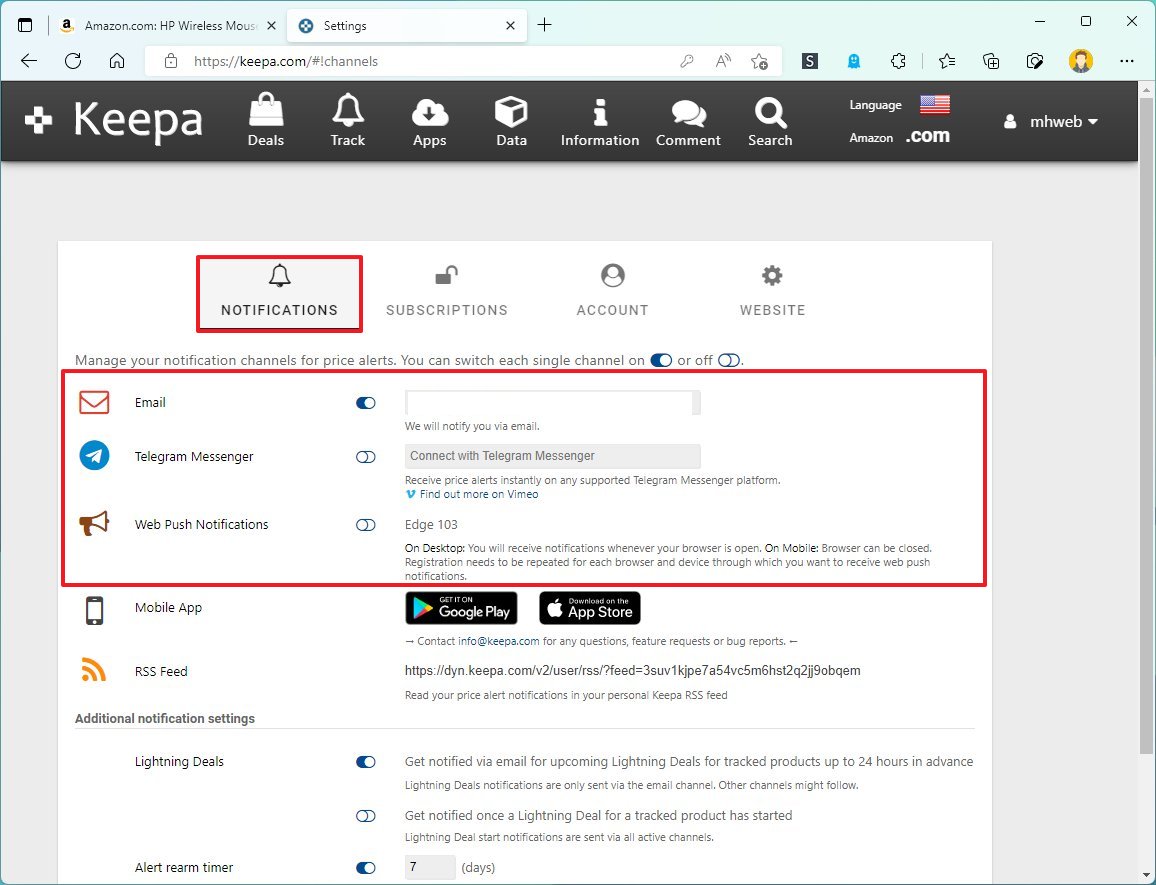
Once you complete the steps, the changes will become the new default settings.
We focused this guide on Windows 11, but you can refer to this guide to save time and money shopping on Prime Day 2022 on older versions of Windows, macOS, and even Linux.
More resources
For more helpful articles, coverage, and answers to common questions about Windows 10 and Windows 11, visit the following resources:


