

On Windows 11 (and 10), MSConfig (also known as System Configuration) is a built-in tool designed to help you troubleshoot and manage the operating system’s startup process.
It allows you to turn on and off programs, device drivers, and services that run at startup and modify boot parameters, including the ability to access the Safe Mode. This utility is particularly useful for diagnosing performance issues and software conflicts in the operating system.
System Configuration isn’t new. It’s been available since Windows 98, and even though it has evolved over the years, the overall experience hasn’t changed significantly. However, some newer features have been added, and others have been removed, such as the ability to control apps at startup.
In this how-to guide, I’ll explain the steps to get started with the System Configuration tool on Windows 11. However, these instructions will also apply to Windows 10.
How to access the msconfig on Windows 11
To open the System Configuration utility, you have at least two options:
From the Run dialog:
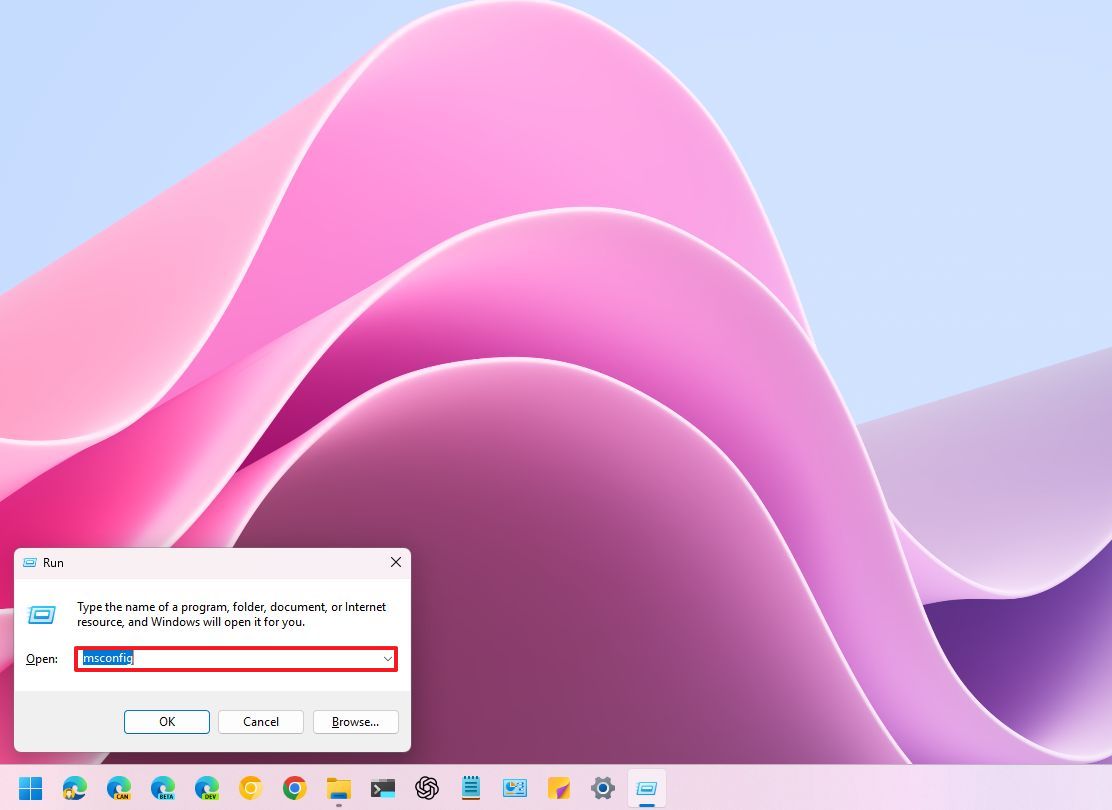
To open msconfig from Run, use these steps:
- Use the “Windows + R” keyboard shortcut to open the Run dialog box.
- Type msconfig and press Enter (or click the OK button).
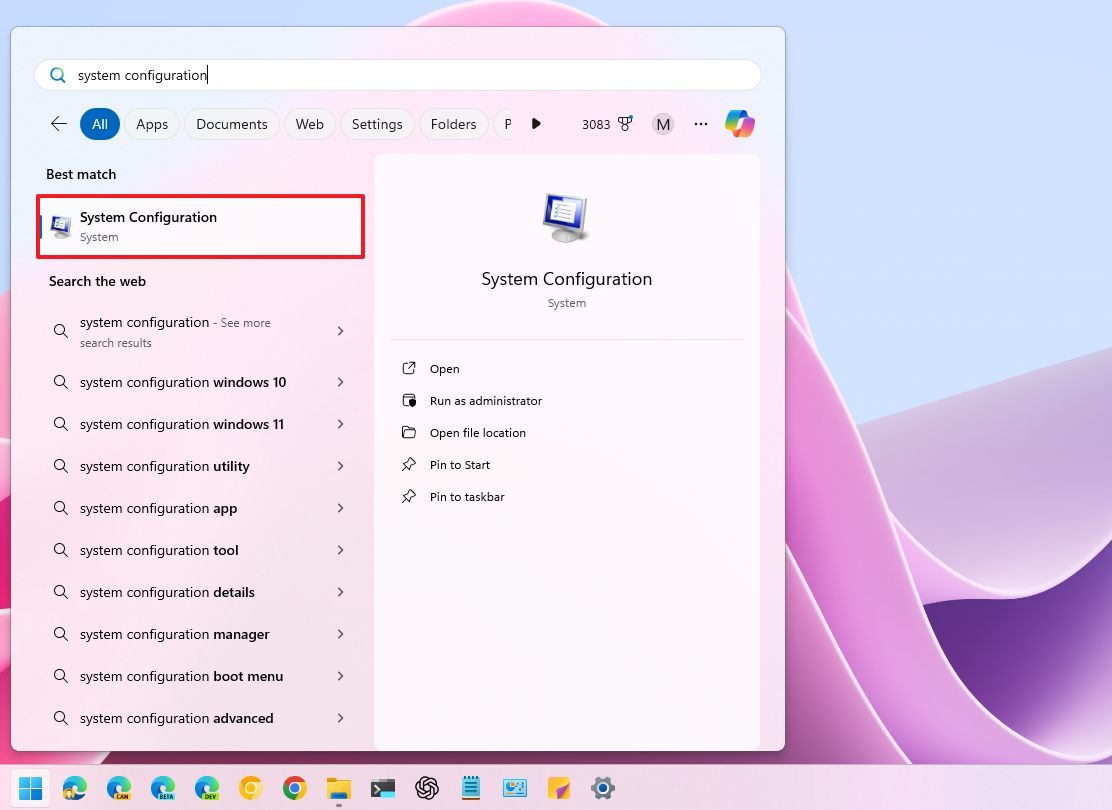
To open msconfig from the Start menu, use these steps:
- Open Start.
- (Option 1) Search for msconfig and click the top result to open the app.
- (Option 2) Search for System Configuration and click the top result to open the app.
How to navigate the msconfig on Windows 11
Upon launching the System Configuration app, you’ll encounter several tabs, each serving a specific function.
General tab
In the “General” tab, it’s possible to change startup behavior.
- Normal Startup (default): This is the default mode where all startup programs and services are loaded.
- Diagnostic Startup: This mode starts the operating system with only essential services and drivers, helping to identify conflicts or issues.
- Selective Startup: This lets you choose which programs and services to load at startup. You can turn off non-essential items to speed up boot times and resolve conflicts.

It’s worth noting that the “Selective Startup” option has three settings, as described below.
Load System Services:
- Checked: This option loads all essential system services required for the operating system to function correctly.
- Unchecked: Disables most built-in services. Although this option can significantly speed up startup, it may cause instability or prevent some programs from working correctly. Only uncheck this if you know what you’re doing.
Load Startup items:
- Checked: This option loads programs set to launch automatically during sign-in. This includes apps you’ve installed, as well as some system utilities.
- Unchecked: Prevents all startup programs from running. This can speed up boot times but means you’ll have to manually launch any applications you need.
The “Use original boot configuration” option tells the operating system to ignore any changes you’ve made to your startup configuration in System Configuration and instead use the original boot settings that were present when the system was first installed.
If you check this option, the “Selective Startup” option will be grayed out, and the “Normal startup” option will be checked automatically.
Boot tab
The “Boot” tab allows you to manage boot options such as Safe Boot, boot logging, and setting default operating systems in multi-boot setups.
At the top of the screen, you will find the list of operating systems installed on your computer. Usually, you’ll only find one setup, but the other setups will also be listed here if you’re a dual-boot system.
If you have multiple versions of Windows installed on the computer, you can also use a specific setup and click the “Set as default” button to install the default that will start automatically after the timeout time.
Furthermore, you can select and delete an entry. However, you would only use this option if, after removing the dual-boot system, you find out that the boot menu hasn’t reflected the changes.
Safe boot: This option lets you start the computer in Safe Mode, a diagnostic mode that uses minimal drivers and services. It’s useful for troubleshooting problems. You can choose from different options:
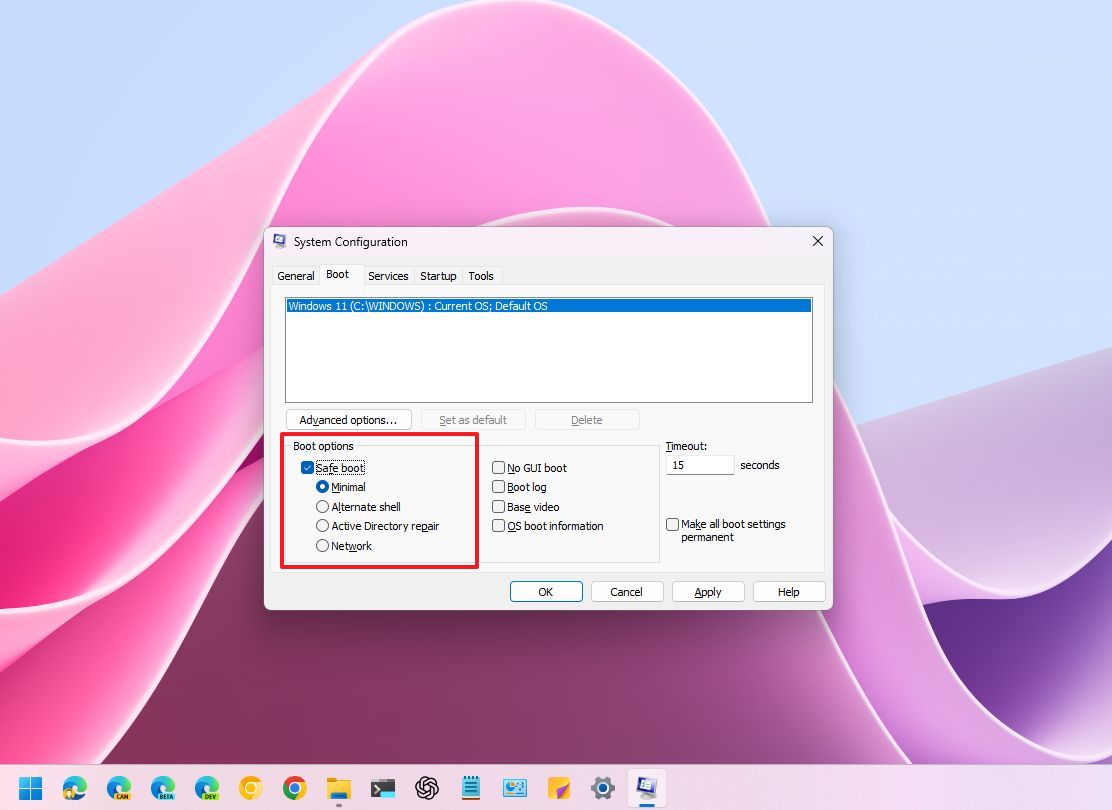
- Minimal: Safe Mode experience with the standard graphical user interface.
- Alternate shell: Safe Mode with a command prompt instead of the graphical experience.
- Active Directory repair: Safe Mode with Active Directory services for repairing network connectivity issues with Active Directory.
- Network: Safe Mode with network support and graphical interface.
As part of the boot option, you can also choose:
- No GUI boot: Disables the startup splash screen during startup, showing a black screen instead.
- Boot log: Creates a log file (Ntbtlog.txt) that records the startup process, which can help identify driver issues. The file will be available inside the “Windows” folder on the “C:” drive.
- Base video: Forces the system to use the basic video driver, which is helpful if you have display problems.
- OS boot information: Displays driver loading details on the screen during startup, which is useful for debugging.
The “Timeout” option determines how long the boot menu is displayed if you have a dual-boot system. You can adjust the time in seconds before the default operating system automatically starts during the startup process.
Finally, you can also check the “Make all boot settings permanent” option. If you select this option, the boot settings will be locked in.
For example, if you don’t check this option, you can easily switch between different startup modes (Normal, Diagnostic, Selective) in the General tab.
If you check the option, you’ll lose the ability to easily switch back to the “Normal Startup” option. Even if you want to choose the “Normal Startup” option again, the system ignores you because you have essentially forgotten about this option.
The settings within each mode are always saved. The difference is whether you can easily choose a different mode.
The “Advanced options” page allows you to tweak some low-level settings for the boot process, which are generally for specific troubleshooting or testing scenarios.
It’s important to note that modifying these settings can affect the computer startup process and might even cause instability issues.

Number of processors
This option lets you limit the number of processor cores that the system uses during startup.
Although Windows 11 will still recognize all cores inside the processor, it’ll only use the number of cores you specified for the initial boot phase.
This option is primarily used for debugging and testing, and you should generally leave it unchecked to allow the operating system to use all available cores.
Maximum memory
This option restricts the amount of memory that the operating system uses during startup.
Similar to the processor option, this is mainly for testing or simulating low-memory conditions. Unless you have a specific reason to limit memory during boot, it’s best to leave this unchecked.
PCI lock
This option prevents the operating system from reallocating input/output (I/O) and interrupt request (IRQ) resources on the PCI bus during startup.
This is a very technical setting that’s rarely needed, usually only in cases where you have hardware conflicts or compatibility issues with older hardware components.
Debug
This option activates kernel-mode debugging, which developers primarily use to troubleshoot driver issues.
It’s not something you’d typically need for regular use.
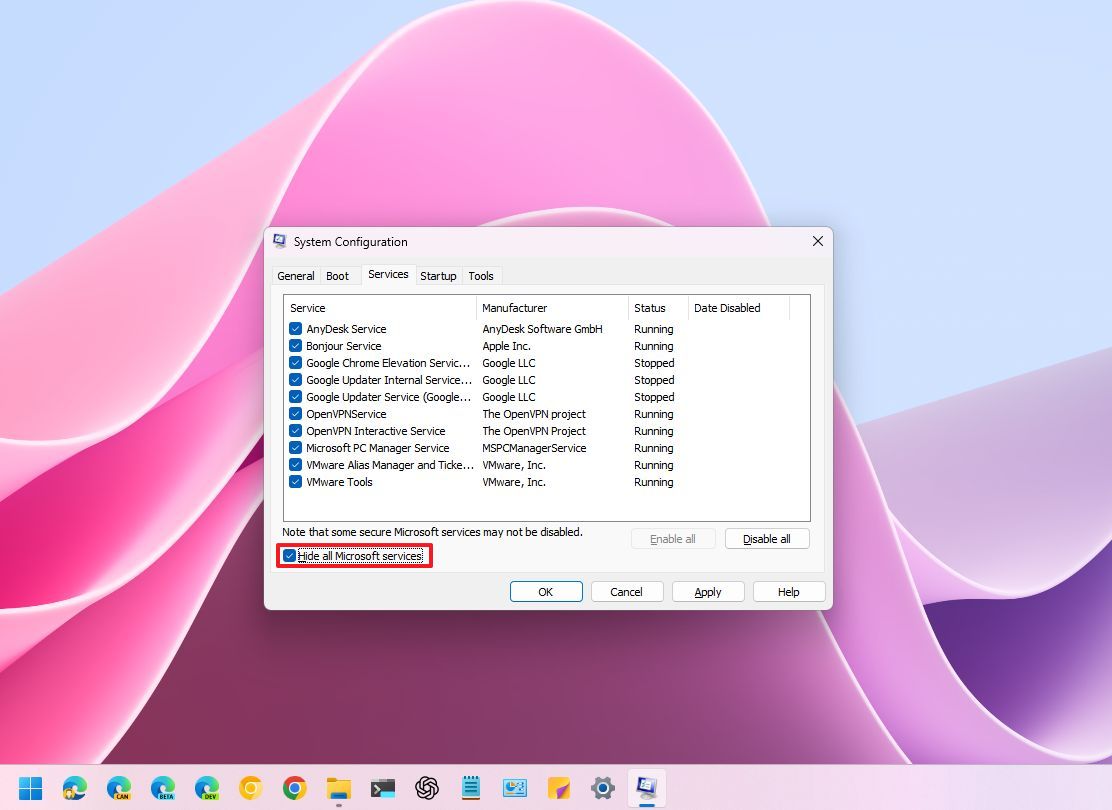
Services tab
The “Services” tab provides an interface to manage the various background services that run in the operating system.
List of services
This section displays a list of all the services available on your computer. The list will show the service name, manufacturer details, current state (running or stopped), and whether it’s enabled at startup.
In this section, each service has a checkbox next to it. If it’s checked, the service is enabled and will start automatically during boot. If it’s unchecked, the service is disabled and won’t start automatically.
The “Hide all Microsoft services” option hides all the services essential to running the operating system.
It’s a convenient option because it allows you to focus on third-party services (those installed by programs you’ve added), which are more likely to be safe to disable if you’re trying to streamline startup or troubleshoot problems on your computer.
In addition, this tab includes buttons to turn all services on or off, which can also come in handy to troubleshoot different problems.
For example, if you want to perform a clean boot to troubleshoot software conflicts, you would check the “Hide all Microsoft services” option and click the “Disable all” button. Also, from the Task Manager’s Startup tab, you would disable all the applications configured to run at startup.
The Services tab provides a way to manage background services, but you should use it cautiously. Always research unfamiliar services before deactivating any of them, and remember that many services are essential for Windows 11 to work correctly.
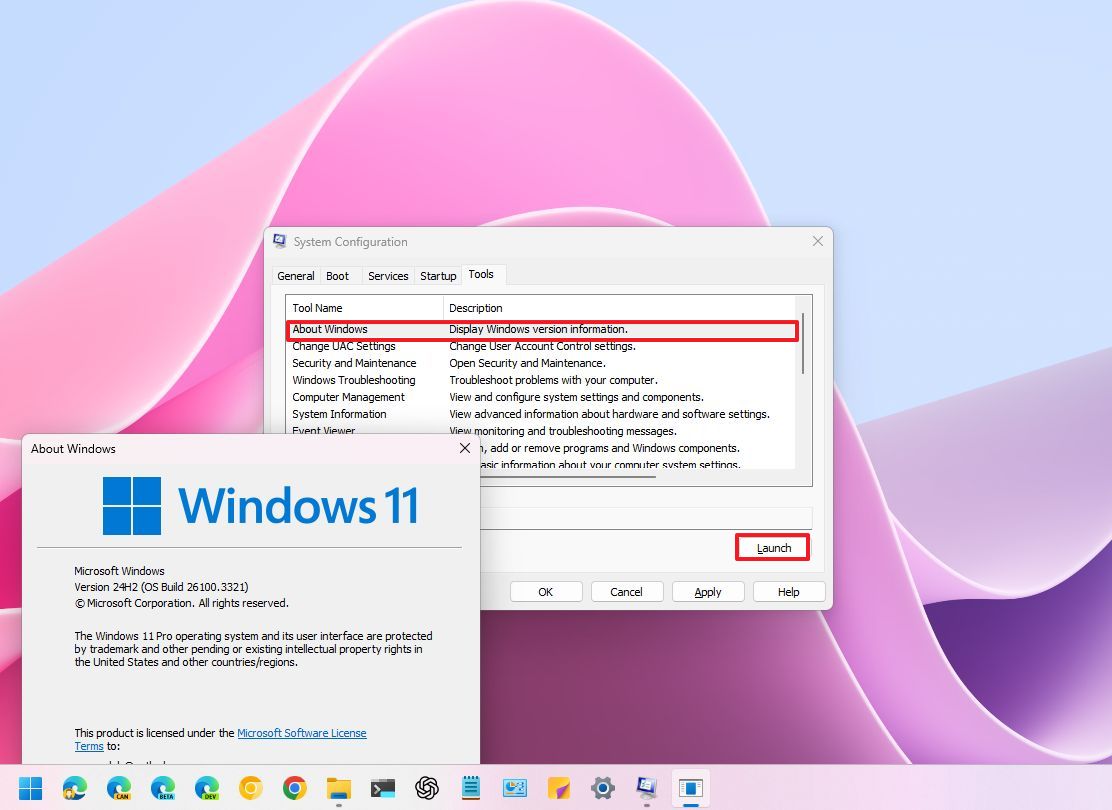
The “Tools” tab offers quick access to various system utilities and diagnostic tools. It’s essentially a convenient launcher for these programs, saving you the extra steps to navigate the Start menu or search for them while inside the System Configuration app.
From this tab, you can launch:
- About Windows.
- Change UAC Settings.
- Security and Maintenance.
- Windows Troubleshooting.
- Computer Management.
- System Information.
- Event Viewer.
- Programs.
- System Properties.
- Internet Options.
- Internet Protocol Configuration.
- Performance Monitor.
- Resource Monitor.
- Task Manager.
- Command Prompt.
- Registry Editor.
- Remove Assistance.
- System Restore.
The Tools tab is primarily a shortcut to existing system utilities, but it’s rarely used since you can access these from the Start menu, Settings app, or Windows Tools.
System Configuration also includes the “Startup” tab, but the settings have been relocated to the Task Manager.
More resources
Find in-depth guides, troubleshooting tips, and the latest updates on Windows 11 and 10 here:

