On Windows 11, “Nearby sharing” is a feature that allows you to transfer documents, pictures, and other files as well as links to other compatible devices that are near each other using a combination of Bluetooth and wireless communication.
The feature isn’t new, it’s been available since Windows 10 (version 1803), but since Windows 11 has a new interface, the steps to set it up are slightly different. However, it works the same way as before to send virtually any type of files to another device across the room or to another user without the need for network file sharing, cloud services, email attachments, or using a USB flash drive.
In this Windows 11 guide, you will learn the steps to enable and use Nearby sharing between compatible computers.
How to enable Nearby sharing on Windows 11
To enable the Windows 11 Nearby sharing feature, use these steps:
- Open Settings.
- Click on System.
-
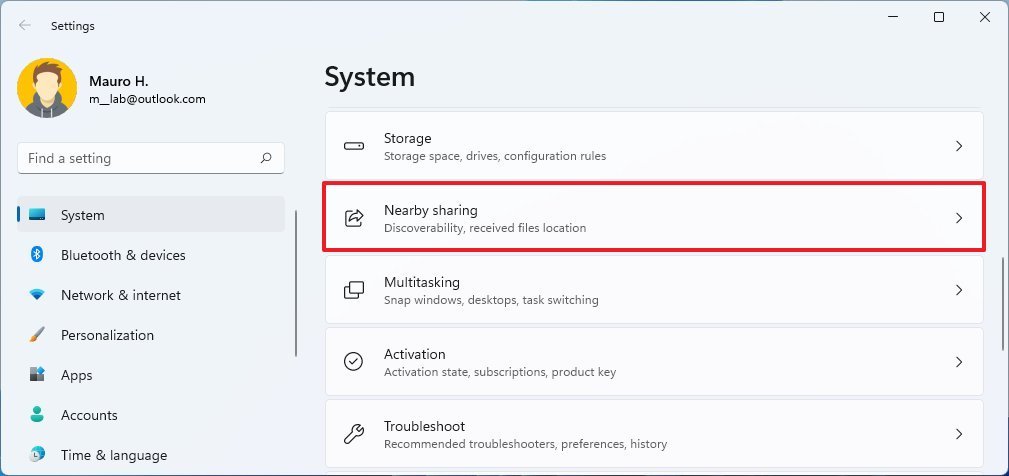
Click the Nearby sharing page on the right side.
Source: Windows Central
-
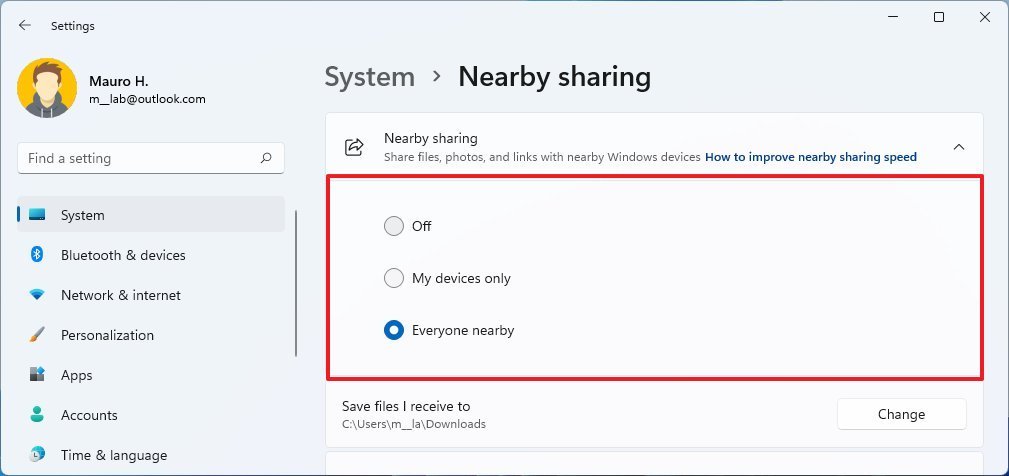
Select the option to enable Nearby sharing:
- Off — The feature remains disabled.
- My devices only — Only allow file sharing between devices configured with the same Microsoft account.
- Everyone nearby — Allows sharing files with any nearby devices.
Source: Windows Central
Alternatively, you can also open Quick settings (Windows key + A keyboard shortcut) and click the Nearby sharing button to enable the feature (Everyone nearby). If the option is not on the list, click the Edit button, and add the button. Also, in the “Share” interface, there is an option to enable the feature.
How to change Nearby sharing download folder on Windows 11
To customize the Nearby sharing download location, use these steps:
- Open Settings.
- Click on System.
-
Click the Nearby sharing page on the right side.
Source: Windows Central
-
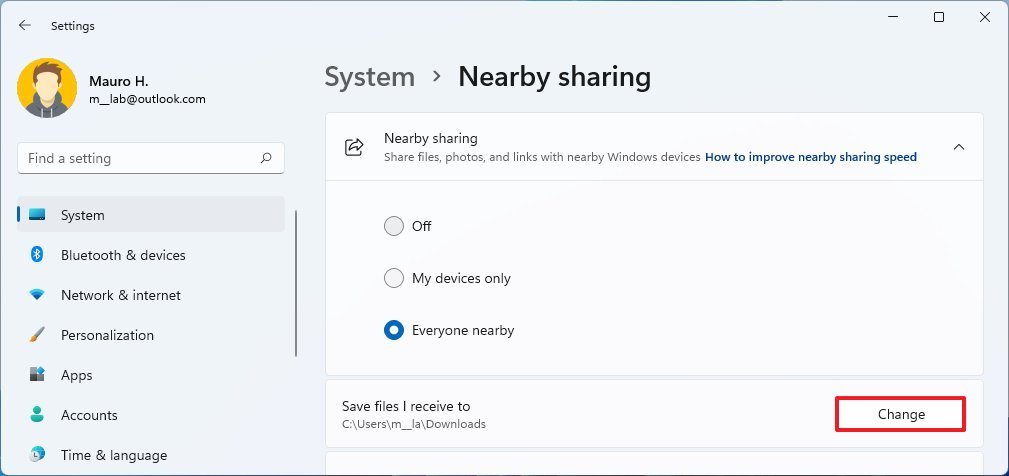
Click the Change button for the “Save files I receive to” setting.
Source: Windows Central
- Select the folder to receive the files.
- Click the Select Folder button.
Once you complete the steps, the files you transfer to the destination device will download in the specified folder.
How to send files with Nearby sharing on Windows 11
The data transfer process is straightforward, and it works on Windows 11 as well as on Windows 10 devices.
Share files
To share a file with Nearby sharing on Windows 11, use these steps:
- Open File Explorer.
-
Browse to the path where the file is located.
Quick note: To use Nearby sharing, you can’t select files from the OneDrive folder. If you do this, the OneDrive sharing will be available instead.
-
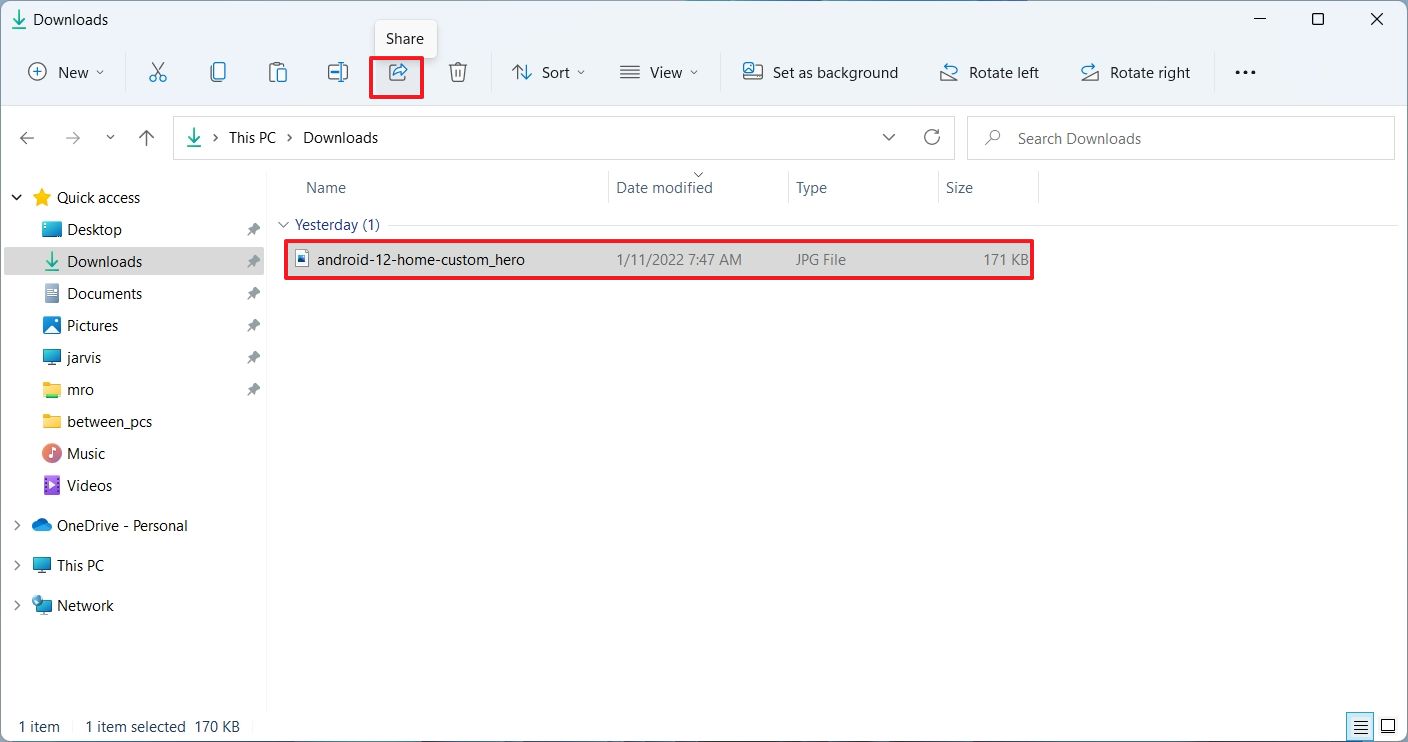
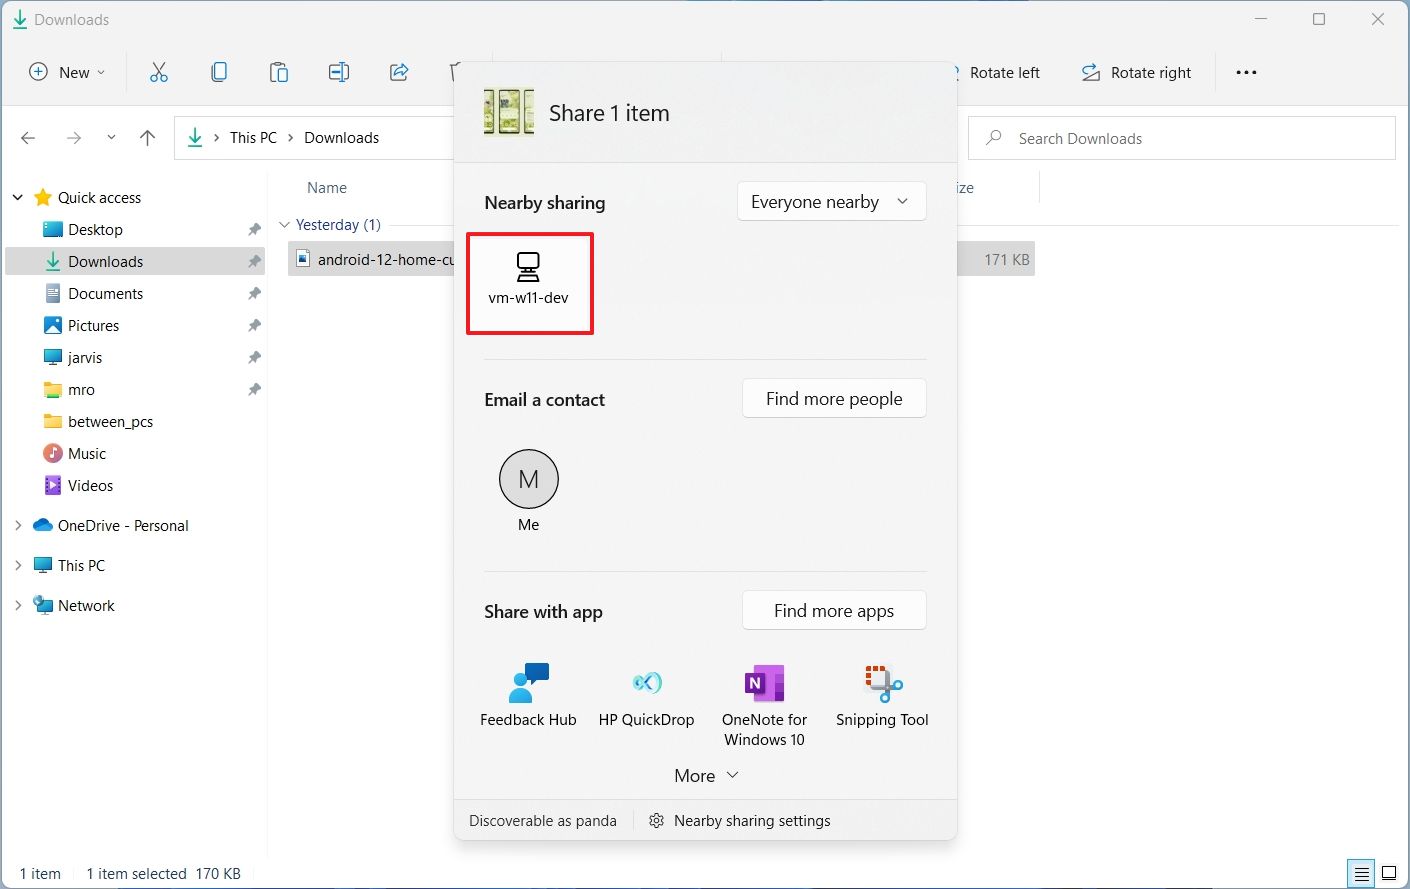
Select the file and click the Share button from the command bar.
Source: Windows Central
-
Under the “Nearby sharing” section, select the device to transfer the file.
Source: Windows Central
- On the destination device, click the Save & open or Save button on the notification to complete the transfer.
If you haven’t changed the default transfer location, the new file will download in the “Downloads” folder. If you don’t see the notification, use the Windows key + N keyboard shortcut to open Notification Center to find the notification to complete the transfer.
Share links
To send a link to another device through Nearby sharing, use these steps:
- Open Microsoft Edge.
- Browse to the website to share with another device.
-
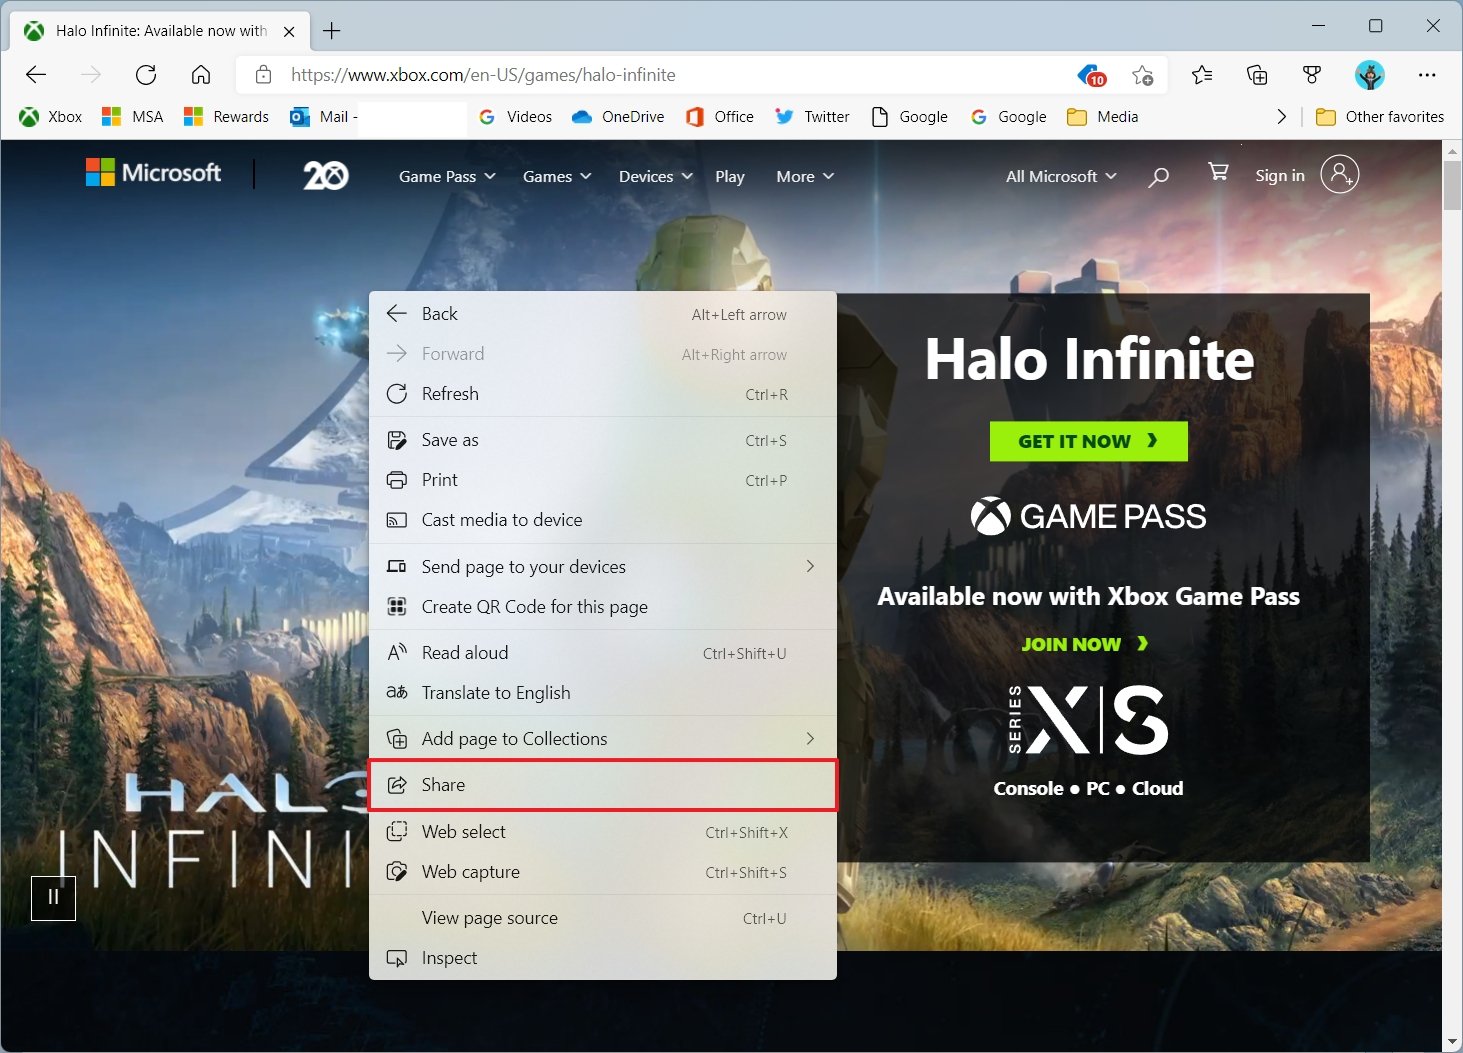
Right-click the page and select the Share option.
Source: Windows Central
-
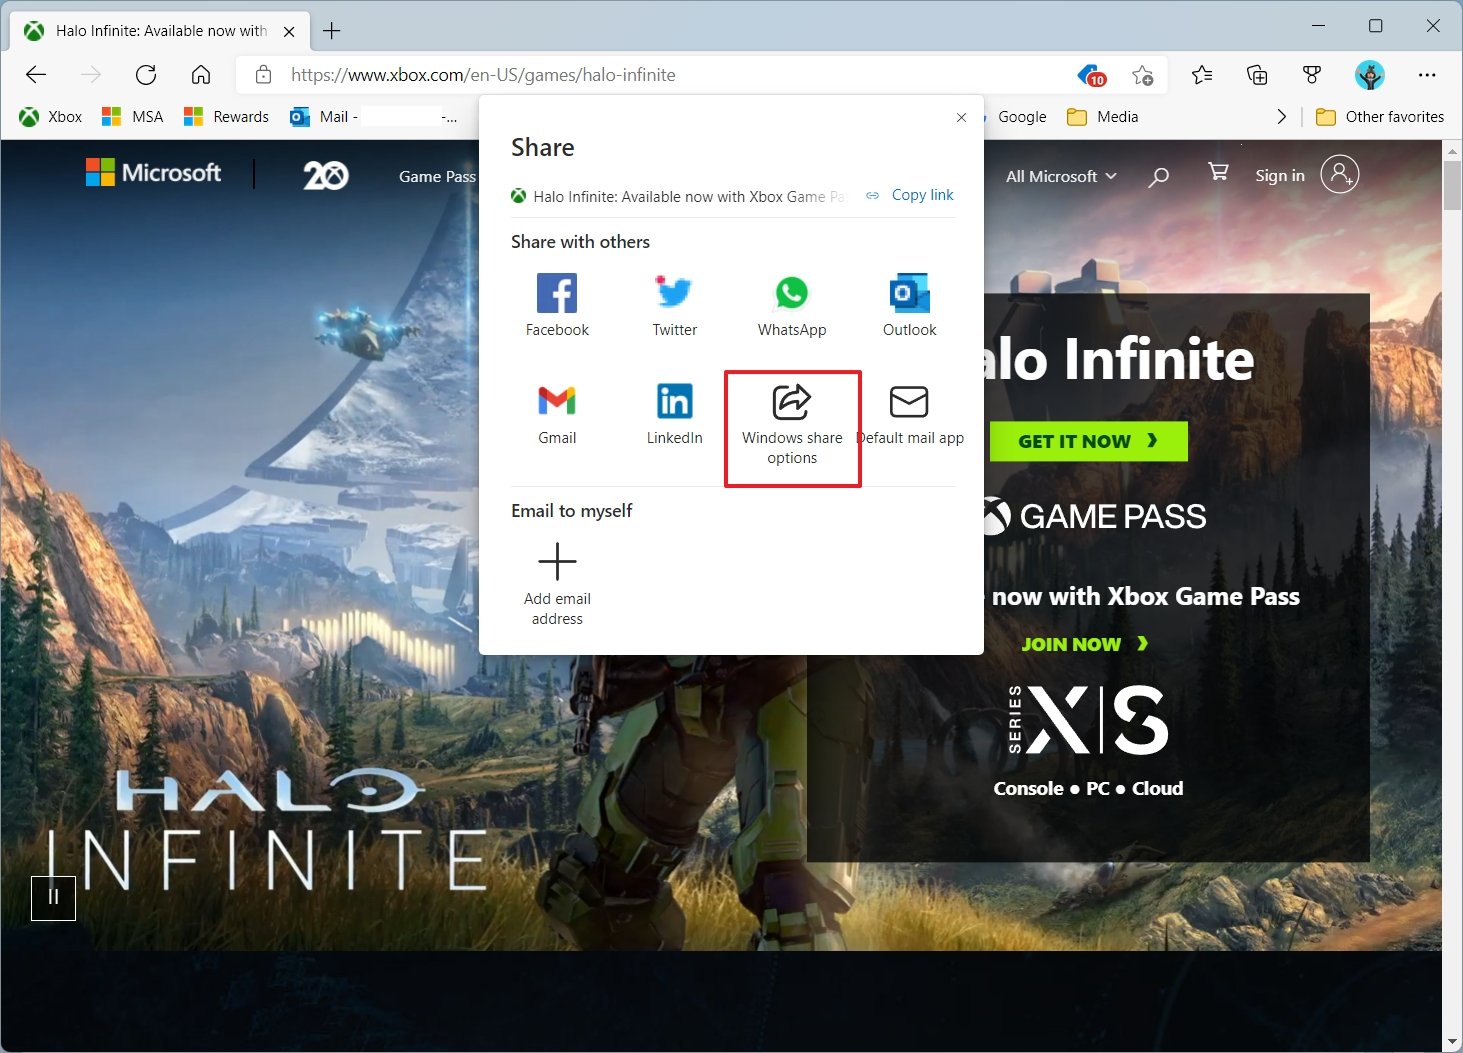
Click on Windows Share options.
Source: Windows Central
-
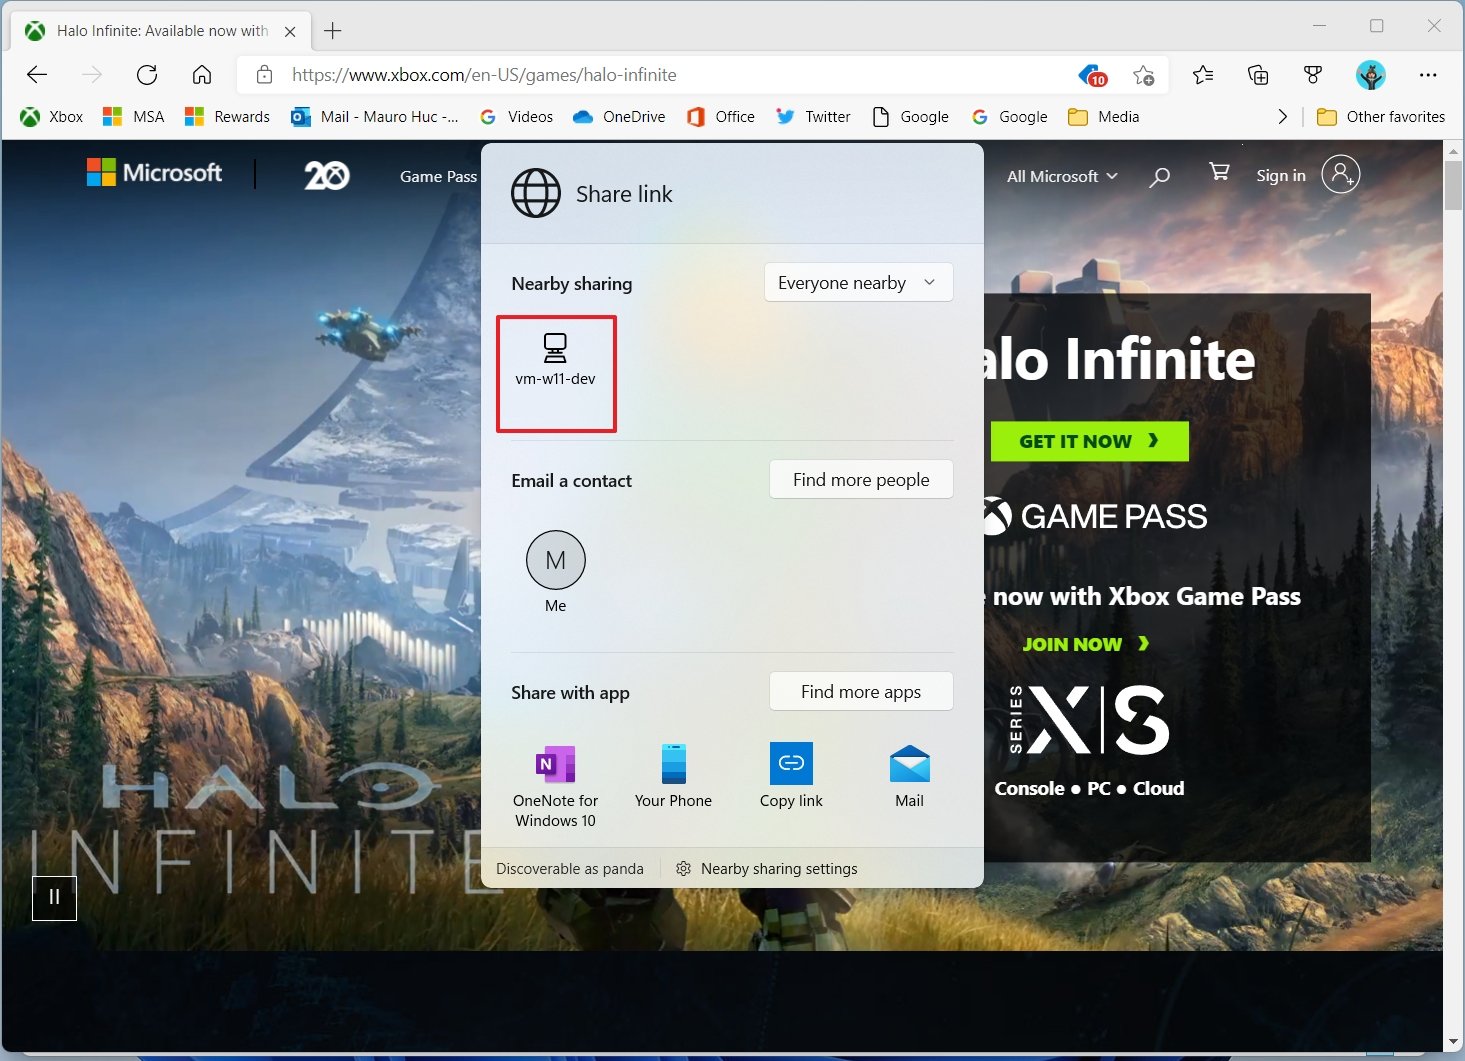
Under the “Nearby sharing” section, select the device to transfer the file.
Source: Windows Central
- On the destination device, click the Open button on the notification to open the link in the web browser.
After you complete the steps, the link will open automatically with Microsoft Edge on the destination computer.
How to fix problems with Nearby sharing on Windows 11
Although Nearby sharing is easy to use, sometimes, you may not be able to transfer content between devices, and some troubleshooting may be required to resolve the problem.
Confirm Bluetooth driver
To check whether the Bluetooth driver is installed correctly, use these steps:
- Open Start.
- Search for Device Manager and click the top result to open the app.
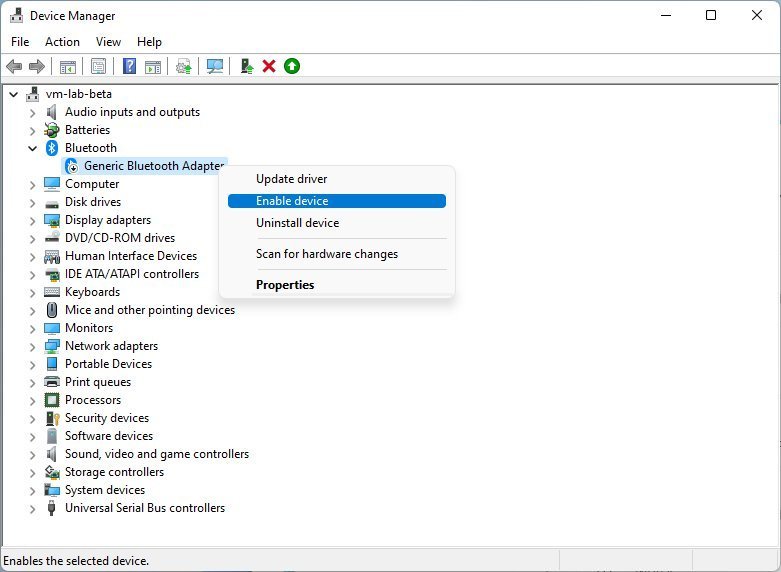
- Expand the Bluetooth category.
-
Confirm the Bluetooth driver is installed correctly.
Source: Windows Central
If you see a yellow icon, the driver has a problem. If you see a down arrow, the device is disabled. If this is the case, you need to right-click the Bluetooth item and select the Enable device option. The computer may not include this support if Bluetooth is missing or the driver isn’t installed.
Enable Bluetooth adapter
To enable Bluetooth on Windows 11, use these steps:
- Open Settings.
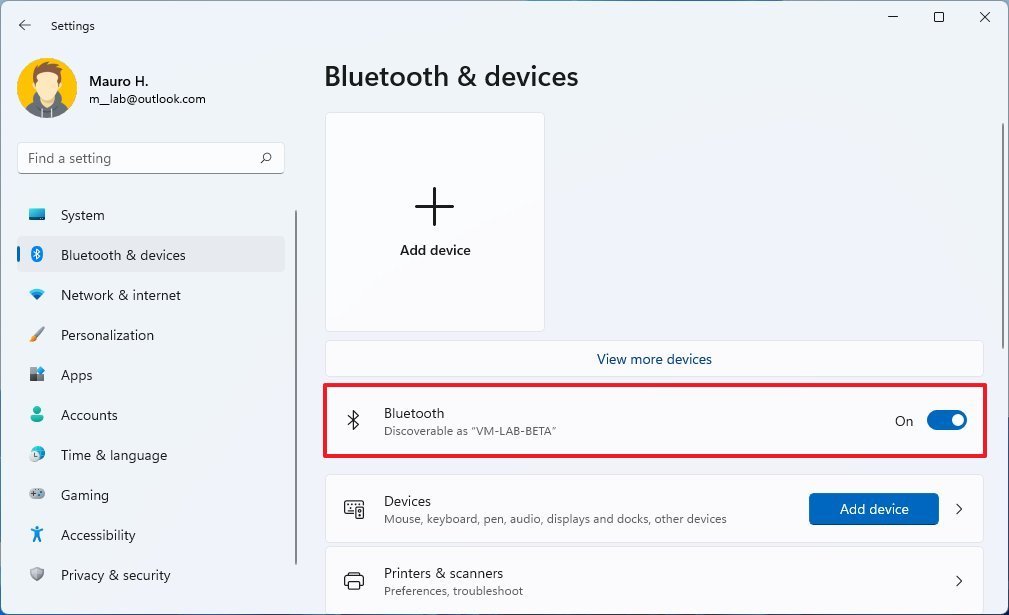
- Click on Bluetooth & devices.
-
Turn on the Bluetooth toggle switch.
Source: Windows Central
Once you complete the steps, the radio adapter should work with Nearby sharing. If the feature is still not working, you may need to update the adapter’s driver.
Check Bluetooth compatibility
On Windows 11, Nearby sharing requires Bluetooth is version 4.0 (or later) with Low Energy (LE) support. As such, you need to make sure the device meets this requirement:
- Open Start.
- Search for Device Manager and click the top result to open the app.
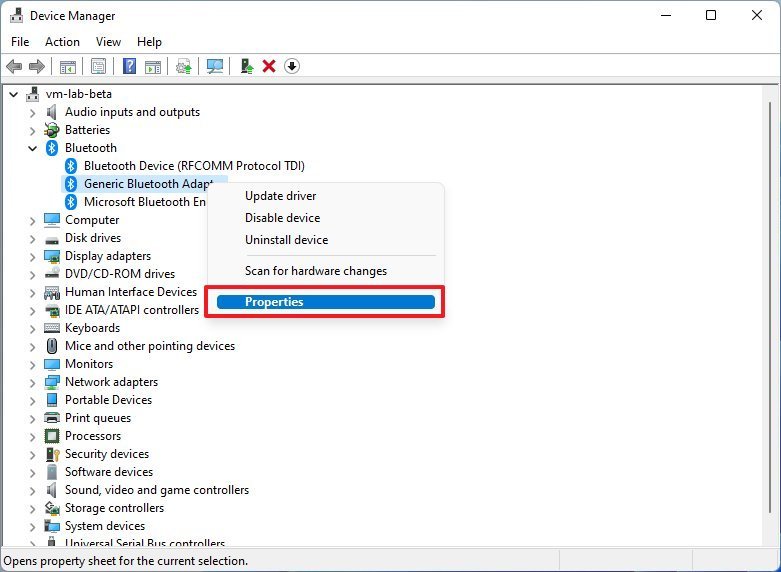
- Expand the Bluetooth category.
-
Right-click the radio adapter and select the Properties option.
Source: Windows Central
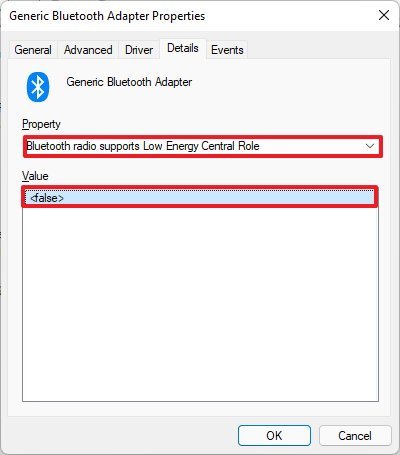
- Click the Details tab.
-
Use the “Property” drop-down menu, and select the Bluetooth radio supports Low Energy Central Role option.
Source: Windows Central
- Confirm the value is True.
If the devices can’t communicate, bring them closer, as they may not be within the Bluetooth connectivity range.
Check network connection
On Windows 11 (and 10), Nearby sharing works over Bluetooth and the local Wi-Fi network. If you want to transfer the data quickly, both devices must be connected to the same network and using the same network profile type.
Check connectivity
To confirm that both devices can connect, use these steps:
- Open Start (destination device).
- Search for Command Prompt and click the top result to open the app.
-
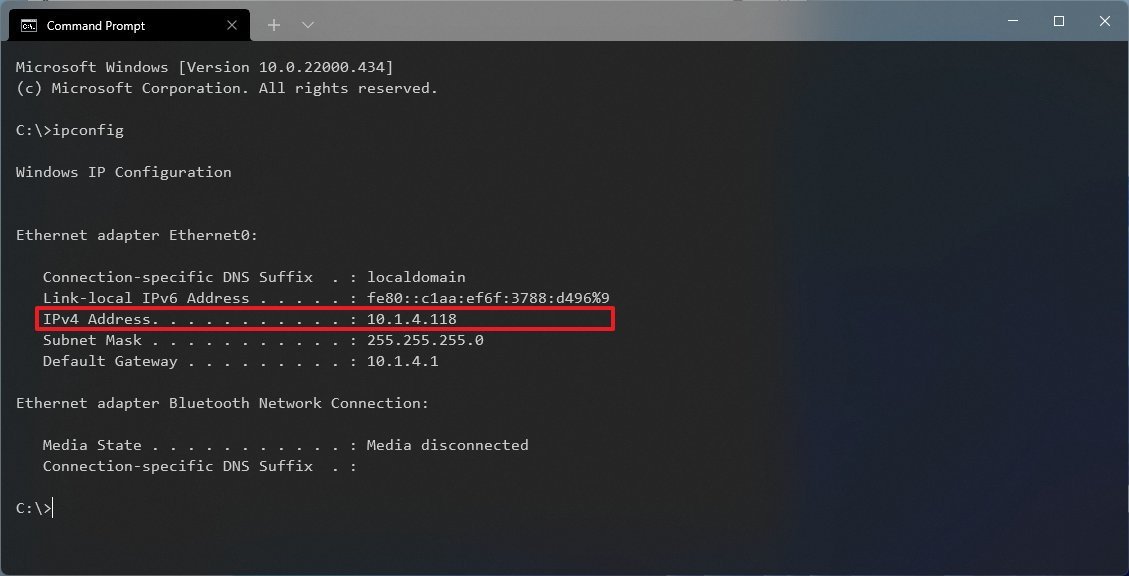
Type the following command to determine the TCP/IP configuration and press Enter:
ipconfig -
In the “IPv4 Address” field, confirm the device network address.
Source: Windows Central
- Open Command Prompt (source device).
-
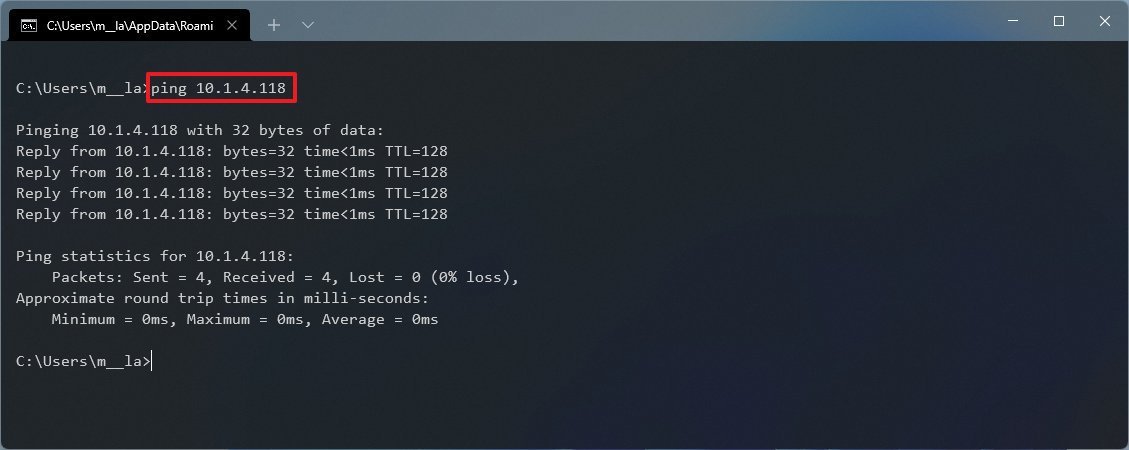
Type the following command to confirm the network connectivity between both devices and press Enter:
ping 10.1.4.155Source: Windows Central
In the command, change the IP address for the address corresponding to the destination device.
After you complete these steps, repeat the same instructions on the other computer, and if both computers show a successful reply, they can connect.
On Windows 11, Nearby sharing should play nicely with the firewall. However, if you have a third-party security solution, it’s recommended to disable the firewall temporarily to transfer data between devices.
Check network profile
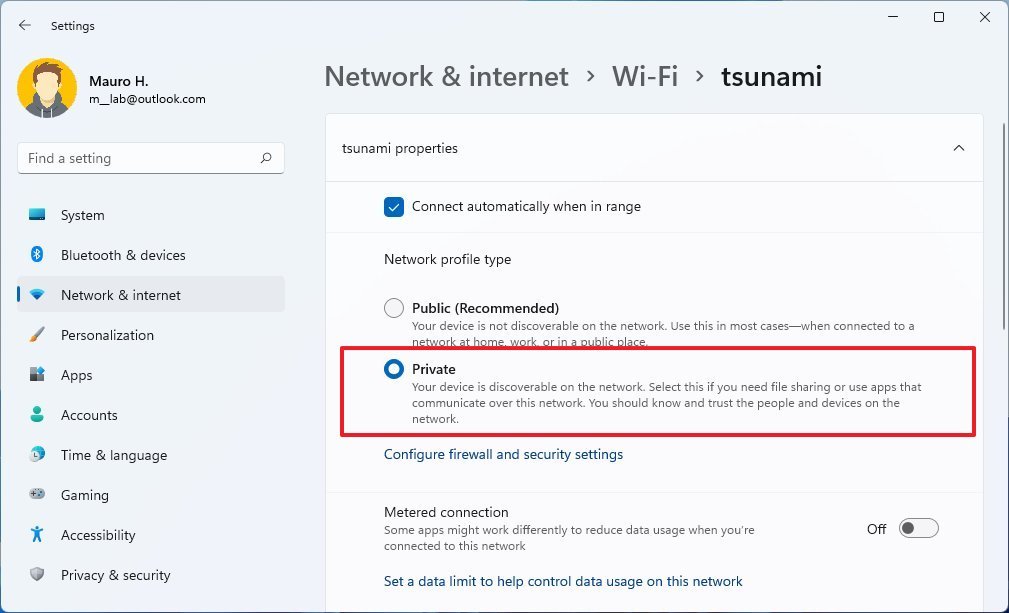
If you want to use Nearby sharing, both devices must be set with the “Private” network profile. If this is not the case, the transfer may happen very slowly.
To change the network profile type on Windows 11, use these steps:
- Open Settings.
- Click on Network & Internet.
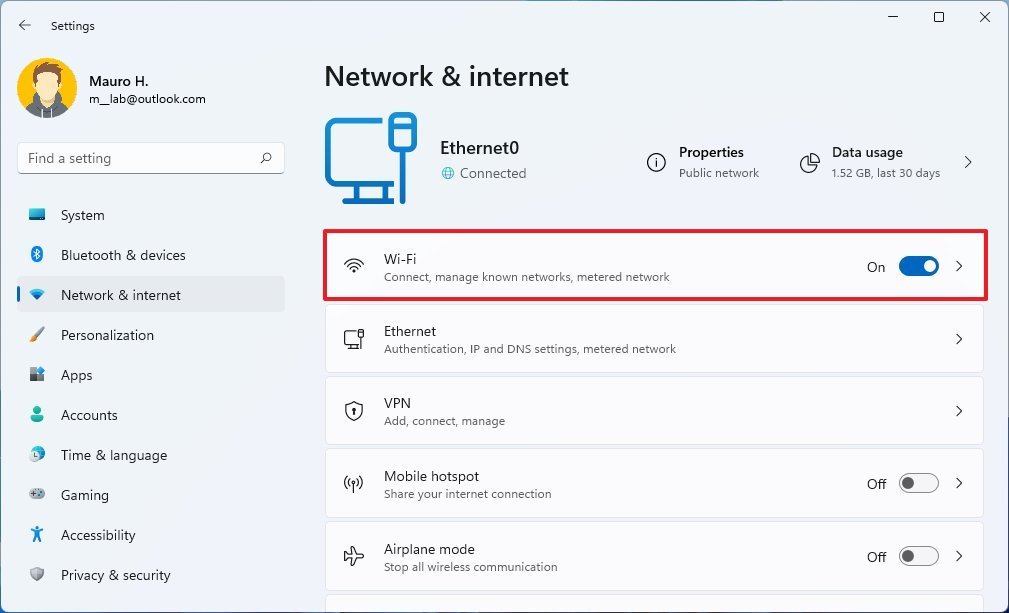
-
Click on Wi-Fi.
Source: Windows Central
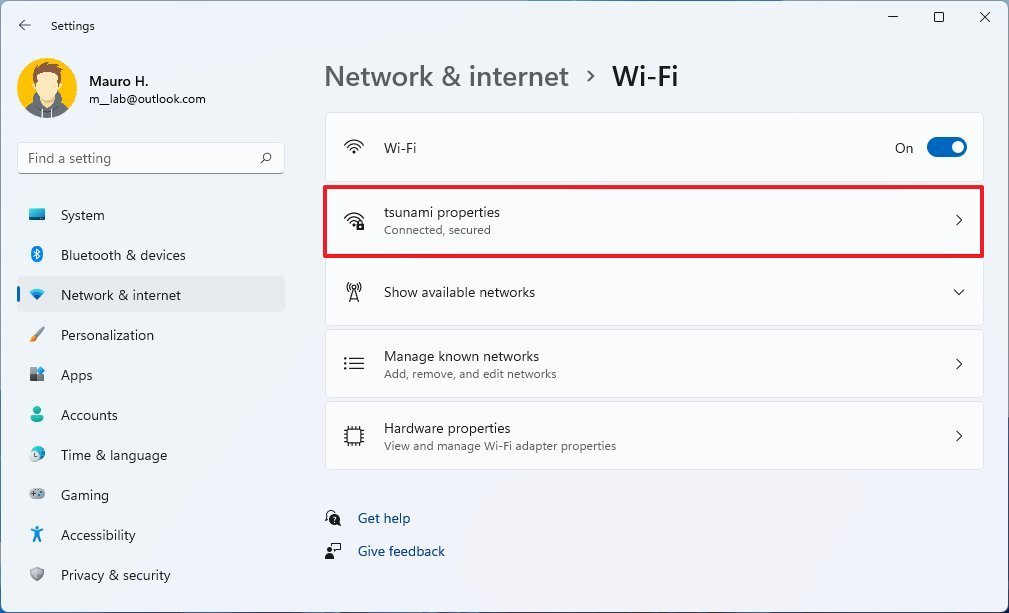
-
Click the network connection properties option.
Source: Windows Central
-
Under the “Network profile type” section, select the Private option.
Source: Windows Central
Once you complete the steps, you may need to repeat the instructions on the other computer.
More Windows resources
For more helpful articles, coverage, and answers to common questions about Windows 10 and Windows 11, visit the following resources:

Final Fantasy 14 (FFXIV) Endwalker PC review: The new king of MMORPGs
Final Fantasy XIV: Endwalker is here, and winds up a story that has been building up for the best part of a decade. After dozens of hours of hands-on gameplay, the time has come to pass judgment on Final Fantasy XIV: Endwalker. Read on to see our full review.


