

Presenter Overlay won’t comb your hair, lose you weight, or dress you better.
You can turn yourself into a weather presenter in your video calls, or keep eye contact with your audience as you show them slides while using Presenter Overlay in macOS Sonoma. Here’s how it works.
It’s the most visually impressive new feature of macOS Sonoma, and if you ever do slide presentations online in your work, you’re going to use Presenter Overlay from now on. Instead of having to choose between an image of you or one of your slides with tiny side windows showing everyone on the call, you can now properly present in macOS Sonoma.
To be clear, at present you can do this in at least Zoom and FaceTime. It will come to all video conferencing apps by the time macOS Sonoma is officially released in September or October, but not everything is supported now.
Also, at least in AppleInsider testing, the feature is just a little flaky. In our initial review using Presenter Overlay via Zoom, it didn’t display very well, but also you had an option for either a small or a large view of you to be displayed on the call alongside your slides.
If you chose the large option, then an actually rather small thumbnail of you appeared under the new macOS menubar app for video conferencing. This menubar app shows when your camera or microphone is active, plus it offers app-specific options, but they don’t seem to be finalized.
What is definitely working, though, is the option you are most likely to want to use most of the time. That large Presenter Overlay is how you can have both yourself and your slides on screen, without having to compromise.
It all works the same way on Zoom and FaceTime, but Zoom is more widely used for presentations, so to use the feature in that, these are the steps you need to take.

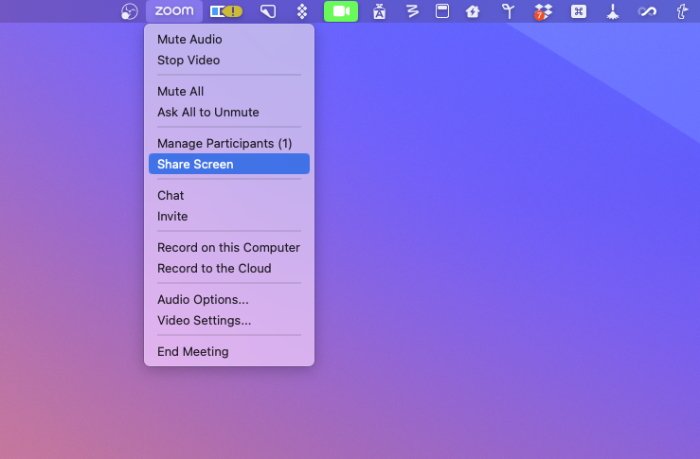
To use Presenter Overlay in Zoom, choose Share Screen, then Advanced, then Slides as a Virtual Background
How to use the new Presenter Overlay in macOS Sonoma
- Open Zoom
- Start a call
- Click on either the menubar icon and if necessary, on the name of your video app, or
- Choose Share Screen from the Zoom menubar app
- On the Zoom dialogue, choose Advanced
- Double click on Slides as Virtual Background
- Navigate to your Keynote or PowerPoint document
- Click Share
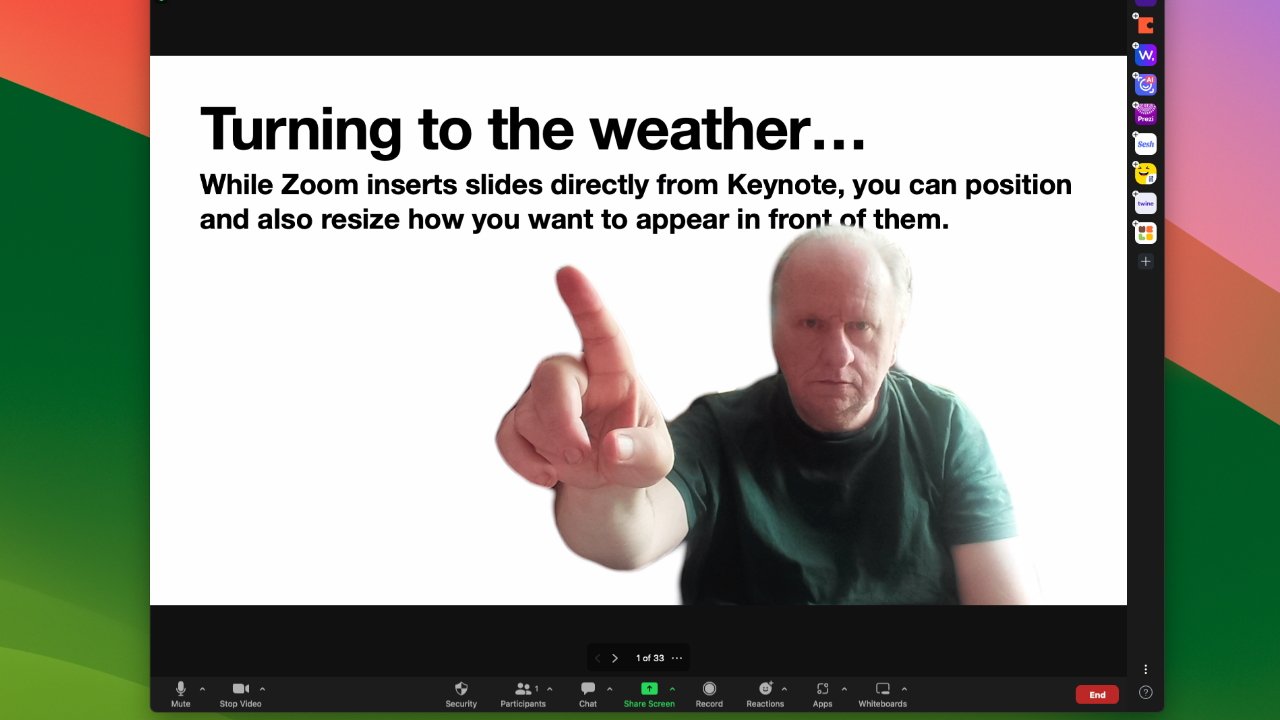
From then on, your face and torso — depending on your position in the camera frame — will be shown on screen, but the background will be replaced by your slides. This is exactly and precisely the same as using a fake photo of a beach as your Zoom background.
And it has the same problems. When you move, it can take a moment for the Mac to recalculate your position and just exactly what bits of background it has to remove.
So there can be a fluttering around your body on screen, and especially around your hair.
There’s nothing you can do about that, but there are other things you can control.
As well as Zoom’s Share Screen option, note the green highlighted camera icon in the menubar.
Changing the size and position of your Presenter Overlay
- On your Zoom screen, click on your face
- Drag to reposition yourself in the frame
- Or click on the drag handles around your image to resize
Then to get out of Presenter Overlay, you just choose Stop Sharing from the top of the screen.
That will remove the slides and restore the full image of you and your background.

")
