Whether you’re writing a book, a business plan, an academic paper, or a newsletter, a title page is a great way to capture your reader’s attention, lay out what the document contains, and add professionalism to your work. In this article, we will explore the steps to achieving this.
Cover Page Templates (And Why You Shouldn’t Use Them)
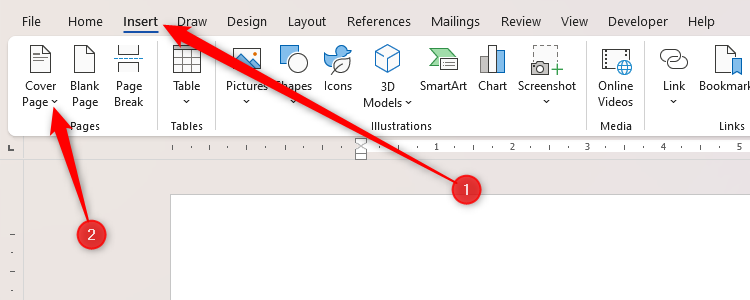
Microsoft Word offers many template title pages for you to add to your document, which you can access by clicking the “Insert” tab on the ribbon, and choosing “Cover Page” in the Pages tab.
While this might be a good option if you’re looking to save time, there are various reasons why it’s not the best choice:
- Certain preset designs are overused. Similar to well-known PowerPoint presentation designs or website templates, they look pre-designed and standard, lacking that personal touch.
- Designing your own title page means that you can create and follow your own formatting. If you add a preset cover page after finishing your work, you might find the layout is inconsistent with the remainder of your document.
- Word’s preset cover pages contain placeholders where you position your text. While you can move, format, and resize these placeholders, they are created using text boxes (rather than as text on the page itself), so their structure is limiting and insecure.
- Depending on the type of document you are creating, you might want a plainer title page. Indeed, some of Word’s fancier layouts would look out of place at the beginning of a formal academic document.
- You might find that the designs do not work for you. Creating your own title page offers more flexibility for displaying what you want, where you want it, and how you want it.
Use Styles to Create Your Text
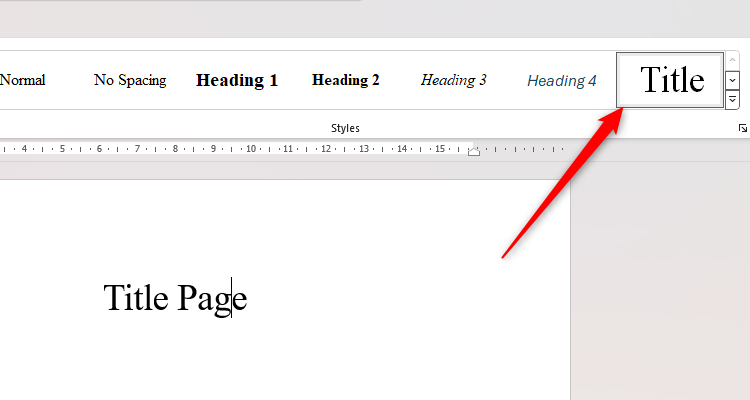
The first step to creating your impressive title page is to use or modify styles. You’ll find a Title style in the Style Gallery (in the Home tab on the ribbon), which you can click before, during, or after typing your main document title.
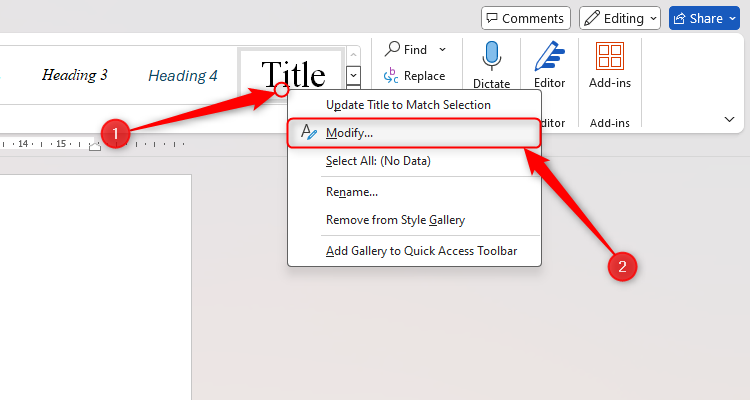
However, if you’re not happy with the layout of the Title style, right-click “Title” in the Style Gallery, and click “Modify.”
You can then change the style’s settings to present your title as you wish. I’d recommend the following settings.
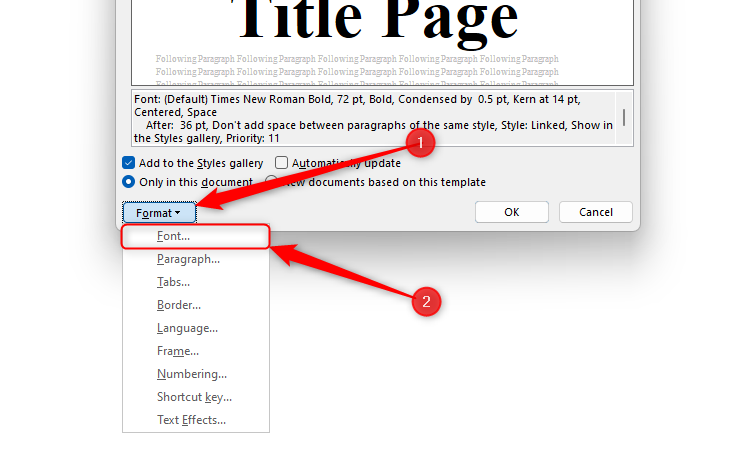
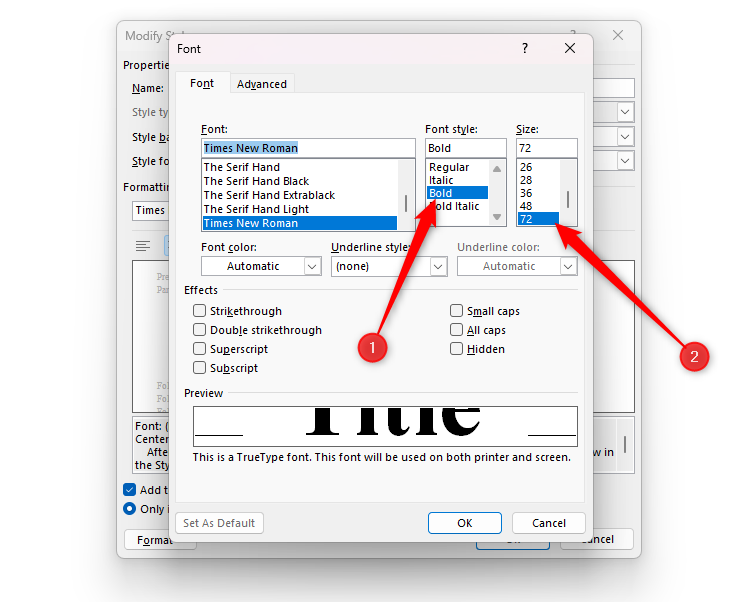
In the Modify Style dialog box, click Format > Font.
Here, change the font to bold and 72 pt (or a similarly large size, but not too big!). This will make your title really stand out.
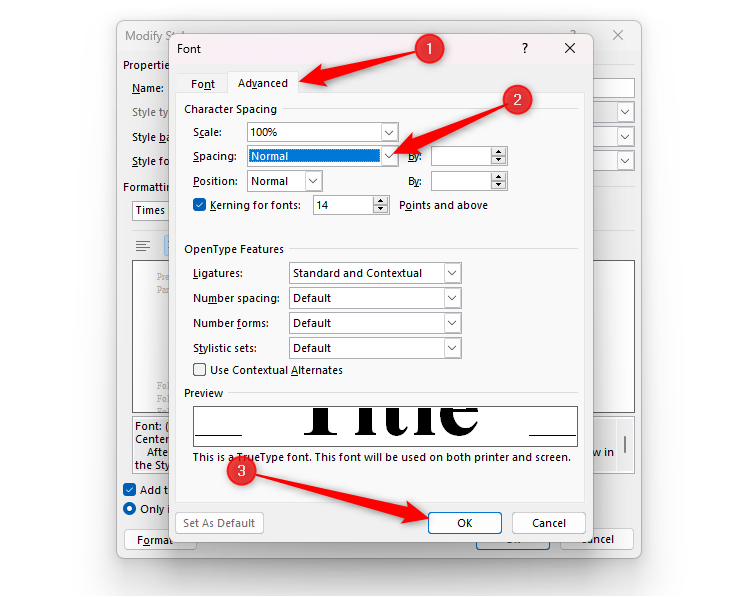
By default, Word condenses any text in the Title style to differentiate it from the rest of the text. However, since I’ve chosen a larger typeface, I don’t need the text to be condensed. So, open the “Advanced” tab, change the Character Spacing to “Normal,” and click “OK” to close your font settings.
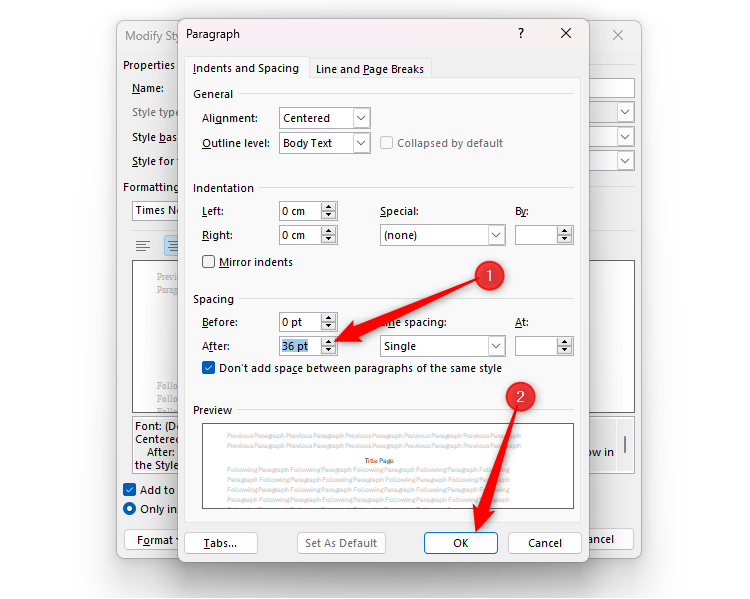
With the Modify Style dialog box still open, click Format > Paragraph to open the Paragraph dialog box. Here, change the Spacing After to half your chosen font size. So, since I have chosen size 72 pt font, I’ll go with 36 pt for the spacing after the paragraph. Then, click “OK.”
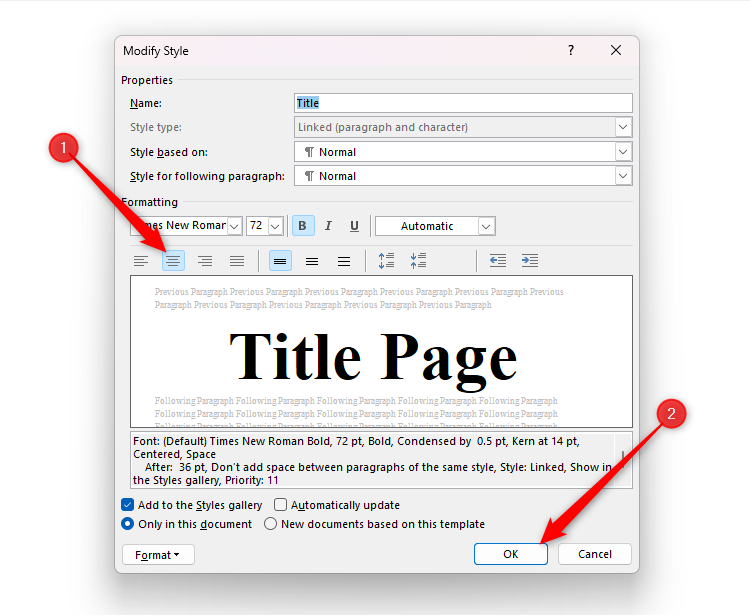
Before you close the Modify Style dialog box, decide on your title alignment. In my example, I’ll go with center alignment, as this layout looks great on a cover page. Finally, click “OK.”
You can now press Enter and type further text beneath your title (such as your name, a second heading, or whatever you wish), and follow the same steps to decide on the style formatting. I’ve gone with Word’s Intense Quote style and modified it to size 20 pt.
Add a Section Break
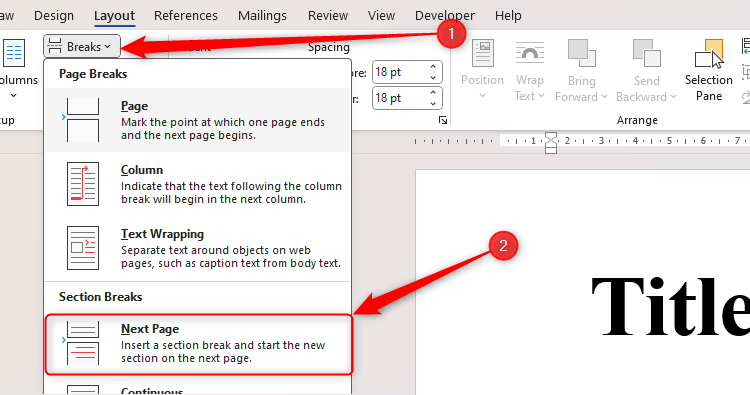
So that you can format your title page separately from the rest of your document, you need to add a Section Break. With your cursor at the end of the last word you have typed on the title page, click “Breaks” and then “Next Page” in the Layout tab on the ribbon.
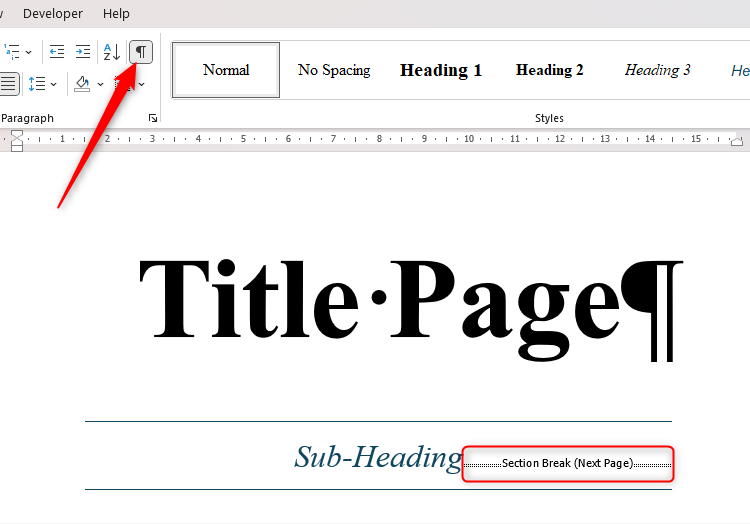
This will create a second page in your document, separated from your title page by an invisible section barrier. If you click the “Show/Hide” (¶) icon in the Home tab on the ribbon, you’ll see where this Section Break is added. Click the ¶ icon again to hide these pagination markers.
If you want to add more content to the title page, simply place your cursor before the Section Break, and press Enter. Word will then set the following line to the Normal style, ready for you to add more details.
Add a Page Border
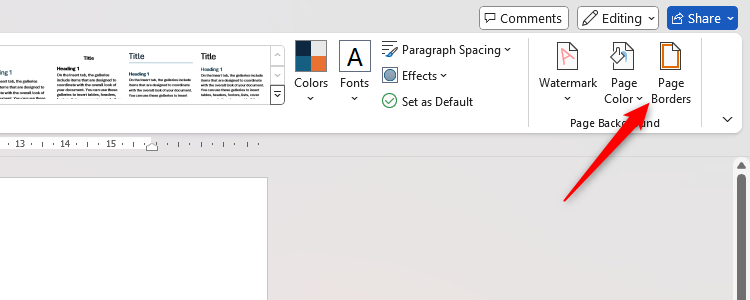
A great title page always has a page border. To add one, place your cursor anywhere before the Section Break you just added, and click “Page Borders” in the design tab on the ribbon.
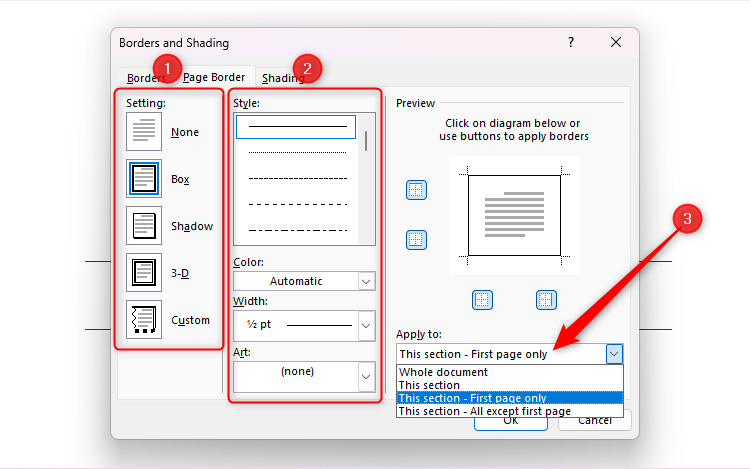
In the dialog box that opens, modify the border’s Settings and Style to suit your needs. I’ve gone for a simple box and a solid, thin line, but you can design your border to your taste. Then, importantly, ensure you click the “Apply To” drop-down option and choose “This Section” or “This Section – First Page Only.” This is why we created a Section Break in the previous step, and failing to choose this option will add page borders to every page in your document.
When you’re done, click “OK” to see the outcome.
Amend the Page Alignment
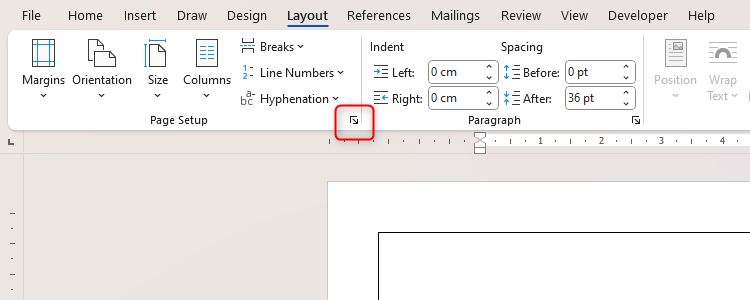
At the moment, the text is aligned at the top of the page, but a more professional title page will align the text in the center. To achieve this, with your cursor anywhere in the text you have typed so far, click the “Page Setup” icon in the corner of the Page Setup group in the Layout tab.
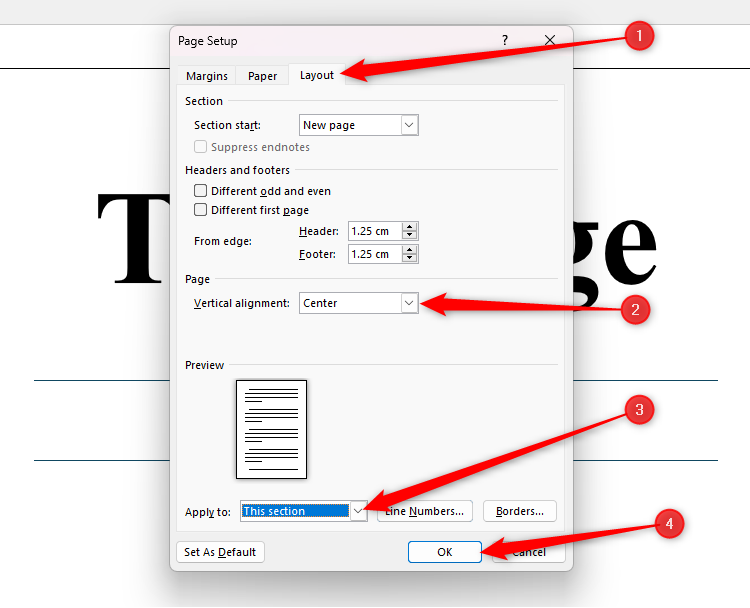
In the resulting dialog box, first, open the “Layout Tab.” Then, click “Center” in the Vertical Alignment option, and choose “This Section” in the Apply To field. When you’re done, click “OK.”
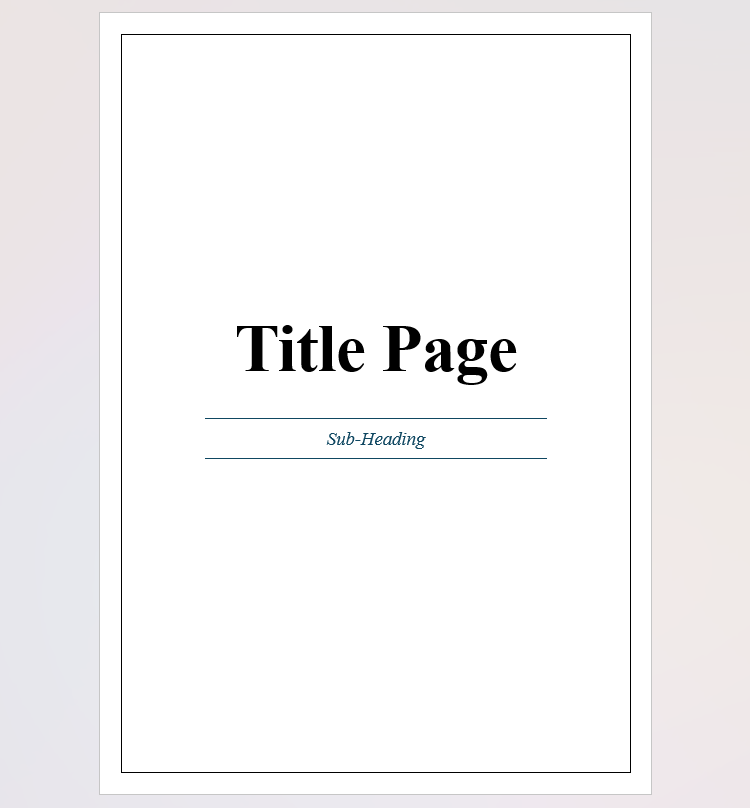
You will now see that your title page is nicely center-aligned.
Organize Your Page Numbers
Title pages tend not to contain page numbers, so you need to change one more setting to make sure this doesn’t happen when you add numbers to your subsequent pages.
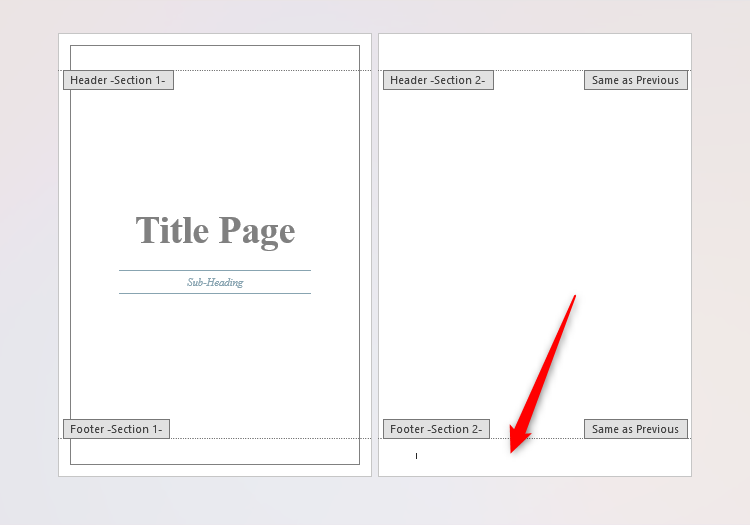
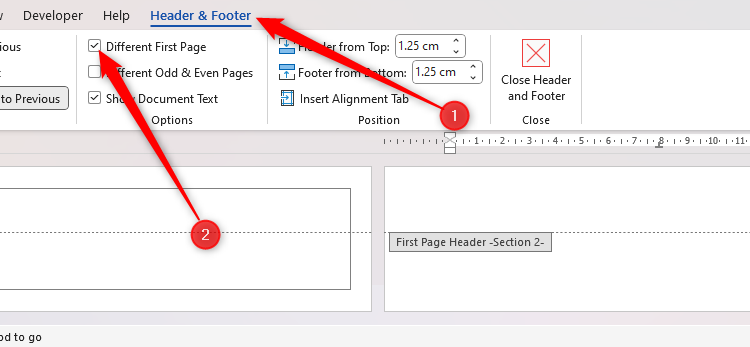
Go to the second page (which you created when adding a Section Break to your title page), and double-click in the footer area.
Then, in the “Header And Footer” tab on the ribbon, check “Different First Page.”
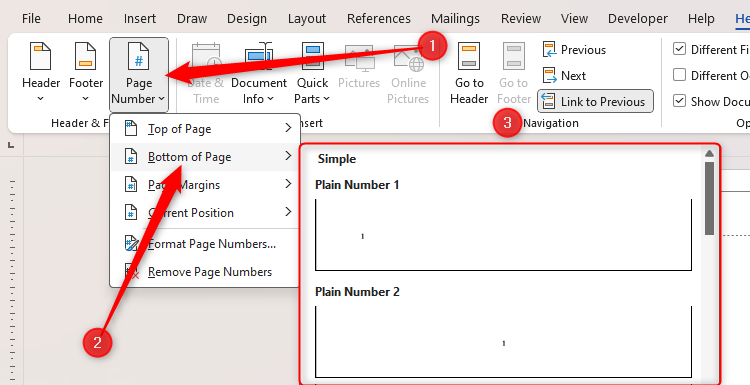
Now, in the same tab, click “Page Number,” then “Bottom Of Page,” and choose your preferred style. Personally, I always go for a centered page number.
Since you told Word that your first-page footer is different from the rest of the document, you’ll see that although your second page is numbered as page 2, there isn’t a page number on your title page, keeping it clean and tidy without any unnecessary detail.
Now that you have an impressively formatted cover page, make sure you apply the necessary settings to make the rest of your document equally professional.


