Summary
- Windows 11 offers very limited customization options for the Start menu, such as changing the layout.
- You can use Windhawk to change the look of the Windows Start menu.
- Make sure to regularly update the installed mods to prevent any issues with your computer caused by them.
The quickest way to access an app on Windows is through the Start menu. Since the Start menu is frequently used, wouldn’t it be great if you could customize its look to something different from what Microsoft currently offers? Fortunately, you can do this with a third-party tool called Windhawk.
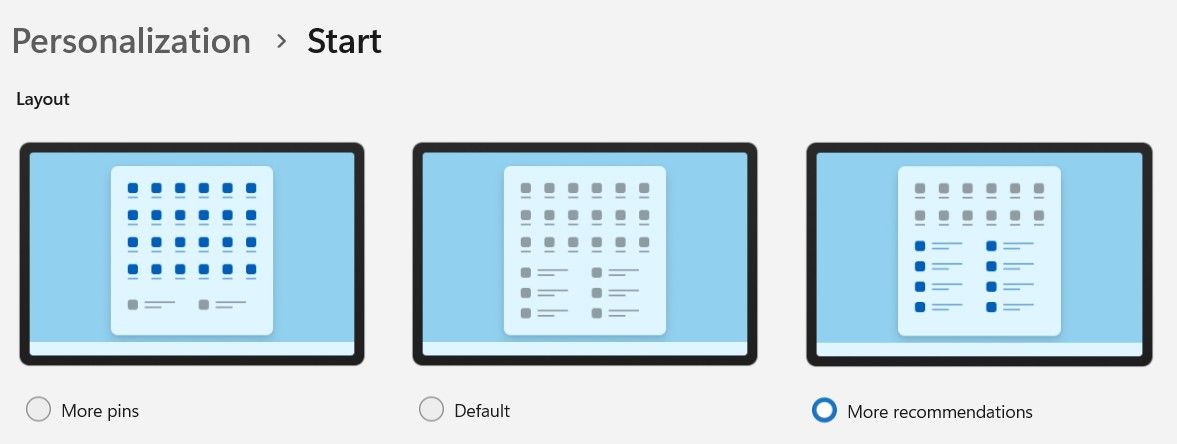
The only major customization you can currently make to the Windows 11 Start Menu is changing its layout. You can do this by opening the Settings app, and navigating to Personalization > Start. Under the Layout section, you’ll find three layout options for the Start Menu—More Pins, Default, and More Recommendations.
The More Pins layout displays more pinned applications in the Start menu, the Default option balances pinned applications with recommended files and apps, and the More Recommendations option prioritizes the recommended section in the Start menu.
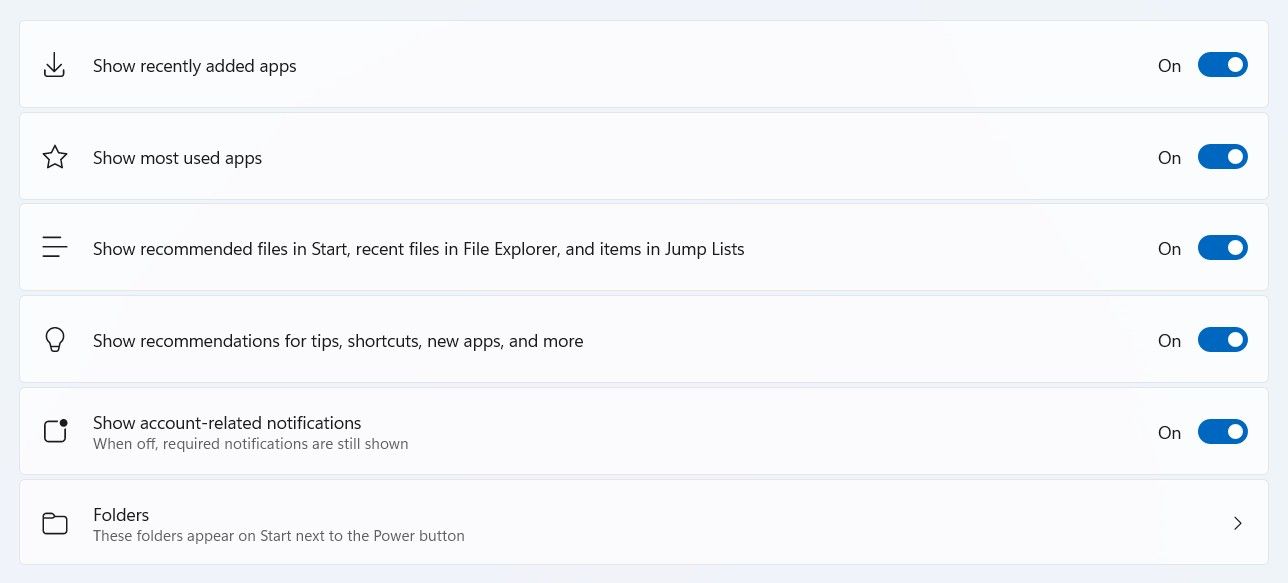
In addition to changing the layout, there are a few minor tweaks you can make to the Start Menu. For instance, you can choose which folders appear next to the Power button on the Start Menu. You can also configure settings like whether to display recently added apps, show the most used apps, and other similar small changes within the same Start settings window in the Settings app.
If you want to completely change the look of how the Start menu appears, you’ll have to use the Windhawk application. For example, if you’re a fan of the Windows 10 Start menu, you can use Windhawk to give your Windows 11 Start menu the look of the Windows 10 version.
To customize the Start menu using Windhawk, first visit the official Windhawk website and download the application to your computer. I’ve tested the application with VirusTotal, and the results show that it is safe to use. So you can download it without a second thought.
Once the download is complete, install it on your computer and launch the application. On the Windhawk homepage, click the “Browse for Mods” option.
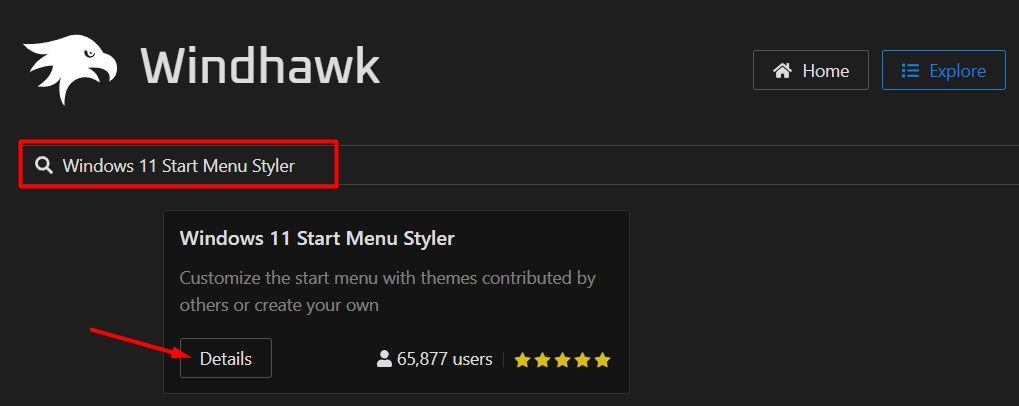
In the search bar, type Windows 11 Start Menu Styler. Click the “Details” button under the relevant result.
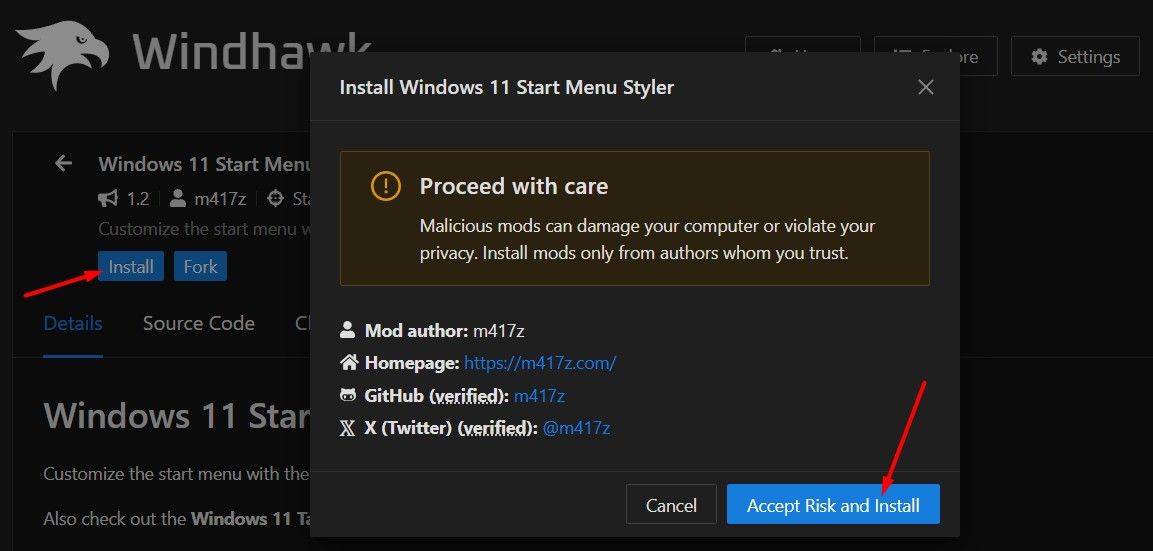
Next, click the “Install” button. In the confirmation box that appears, select the “Accept Risk and Install” option.
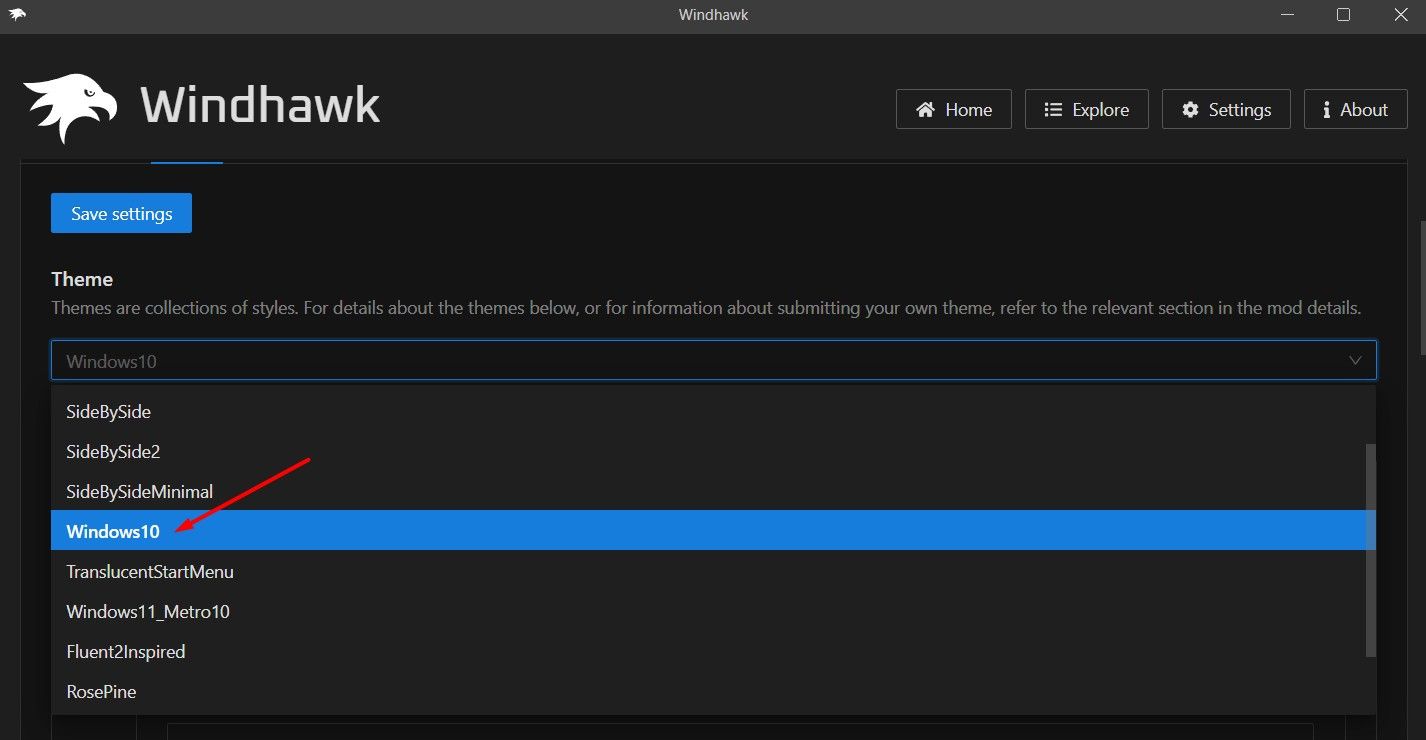
Once the installation is complete, switch to the “Settings” tab. Use the drop-down menu under the Theme section to select a theme for your Start menu. After selecting a theme for your Start menu, click the “Save Changes” button to apply the changes.
Personally, I prefer the RosePine theme because of its unique look compared to the traditional Windows 11 Start menu. Its neon-like color background is another major plus point of the theme. Along with RosePine, here are the other Start menu themes currently offered by Windhawk:
- NoRecommendedSection — This ensures you won’t see any app recommendations in the Start menu and will only see the pinned apps.
- SideBySide — Selecting this theme divides the Start menu into two vertical sections. On the left, you’ll find pinned and recommended apps, and on the right, you’ll see a list of all the apps installed on your computer.
- SideBySide2 — The SideBySide2 theme is similar to the SideBySide theme. The only difference is that it displays the pinned and recommended apps on the right side and the list of all apps on the left side of the Start menu.
- SideBySideMinimal — The SideBySideMinimal theme is similar to the SideBySide2 theme, with the key difference being that all the unnecessary spacing between icons is removed.
- Windows 10 — If you prefer a Windows 10-style Start menu, this is the theme to choose.
- TranslucentStartMenu — This is my second favorite theme on the list. As the name suggests, selecting this theme makes the Start menu translucent.
- Windows11_Metro10 — This theme also divides the Start menu into two sections. It includes a vertical slider to easily navigate the app list, and all pinned apps are displayed with a gray, boxy background.
- Fluent2Inspired — Selecting this theme removes the recommended section from the Start menu, leaving only the pinned apps. It also features a large search bar at the top of the Start menu to help you search for installed apps.
- Everblush — The Everblush theme gives the Start menu a greenish color tone.
Windhawk will automatically start every time you turn on your computer, so you don’t need to worry about reopening it on every startup. If you want to switch back to the default Windows 11 Start menu in the future, you’ll need to disable the installed mod.
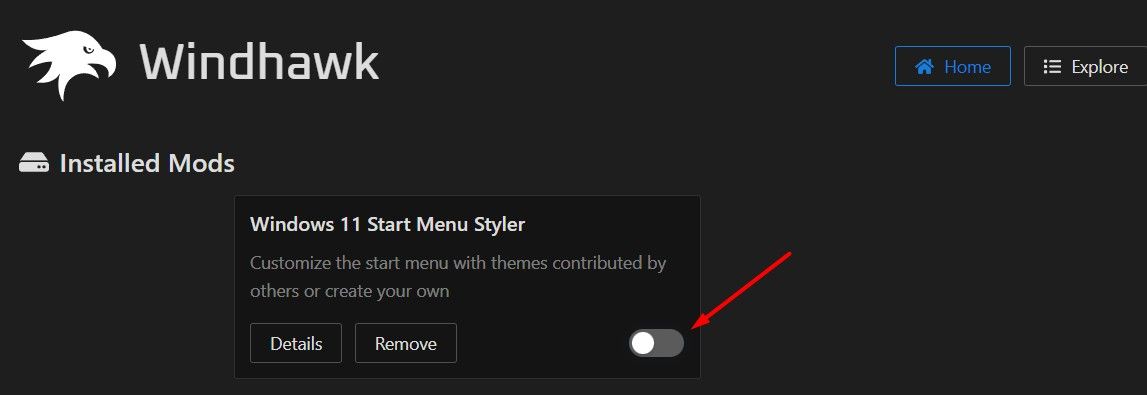
To do this, open the Windhawk application, click the “Home” tab at the top, and turn off the toggle for the Windows 11 Start Menu Styler mod. If you want to use the mod again later, you’ll have to just enable the toggle.
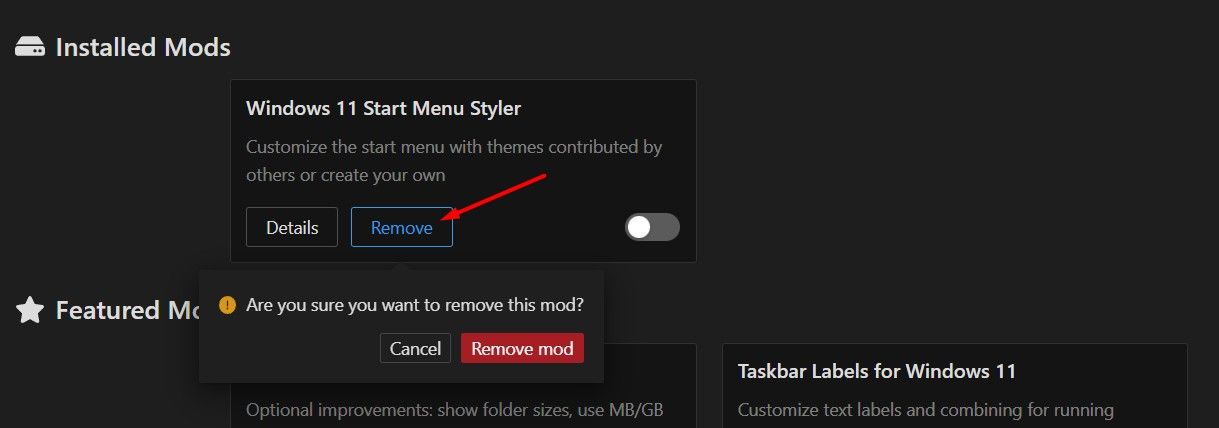
In case, you’re certain you won’t use the mod again, click the “Remove” button to uninstall it.
Yes, since Windhawk is a third-party application, a Windows update might break the mods you’re using, such as the Windows 11 Start Menu Styler in this case. That’s why I’d recommend that after downloading a Windows update, you open the Windhawk app and check if Windhawk has rolled out any updates for the mods you’ve installed. Any available updates will appear under the mod’s name in the Home tab.
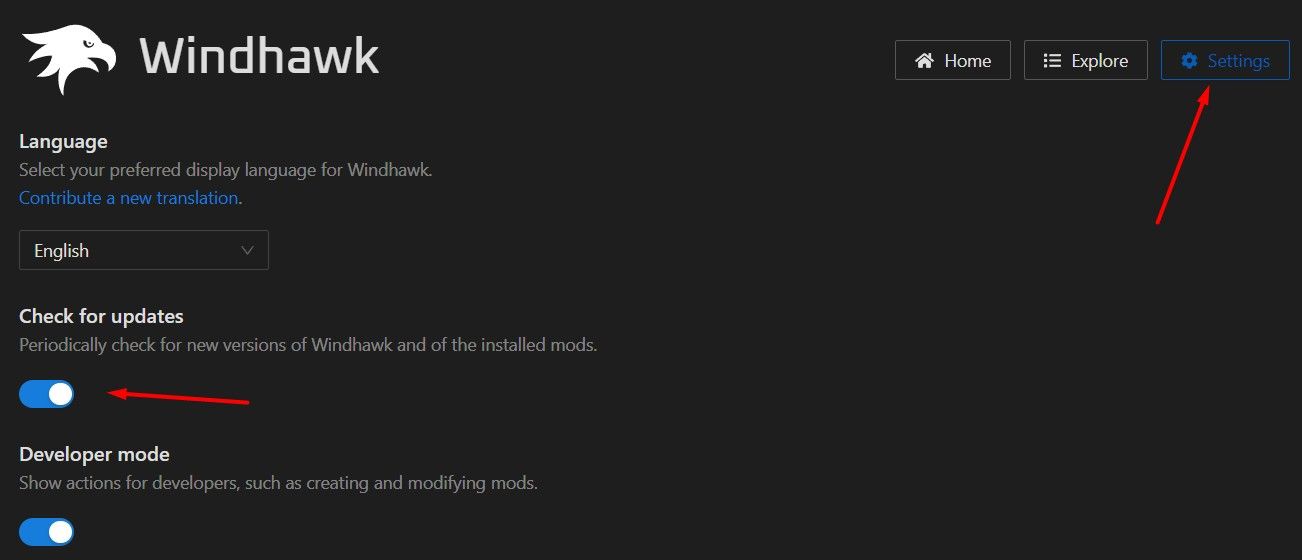
Additionally, you should go to the “Settings” tab in the Windhawk app and ensure the “Check for Updates” toggle is enabled. This will allow the app to automatically check for updates for Windhawk and all installed mods on a regular basis.
In addition to changing the Start menu’s appearance, you can use Windhawk mods for many other Windows customizations. For example, you can configure Windows to display folder sizes in File Explorer, adjust the Taskbar height, modify the Taskbar’s appearance, and apply many other customizations.


