

If you’ve never used an iPhone before, there steps you have to go to set it up, and then there are things you need to know about how to get the most from it. Here’s what Apple doesn’t tell you.
It is true that Apple devices tend to just work, and it’s certainly true that the iPhone is ultimately incredibly easy to use. But when you first hold that piece of glass and metal in your hand, it’s a mystery.
And it’s a mystery that Apple assumes you will figure out. While there are support pages on Apple’s website, those are useless until you’re online.
Regardless of which iPhone you have, here’s what you absolutely have to do to turn it on and set it up. Then here’s what you need to know to use it.
Unboxing and setting up
Once you’ve opened that box, got the iPhone out, and pulled that protective cover off the screen, nothing happens.
Turn the iPhone so that the screen side is facing you, is vertical, and you can feel that the the camera bump on the back is at top left. Now press and hold the button that’s on the rim of the iPhone toward the top right.
This is the sleep/wake button and you need to hold it in until a white Apple logo appears on screen. Then let go and wait.
The screen will shortly say “hello” in multiple languages, and you will start to be guided through setting up some essential elements. These are all intended to later on make it quicker and easier to use your iPhone, while hopefully making it impossible for anyone else to take it from you.
Each step works the same way. You’re asked a question, or told some information, and then have to make a selection by tapping on a button, or typing in some details.
You do not have to do every step, you can elect to do some later. But it’s best to do them now.
The first setup steps
The very first step is to set what language the iPhone will use. Then you’re asked to select your country or region.
It’s obvious what choosing a language does, but setting the region is significant, too. For instance, it sets whether the iPhone will use metric or Imperial measurements, and whether it shows 12-hour or 24-hour clock.
If this is your second iPhone, or for example you already have an iPad, you’ve set those devices up before. And Apple will now say that if you have another device, you can use Quick Start.
That’s a feature that means your new iPhone can just inherit or copy most of these setup details from your other device. It goes a lot further, too, to the extent that your new iPhone gets your Wi-Fi passwords, your contact list, even your apps.
It’s also practically magical — you bring the other device near to the iPhone and it works.
If you’re coming from an Android phone, it’s practically as magical, you just have to download an app first. On your Android phone, download Apple’s Move to iOS app.
With that installed and open on your old Android phone, then on the Quick Start page, tap Set Up Without Another Device. You’ll get a page called Transfer Your Apps & Data, which gives you options to do with where you copy your old data from.
One option is From Android and if that’s you, connect your iPhone to your old phone with a USB-C cable. Then tap this option.
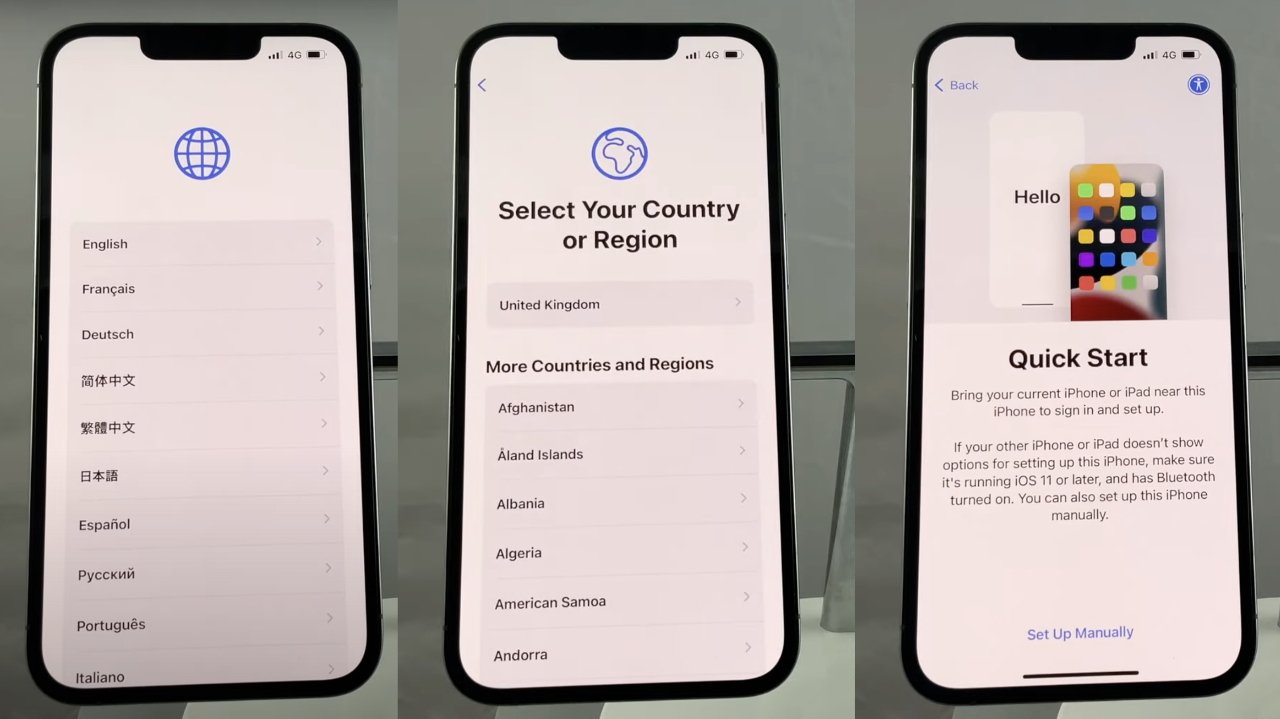
Setting up starts with questions about your language and region
If this first-ever iPhone, though, and you have no other Apple or Android devices, there’s a Don’t Transfer Anything button at the bottom of the Quick Start page. Tap that.
That takes you next to a page where you need to find and choose your Wi-Fi network. In theory you could do a lot of setting up of your iPhone without an internet connection, but in practice you need one and it’s simpler to use Wi-Fi.
The alternative is to use your cellular data plan and you certainly can. But that requires following your carrier’s instructions about setting up an eSIM — or an old-style SIM card if you’re outside the US.
For now, it’s quicker to set up using Wi-Fi and that’s the option Apple presents you with. Tap to select the right Wi-Fi network, enter the password, and then tap the Join button.
You’re going to be asked to sign in to your Apple Account. If you’ve never had an iPhone or any other Apple device, tap Forgot password or don’t have an account?.
An Apple Account is important for many reasons, including automatic backing up of your data. Plus if you do have more than one device, then it’s through an Apple account that each of them works together so that you get, say, your email on all of them.
Choices about your iPhone
It can take a moment for the iPhone to connect to your Wi-Fi, but once it has, you move on to a series of questions. There’s enough of them to be a bit tedious, and sometimes they’re just statements rather than anything you have to answer.
But they are all important, and they concern:
- Data & Privacy
- Face ID
- Create a Passcode
- Apps & Data
- Location Services
- Apple Pay
- Siri
- Screen Time
- iPhone Analytics
- App Analytics
- Appearance
Depending on your point of view, the Data & Privacy screen that you see first is either an ad about privacy, or a declaration that Apple’s on your side. Whichever you think, you do have the option to Learn More, but just nod and tap Continue.
Next, there’s Face ID, which also needs you to tap Continue, though there is an option to Set Up Later. Do it now.
Face ID is how your iPhone can be unlocked just by you looking at it — and not by anyone else looking at it. That’s not the only way to unlock your iPhone, but it’s by far the quickest and most secure.
To set up Face ID, follow the prompts. You’ll be asked to look at the iPhone and then rotate your head, move your face, so that it gets a full view of you.

You’re prompted through setting up Face ID
Face ID will let you unlock your iPhone most of the time. You will almost always just pick up the iPhone and start using it, not even noticing that it has recognized your face.
But when it can’t recognize you for any reason, or when you have restarted the iPhone, or when you simply haven’t used it in a long time, Face ID won’t work. You will have to enter a six-digit passcode — and that code is what you set up next.
One thing. This is what happens with any iPhone you buy as an individual. At this point if your iPhone has been supplied by your company, especially a large corporation, then you may be prompted to create a more complex password than a six-digit passcode.
Companies will also have apps that you need to use. But once more, Apple tries to save everyone a step or two by next giving you ways to quickly get your Apps & Data.
Again, if you have a previous device — including a PC or Android phone — then you can follow the instructions to get your data and equivalent apps off a backup from there.
But assuming this is your first device as well as your first iPhone, tap Don’t Transfer Apps & Data.
Next, you’re shown a screen about Location Services which tells you how if you’re willing to let it, the iPhone can know where you are. Do it. Tap Enable Location Services.
Conceivably there’s a privacy thing here but enabling Location Services means maps will work, it means weather apps will tell you the right details for your area. Just say yes.
Whereas with the next one, Apple Pay, it’s handy more than being as so very useful as the location details. This is another one you can set up later, but having a credit card or two on your iPhone is definitely convenient.
If you choose to add Apple Pay now, then the iPhone will prompt you through taking a scan of your credit card. It will then read the numbers on that card and go through a series of security steps with you and your bank.
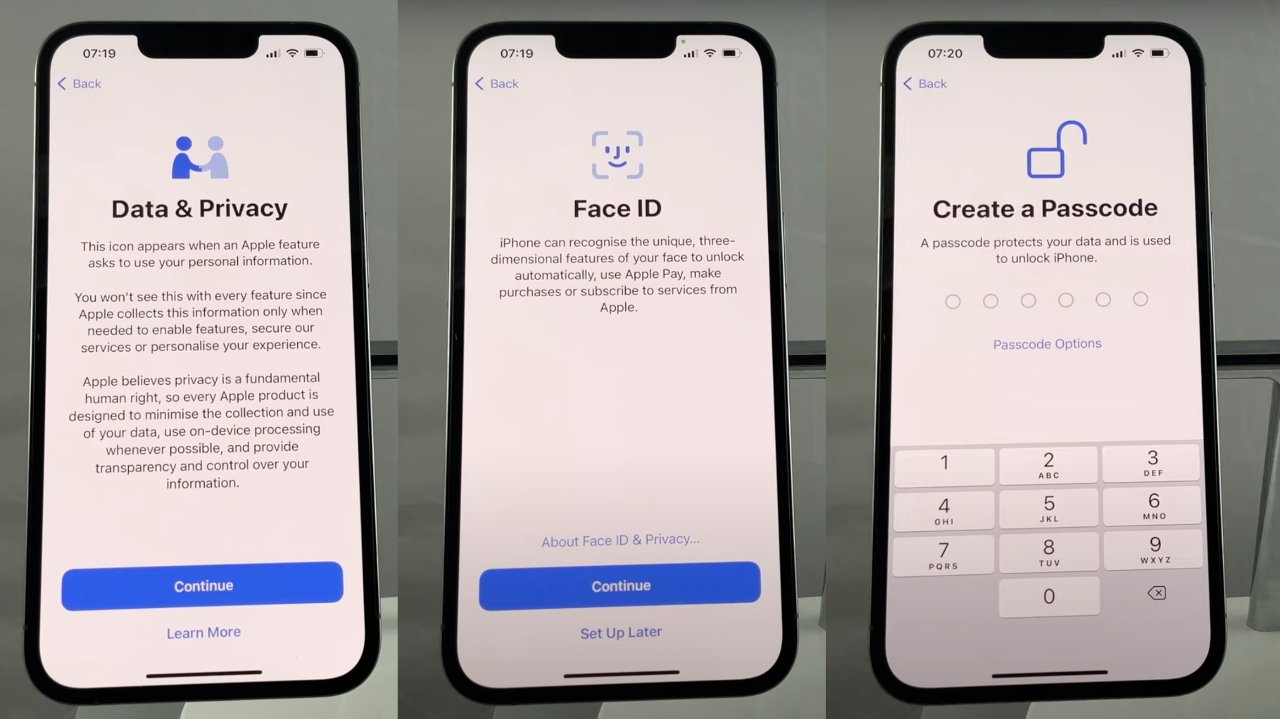
Most of setup requires you to make choices or to go through stages like creating Face ID
Next, Siri. There’s doubtlessly been some serious analysis and thought over what you have to set up and in what order. It looks like Apple wants to vary it so that sometimes you have to do a lot, sometimes you just have to tap yes.
With Siri, tap Continue and you will be prompted to say aloud certain phrases. This is training Siri to recognize your voice, and it’s well worth it — but you can, once more, set Siri up later.
It is always up to you whether you want to schlep through a setup step now or do it later, but with the next one, you might not want to bother setting it up at all. It’s Screen Time, which sees your iPhone sending you a weekly report of how much you’ve been using it.
If you care, tap Continue to set that up. Or tap Set Up Later in Settings and forget about it.
You can equally well forget the next two steps, but don’t. Over two screens, called iPhone Analytics and App Analytics, you’re asked permission for your iPhone to send data to Apple and to app developers.
None of the information is personal about you, it is solely about how an app is used and specifically when an app goes wrong. Tapping Share with Apple and then on the next page Share with App Developers helps Apple and developers improve their apps.
Next there’s a rather trivial section where you have to make a choice about the Appearance of your iPhone. This is an odd one to ask here because it’s whether you want a Light look or a Dark one, and it’s unlikely that you know until you’ve been trying out both.
Nonetheless, you have to pick one and then tap Continue. Just know that whatever you pick now, you can change on a whim later.
Completing setup
That vital question about Light or Dark Appearance is the last thing you have to answer. What happens next is that the iPhone rather sorts itself out.
Which means if you did have a previous device, it will now copy data from it. Restore from iCloud is always a long and very boring process when you just want to get on with using the iPhone.
If you are switching from another device, you’ve no option now but to let it do its thing. You could choose between coffee and tea, and that might be a better use of your time than watching this screen.
When you come back, this transferring of data is hopefully done, but what will definitely have happened is that your iPhone screen will have gone blank. Pick it up and depending on the model, the iPhone may automatically show you the lock screen.
Whether it does so automatically or not, you can tap on the screen, or quickly press the sleep/wake button on the side. The screen then definitely lights up, and either you get scanned with Face ID, or you’re prompted to enter your passcode.
And with that, your iPhone is set up. That’s everything you have to do — but it’s not everything you’ll want to, and it’s not all you need to know to use your iPhone.
Apple trains you how to use your iPhone
During setup, you have tapped a lot of buttons and that’s perhaps the most common thing you will ever do on an iPhone. Some buttons looked like buttons — they were text in a blue lozenge-like shape — and others were just text.
Unthinkingly, then, you now know that you can tap on anything and it might well do something. You’ve got tapping down, you just now need to know swiping.
Swiping sounds obvious because instead of a quick tap of your finger, you’re just sliding that fingertip across the screen. But it’s where you slide, and in what direction, that you need to know.

L-R: Swiping down from the middle of the screen, from top right, from top left, gets you these options
Starting with the most commonly used one, the swipe up. When you’re in an app and you don’t want to be, you want to go back to the iPhone’s home screen, you swipe up.
But.
You have to swipe from the very bottom of the screen. Start with your finger grazing the metal frame at the bottom of the iPhone, and swipe up.
It will become second nature in moments, even if you have previously used an iPhone with a physical Home button. But it’s important to get it right.
For if you instead swipe from roughly the bottom of the screen, you don’t leave an app, you probably just scroll through a list inside it. Or if you’re on the Home Screen, a swipe up from not quite the bottom moves you between home screens.
Then there’s the swipe down.
- Swipe down in the middle of the screen
- Swipe down from top right
- Swipe down from top left
If you swipe down in the middle of the screen, you get the option to search your iPhone. There are also Siri Suggestions of apps that you may want to use now, based on what you’ve previously used at this time.
Swiping down from the very top right, gets you Control Center. This is quick access to countless controls ranging from turning on Airplane mode, to altering the brightness of your screen.
Control Center recently had a revamp to make it incredibly customizable. As you go through using your iPhone, there are going to be controls you tend to use a lot — and they can probably be set up in Control Center so that you can get to them faster.
Last, swiping down from the top left. That takes you to the Lock Screen where you will see recent notifications.
Notifications can be from the iPhone and Apple’s own apps such as Messages, but most of them will be from other apps that you download from the App Store.
Making the iPhone your own with Apps
Everyone’s iPhone is different because everyone has different needs — and those needs are generally served by apps. To get an app, you just tap on Apple’s App Store icon.
If you’re in Europe, you have the option of other companies’ App Stores, but the process is the same. The App Store presents a bewildering list of apps and attempts to guide you through with curated lists and promotions about certain types of apps.
You can while away many an hour typing in something like “To Do” into the search box and scrolling through countless results. Or you can search for a specific app name if you know it, and thereby save your sanity and stop wearing out your finger.
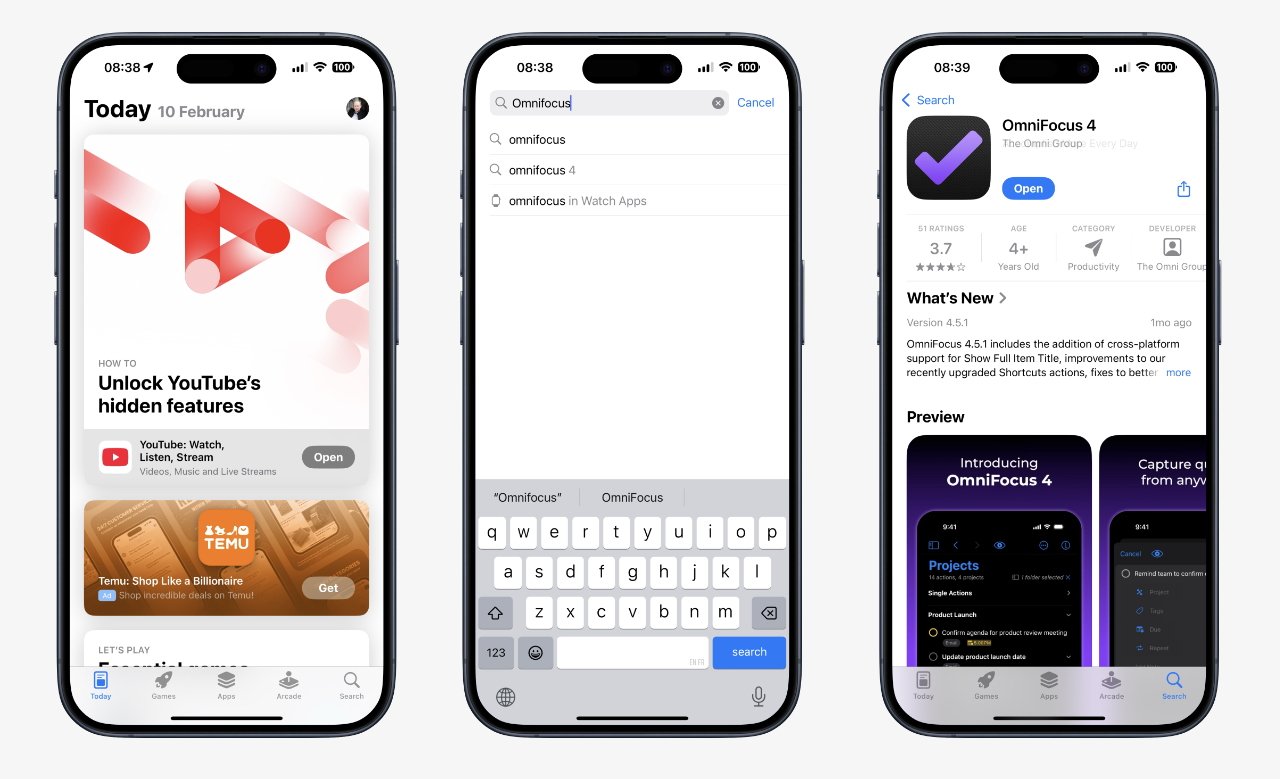
L-R: Opening the App Store, searching for an app, and getting it
Whatever way you get to an app, you can then tap on its entry in the App Store to read more. Then tap the Get button.
You are almost certain to then be prompted to confirm that you want this app. It will be that you’re asked to press the sleep/wake button twice in quick succession, and then Face ID will check that you are you.
The reason for all of this is that you have to make a positive choice to get an app because it can cost you money. Many apps cost money upfront and it’s clear when they do — instead of Get you’ll see a price.
Other apps are free. But then increasingly commonly, you’ll see an listed as free and it is not.
This is really a failing of Apple’s design. What app developers want is for you to be able to try out their full app without having to immediately pay for it.
They want to give you a trial version, really. And the only way to do that is to officially make the app free, then after a trial period, tell you to pay up.
Arranging apps
The last thing to know about using your iPhone is to do with apps and how they — and other elements — can be arranged on your screen. As well as app icons themselves, there are widgets that apps provide, larger panels of information.
When you download an app, it goes into the first empty slot on the home screen. If there isn’t an empty slot, the iPhone creates a new, extra home screen and puts the app there.
To get a widget, press and hold on any blank spot on the screen. Tap Edit when it appears, then tap Add Widget and go through the list provided.
Later, you can press and hold on any app or widget, ignoring any popup menu that appears, and after a moment, all apps start wiggling. Press and hold on any wiggling app and you can drag it to a new position.
This has always been the case with the iPhone, but recently Apple gave you more options to neatly arrange apps and widgets as you want.
By default, apps have a certain size icon and their name underneath. But you can change that to make them bigger and lose the name, by again pressing on a blank part of the screen.
Tap Edit, when it appears, then Customize.
Tap anywhere, you won’t break anything
This is all you need to get started using your iPhone. But there are countless excellent iPhone features such as a genuinely astounding number of Accessibility options, and of course there are myriad apps.
Apple itself makes many apps from a Weather one to the full Pages word processor, and they will already be installed on your iPhone.
Your use of your iPhone will be different to everyone else’s, but the smart money says you’ll be spending at least some time in Messages. What used to be just a text message app is now a world of its own, with Genmoji and Apple Intelligence’s Image Playground.
Messages also has Check In, which lets your iPhone automatically tell a loved one that you’ve arrived home safely.
You can read all of the AppleInsider articles on how to use and make the most of the iPhone’s iOS 18.
But you can also do this — just tap on controls and buttons, swipe on sliders, and use apps. You might make a change you don’t like, such as switching from that Light to Dark appearance, but tap again and you’ve undone it.
Or if you somehow managed to accidentally delete an app, you could get it right back from the App Store.
You’re not going to damage anything, you’re not going to do something like slowing the phone down or wiping out your battery. And always, the best way to get to know the iPhone is to use it.
How to stop using your iPhone
All of this has been about how to switch on and use your device when it’s your very first iPhone. Once you’ve done all of this, the odds are that for the greatest proportion of time, your iPhone will stay on.
That’s whether you’re actively using it or not. There is little advantage to turning off your iPhone, not even when you’re in places where you need to prevent phone calls or message bleeps coming through.
To prevent those, you can swipe down from top right to get Control Center. That has a volume control, although it won’t turn off alarm sounds that you’ve set.
There’s also Airplane mode, which will prevent phone calls coming in. And there’s also a Focus button, which now includes an option called Reduce Interruptions.
So there are many ways to quieten your iPhone when you need to. But if you do need to actually turn it off, there is a quick way to do it.
Swipe down from top right to get Control Center, and then tap and hold on the power icon. That’s at top right of the screen and if you hold it down for a moment and then release it, you get an option to slide to turn off the iPhone.
There is a temptation, especially when this is your first iPhone, to use it too much, to play with it too much. Give in to that temptation — there is so much you can do with an iPhone, and you now know all you need to use it fully.


