Creating a multipage project can be a daunting prospect, due to the time commitment and effort it involves. Luckily, your good friend, Microsoft Word, is ready to help! Whether you’ve yet to start or nearly finished, these tips will enable you to optimize your document and speed up your workflow.
1 Use Word’s Styles
I can’t overstate the benefits of using Styles—accessible via the Home tab on the ribbon—in a long Word document.
There are two ways to format text in a Word document. You can either apply formatting directly (for example, by selecting some text and pressing Ctrl+B to make it bold) or by linking text to a Style. There are several reasons why I would strongly advise you to use the latter method:
- You’ll save time: Let’s say your headings are bold, size 14, underlined, and centralized. Applying these manually to every heading would take at least four clicks or keyboard shortcuts. Instead, you can apply all this formatting with just one click.
- Your work will be consistent: Using Word’s Styles means you don’t have to remember the different formatting settings that you applied to different parts of your work.
- Make wholesale changes: If you decide that you want to change your typeface or font size after you’ve finished, you merely need to change the relevant Style settings. This means that you don’t have to go back through every page of your lengthy document to make the changes manually.
- Styles do more than format your text: For example, the Headings Styles can help you create a table of contents (more on this later).
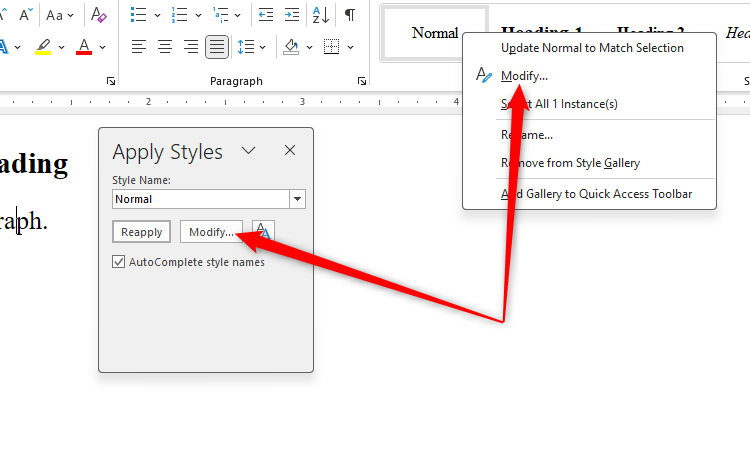
First, amend your Styles so that they contain the formatting you want in your document. To do this, either right-click a Style in the Style Gallery in the Home tab, or place your cursor anywhere within the heading or paragraph you want to format, and press Ctrl+Shift+S. Then, click “Modify.”
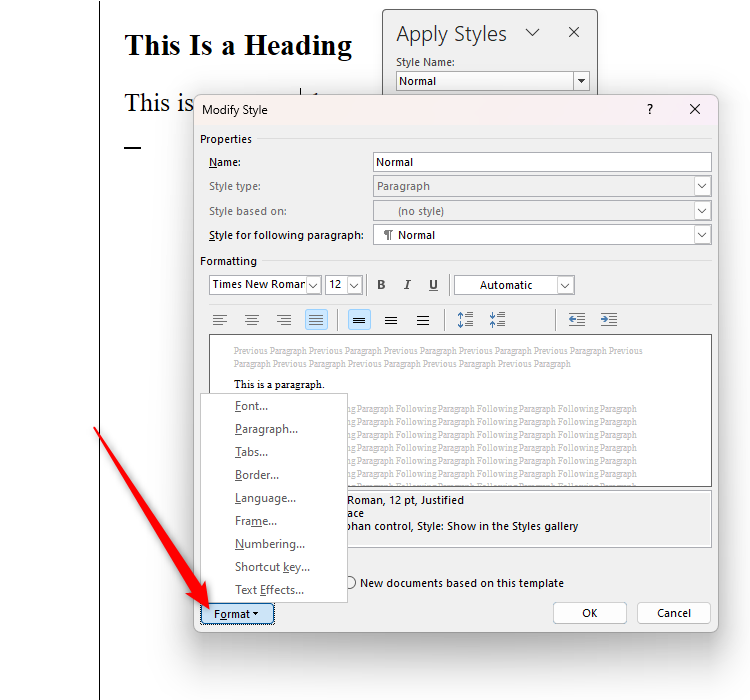
Now, in the Modify Style dialog box, click “Format” to see the different formatting changes you can make to that Style.
After you’ve changed a Style, any time you apply it to some text in your document, you can rest assured that the formatting is consistent. Likewise, any text already assigned to that Style will reformat automatically.
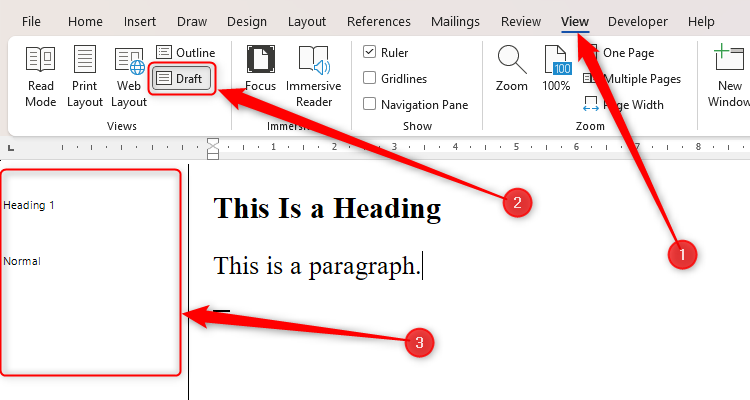
It’s also worth reviewing the Styles after you’ve finished your work to make sure that the correct ones are applied to the correct parts of your document. The easiest way to do this is to display the “Draft” view in the View tab on the ribbon, so that you can see the Style Pane Area containing the Style names on the left-hand side of your screen.
If you can’t see the Style Pane Area in the Draft view, click File > Options > Advanced, and scroll down to the Display options. There, set the Style Pane Area Width to
5 cm
or
2 in
, and click “OK.”
2 Make Your Work Easy to Navigate
Whether you intend to share your long Word document with others or keep it to yourself, it’s worth taking steps to make it more easily navigable.
Insert Breaks
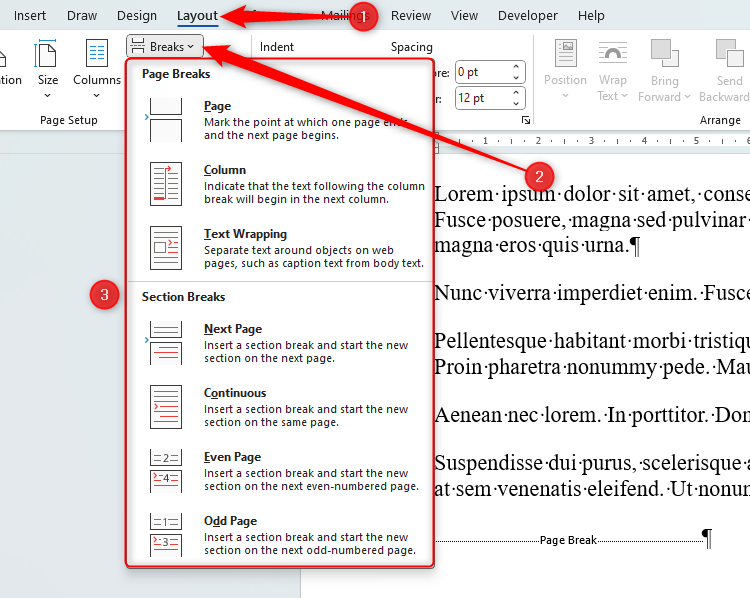
Starting a new page for each section of your lengthy document helps to break it up and prevent it from being one continuous stream of text. With your cursor at the end or start of a chapter, click “Breaks” in the Layout tab on the ribbon, and select the type of break you wish to add.
The two most useful breaks for organizing your lengthy document are the Page Break (the first option in the menu), or the Next Page Section Break (the fourth option in the menu):
- Page Breaks: As the name suggests, Page Breaks apply a soft break to your document without affecting the page formatting.
- Section Breaks: On the other hand, Section Breaks are harder divides in your work, meaning you can change page orientation, add borders, or use different page numbering systems.
Add Page Numbers
Add page numbers so that it’s easier to refer to certain parts of your work. Although you can add page numbers to Word’s headers, the more traditional approach is to have them in the footer.
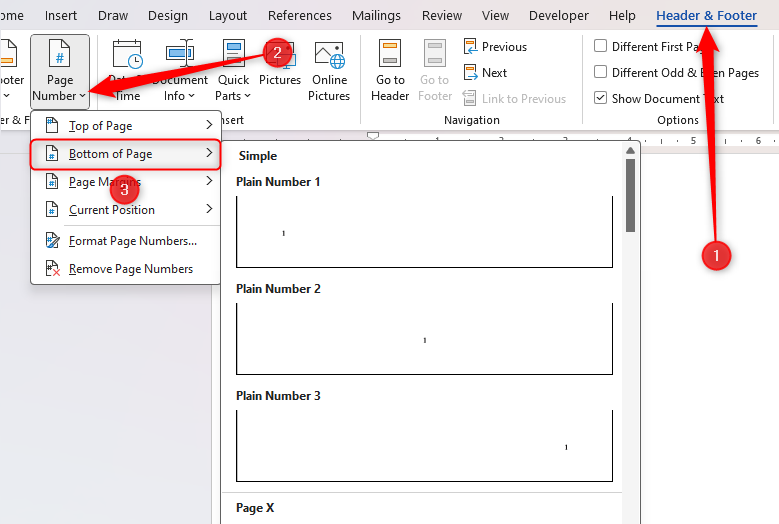
Double-click the footer area at the bottom of any page, and you’ll see the Header And Footer tab appear on the ribbon. Click Page Number > Bottom Of Page and choose the page number style that works well for your document.
Create a Table of Contents
Word’s contents table tool can help your reader to avoid having to scroll or flick through the many pages to find what they’re looking for.
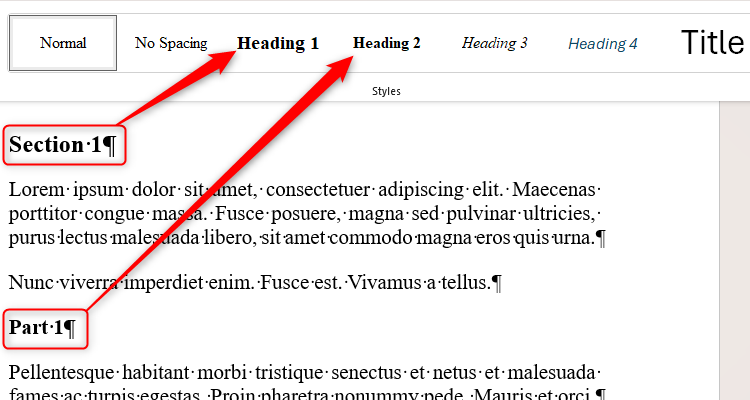
First, make sure you have assigned all the titles in your document to a Heading Style because Word refers to these when creating the automatic table of contents.
Second, add page numbers to your Word document, so that your table of contents is easy to use.
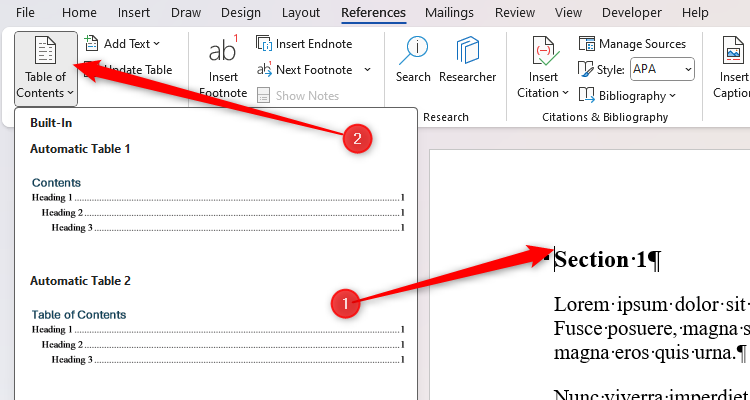
Then, place your cursor where you want the table of contents to go, and click “Table Of Contents” in the Referencing Tab.
You can either choose from the preset options, or click “Custom Table Of Contents” to customize how it will appear.
If you make further changes to your work after adding the table of contents, right-click anywhere on the table, click “Update Field,” and choose either “Update Entire Table” or “Update Page Numbers” to make sure it reflects your updated headings and page numbers.
3 Compress Your Images
Having lots of images at the default 220 PPI (pixels per inch) or higher in your lengthy Word document could cause it to become sluggish. One way to get around this and speed up your Word document is to compress the images. Just bear in mind that doing this will reduce their quality, so you might be selective over which ones you choose to compress.
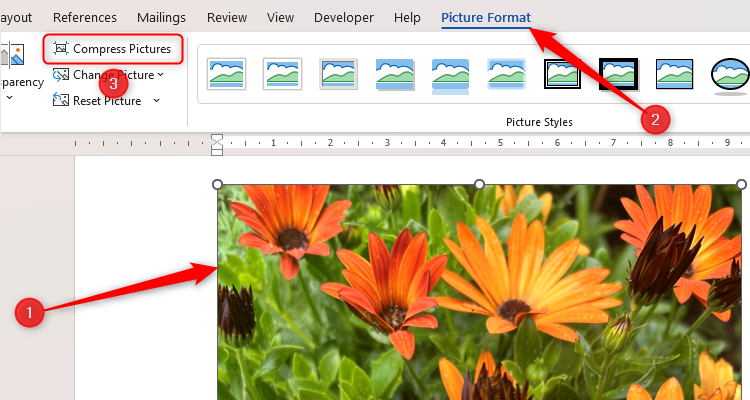
To compress a single image, select the image, and click “Compress Pictures” in the Picture Format tab on the ribbon.
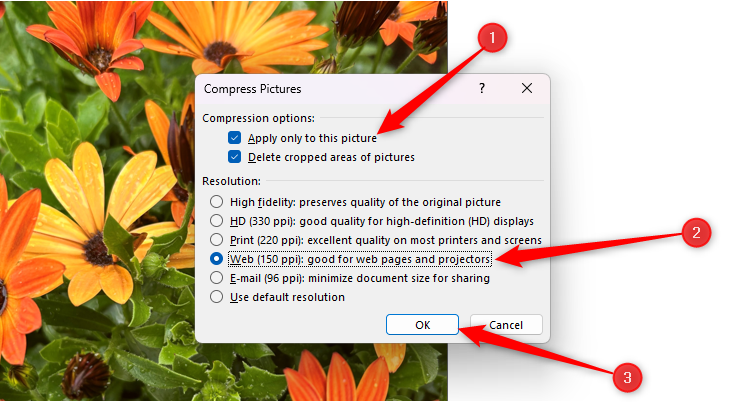
In the Compress Pictures dialog box, check “Apply Only To This Picture,” and choose “150 PPI.” Using this resolution will significantly reduce the image’s impact on your document performance without overly compromising its quality. Then, click “OK.”
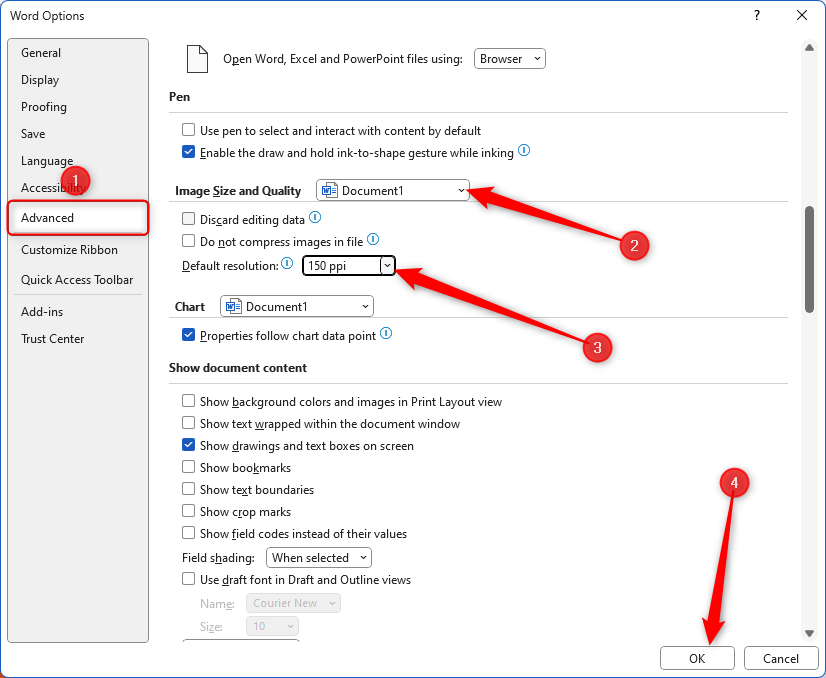
To compress all images simultaneously, click File > Options, and select the “Advanced” tab in the left-hand menu. Then, locate the Image Size And Quality section, and make sure the document you’re working on is selected in the first drop-down field. Change the “Default Resolution” drop-down to “150 PPI,” and click “OK.”
Now, if you add any more images to your work, they will automatically adopt this new default resolution you selected.
4 Control Tables Across Pages
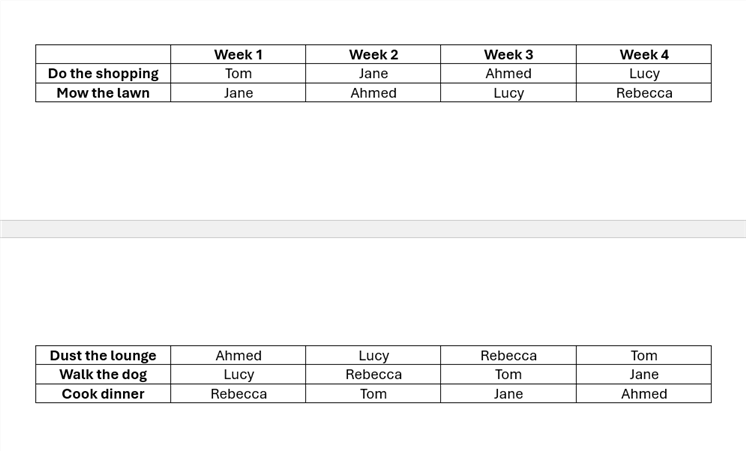
Tables are a great way to present data, but they can instantly become difficult to interpret if they span two pages in a lengthy document.
To keep a smaller table on one page, first select every row except for the bottom row.
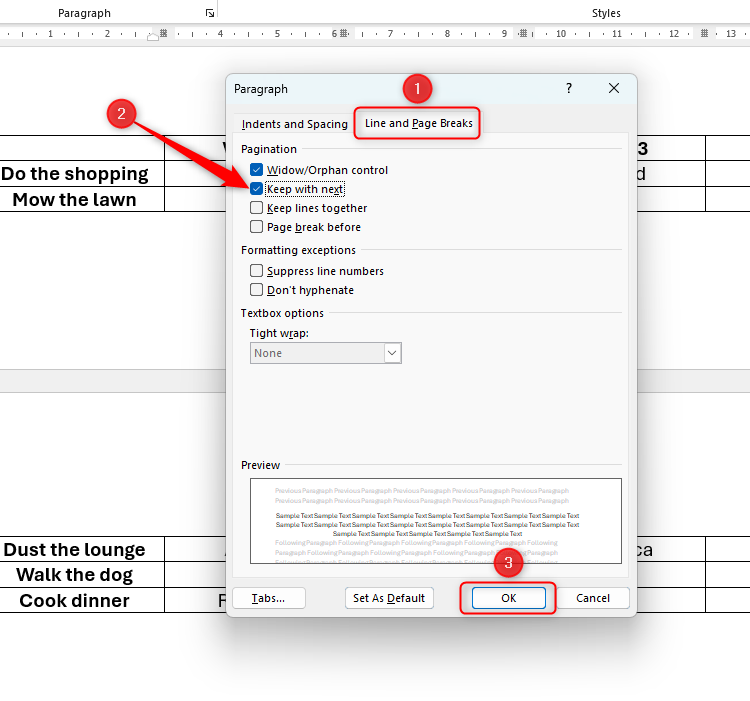
Then, click the “Paragraph Settings” icon in the corner of the Paragraph group of Home tab on the ribbon.
In the Paragraph dialog box, open the “Line And Page Breaks” tab, check “Keep With Next,” and click “OK.”
Word will then force the whole table to move to the next page.
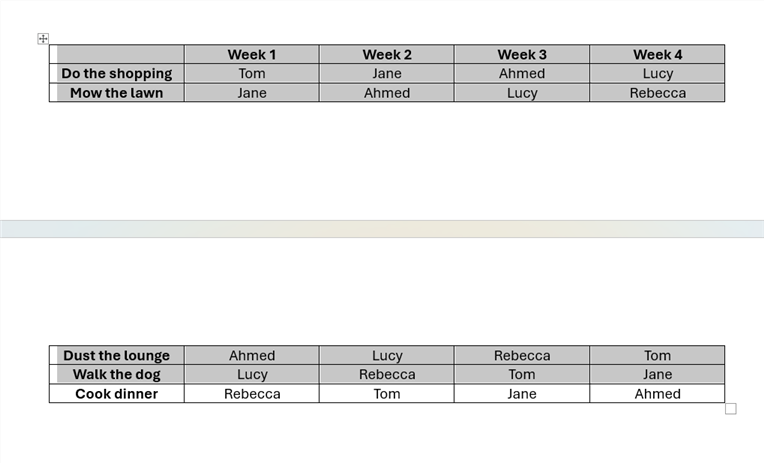
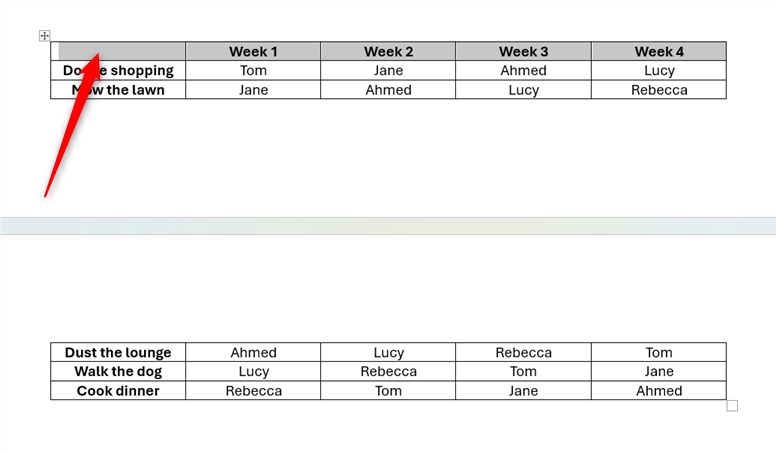
The other option is to keep the table spanning two pages, but repeat the header row. This means you won’t end up with lots of white space in your document, while making your table easier to read.
Start by selecting the header row.
Then, in the blue Layout tab on the ribbon, click “Properties.”
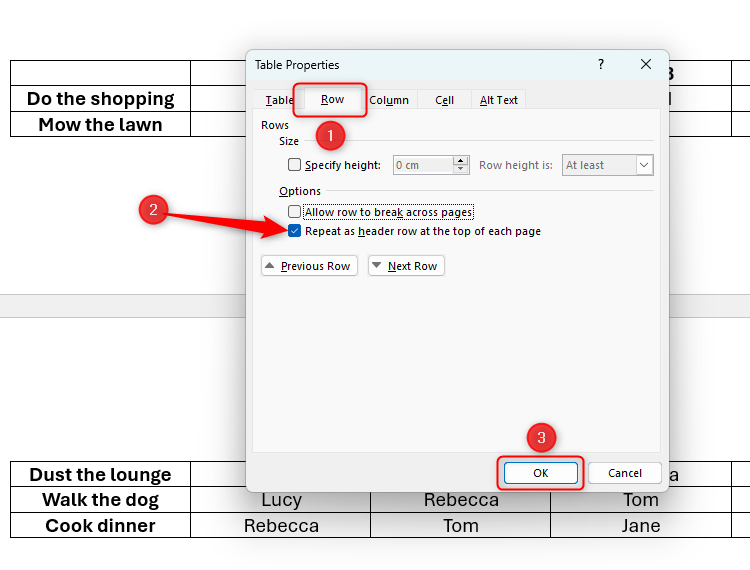
Finally, check “Repeat As Header Row At The Top Of Each Page” in the Row tab of the dialog box that opens, and click “OK.”
Word will now force your header row to repeat when your table extends to a new page.
5 Get Word to Read Your Work Aloud
Proofreading your work is a crucial step in ensuring it’s of the highest quality, but this can be an arduous task if your document is lengthy. Luckily, Word can read it aloud for you.
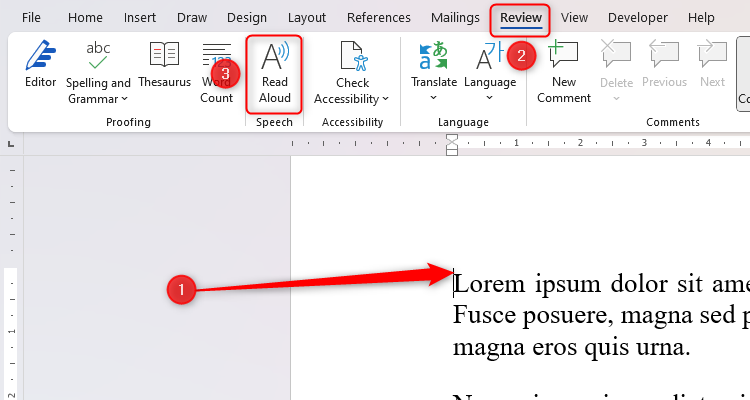
Place your cursor at the start of your work, and click “Read Aloud” in the Review tab. Press Ctrl+Space at any time to pause and resume the playback.
If you intend to print your lengthy document, make sure your Word document is printer-ready so that what you see on screen is replicated on paper.


