Sharing an Excel file properly is just as important as creating it professionally. That’s why I always review the file’s formatting, correct any errors, back it up, and apply password protection before sharing it. Here’s a checklist of everything I do before sending my file to colleagues or clients.
1 Remove Unnecessary Data to Clean the Spreadsheet
Before sharing an Excel spreadsheet, one of the first things I do is tidy it up to make it easier for the recipient to navigate. I remove unnecessary data and check the formatting to ensure I’ve used consistent fonts, sizes, and styles throughout the spreadsheet. If the workbook has multiple sheets, I ensure the format is consistent throughout.
I also check that I’ve used consistent numbers, text, and date formats and that data is consistently aligned within cells across the workbook. I remove empty columns and rows, delete any notes, and remove unnecessary calculations used while preparing the sheet. Also, I remove duplicate entries and properly label columns and rows.
To avoid surprises, I open the spreadsheet on my other computer and smartphone to see how it will appear on the recipient’s end. This helps me catch formatting issues beforehand.
2 Check the Spreadsheet for Errors and Issues
Once my Excel spreadsheet looks cleaner, I check for and fix errors. I ensure formulas are correctly set up, look for incorrect cell references, and use Excel’s built-in error-checking tools to catch critical calculation problems. I use the trace precedent and dependent tools to find incorrect links and missing references.
I also verify that any embedded links point to the intended destinations. When using conditional formatting, I ensure the rules work as expected. I sort and filter the data to confirm everything is working correctly. I don’t overlook seemingly simple steps, like running a spell check, to catch any spelling mistakes.
These steps help me identify potential problems early on, preventing confusion or misinterpretation of data by the recipient.
3 Protect Your Workbook With a Password
I always password-protect my Excel spreadsheet before sharing it, especially if it contains confidential information. This allows me to control who can access it and make changes to the document. While I personally don’t use these options, you can set different passwords to lock individual sheets, the workbook structure, and more.
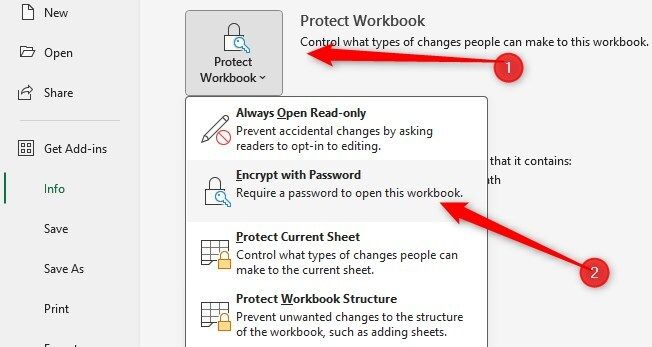
When sharing the password, I use a different, more secure channel than the one used to send the file. I also double-check that the password protection works correctly. To password-protect an Excel file, click on the “File” tab, select “Info,” then click “Protect Workbook,” choose “Encrypt with Password,” and set a strong, unique password.
4 Add Clear Instructions for Publicly Shared Spreadsheets
Before sharing a spreadsheet publicly, I add clear instructions to ensure that users of all expertise levels can understand and use the sheet. I clearly mark where users need to enter data or perform calculations, explain complex formulas, and use comments, notes, and color coding to highlight key outputs and important sections.
I also add my email address in the file so anyone encountering a problem can quickly contact me. Also, I change the file’s access permissions to View-Only (more on that later). This prevents others from making changes to the original file while allowing them to view it and, if needed, create their own copies.
5 Create a Backup Copy of Your Workbook
I always create a backup of my Excel spreadsheet before sharing it. This way, if someone unintentionally alters the document, I can still access the original copy, upload it to the drive, and share it again. The backup also protects me from losing data if the original file is corrupted or accidentally deleted.
Also, when making new changes, I can use the backup instead of tampering with the original file. When working in Excel’s desktop app, I create a backup by saving the file in two locations. When using Excel online, I either download the file for backup or create an online copy and store it in OneDrive’s Personal Vault for added security.
6 Adjust Sharing Settings as Needed
Before sharing any Excel file, I always adjust the sharing settings to ensure that only the intended recipients can access it with the appropriate level of permission. If I want others to view the file, I set the permissions to view only. If I want them to be able to make changes, I keep the file editable.
I can also share the file with different recipients and customize the access permissions individually. I set an expiration date for time-sensitive files that automatically revoke access after a certain time. I inform the recipients about their permission levels and test the file to ensure users won’t be locked out due to misconfigured permissions.
7 Ensure the File Is Optimized for Printing
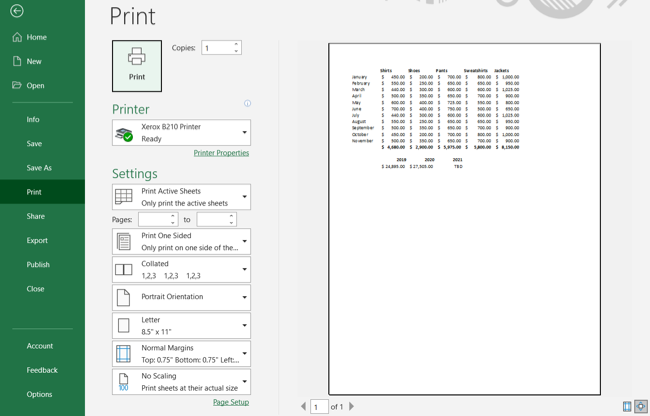
If I know the recipient will print the Excel file and use it in the physical form, I check that the content fits nicely on the pages based on the paper size and orientation they will use. I review and adjust page breaks to ensure data isn’t awkwardly split between pages and double-check that no critical elements are hidden or missing.
I only send the file after previewing how the printed document will look. I also print the document whenever possible to ensure everything works fine.
8 Consider the File Format and Size
I also keep in mind the file format when sharing. If I only want the recipient to view the file, I convert it to a non-editable PDF that perfectly preserves its presentation. I keep the file in its original format (XLSX) if the recipient needs it in the original format. I also ask if the recipient uses an older version of Office to save the file in a compatible format.
I also ensure the file size isn’t too large to cause problems when sharing via email. If it’s large, I compress and resize images or graphics, delete unused sheets, or save the file in a compressed format to reduce its size. If the file size remains an issue, I upload it to the cloud and share a download link instead of the file itself.
These are some practices I consistently follow whenever I share a file. They help me identify issues in advance and avoid embarrassment. It also saves the recipient from having to do back-and-forth checks to understand the spreadsheet. This also saves me time by eliminating the need for additional explanations.


