Microsoft Word is a powerful word processor, but it can also be a source of frustration at times. Knowing how it can sometimes test your patience and how to deal with it can lead to a better experience.
1 Unwanted AutoCorrections
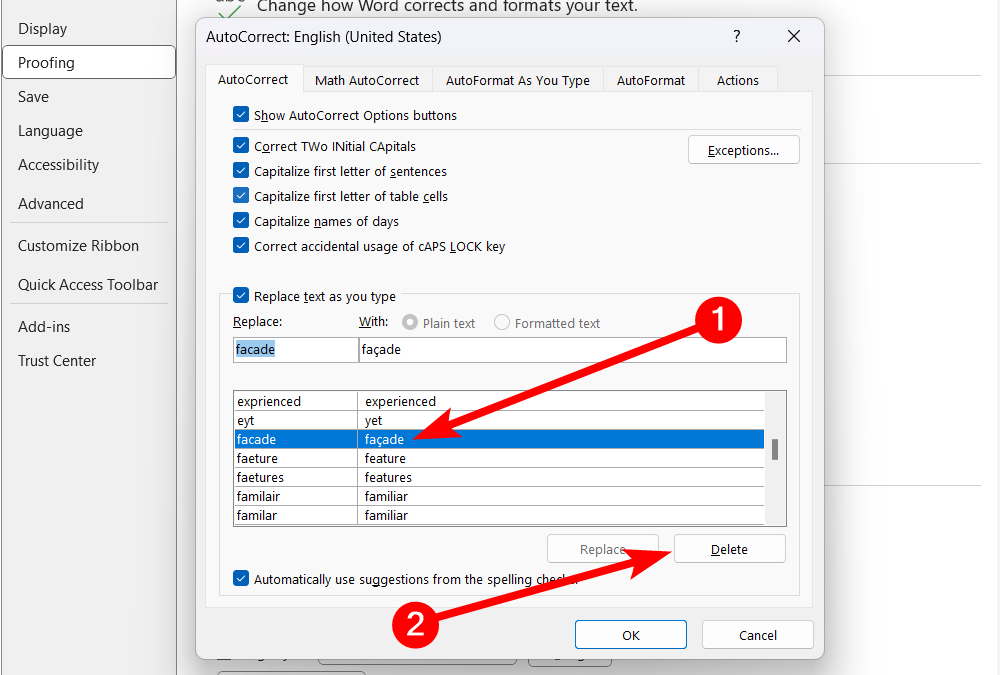
Sometimes Microsoft Word can change words based on your AutoCorrect settings. For instance, you might want to write facade but find Word has changed it to façade by including a cedilla under the letter c. Word might also automatically capitalize or uncapitalize words when you don’t want it to.
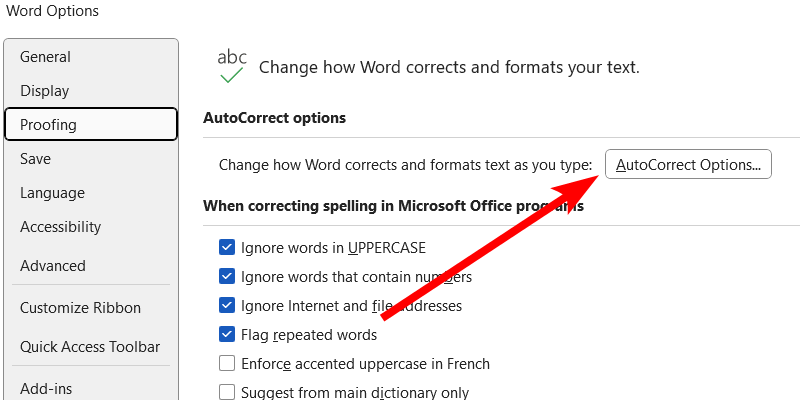
To fix these unwanted corrections, go to File > Options > Proofing and click “AutoCorrect Options” in the dialog box.
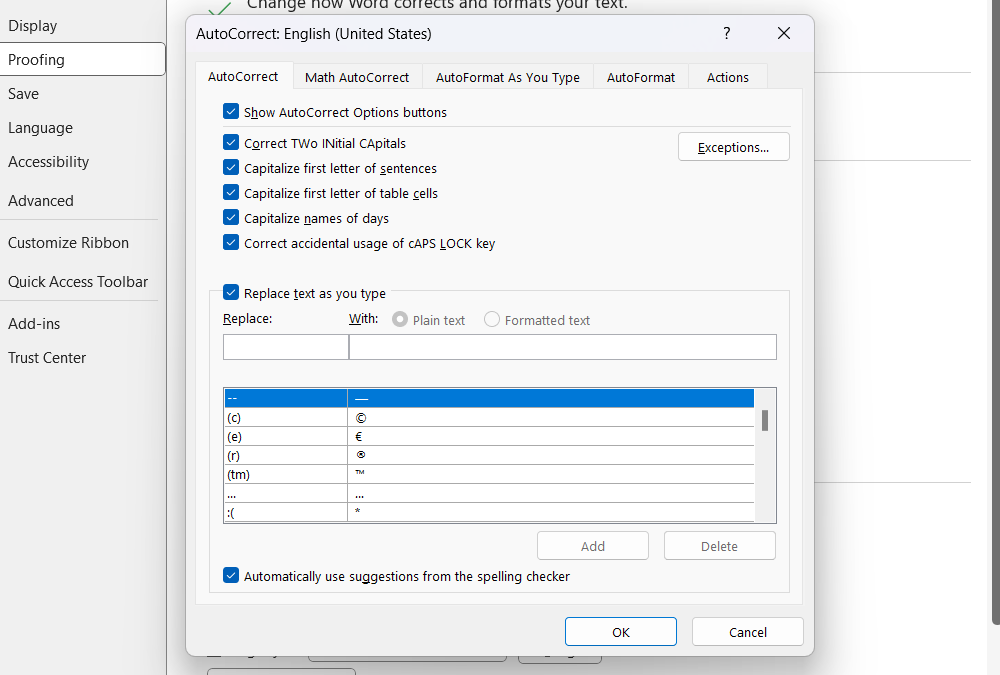
Next, select the “AutoCorrect” tab and adjust the settings accordingly. You will see several checkboxes you can check or uncheck here. For instance, if certain words keep getting changed automatically, you can uncheck “Replace Text as You Type” to turn off that feature for all words.
Alternatively, you can delete a specific word from the list to prevent it from being corrected automatically. To do this, select the word in the list and click the “Delete” button.
Afterward, click the “OK” button to close the dialog box and apply the changes.
If you’re intentionally misspelling some words and don’t want Word’s reliable spell checker to automatically replace them with its top suggestions, you can uncheck “Automatically Use Suggestions From The Spelling Checker” at the bottom of the dialog box.
2 Unwanted AutoFormatting
On top of auto-correcting words, which can be annoying if that is not something you want, Word can also apply formatting automatically sometimes. It can be frustrating to undo the formatting every time Word thinks it knows what your document needs more than you do.
For instance, if you type a number followed by a period and then hit the Space bar, Word will automatically format that into a numbered list. Another example is if you type two hyphens (–), Word might automatically turn them into an em dash (—).
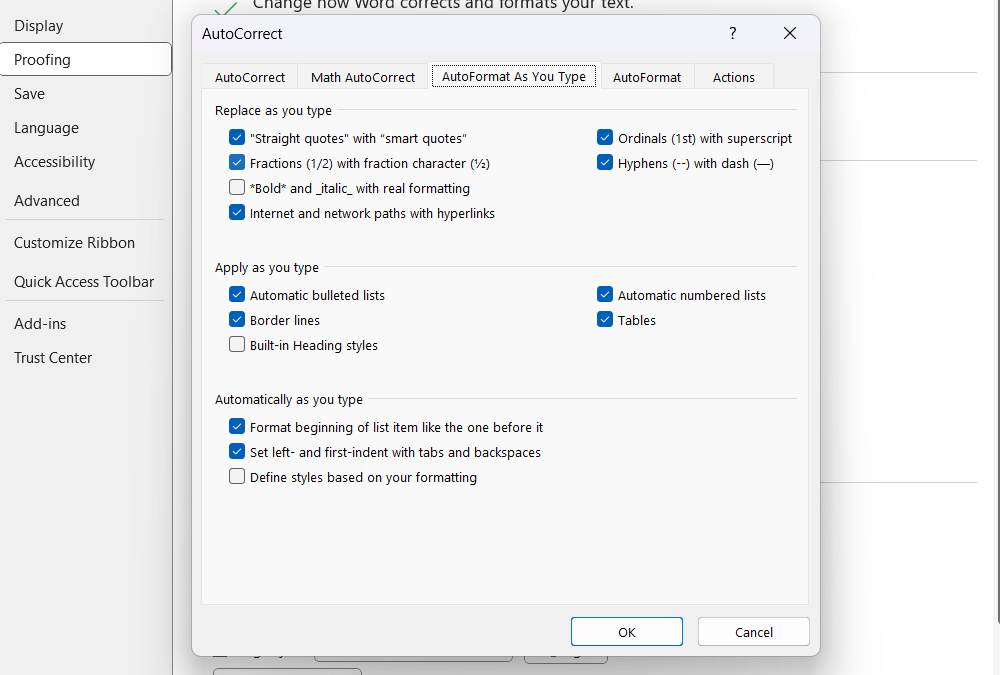
If you want to disable these autoformatting annoyances, go to File > Options > Proofing and click the “AutoCorrect Options” button. In the AutoCorrect dialog box, select the “AutoFormat As You Type” tab and uncheck the boxes of things you don’t want to be automatically formatted.
If you disable some AutoFormatting options, you can always improve your formatting skills in Word to have better control of that aspect of your document.
3 Cluttered User Interface
Word has a lot of features that you’re not going to use, and they tend to clutter the interface. This can make Word confusing and overwhelming, especially for new users. You can hide or disable some UI elements to make it less cluttered.
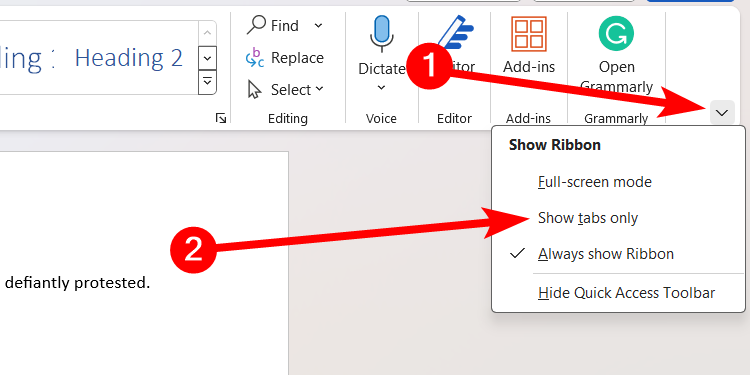
For instance, you can hide the ribbon by clicking the down arrow in its bottom-right corner and selecting “Show Tabs Only” in the menu. Alternatively, you can press Ctrl+F1 to hide it.
The ribbon will collapse whenever you select a tab. It will become hidden again whenever you select a different part of the document.
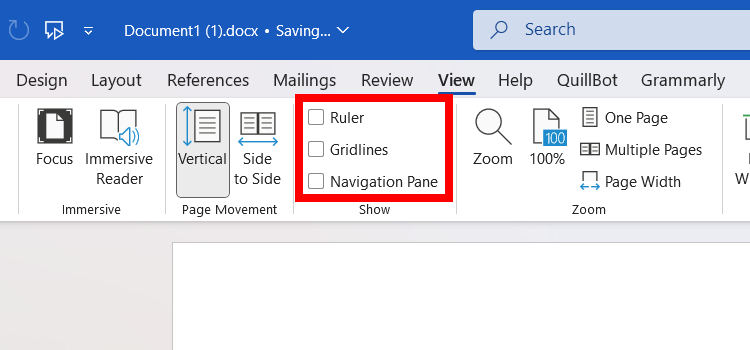
You can also select the “View” tab and uncheck “Gridlines,” “Ruler,” and “Navigation Pane” in the Show section of the ribbon.
But if you want to work distraction-free, you can do it in full-screen mode. Just click the down arrow in the bottom-right corner of the ribbon and select “Full-Screen Mode” in the menu.
I mentioned setting the ribbon display option to only show tabs earlier. If that behavior is not what you wanted, and it’s somehow enabled, it can be extremely frustrating, since you now have to click on tabs to bring up the ribbon.
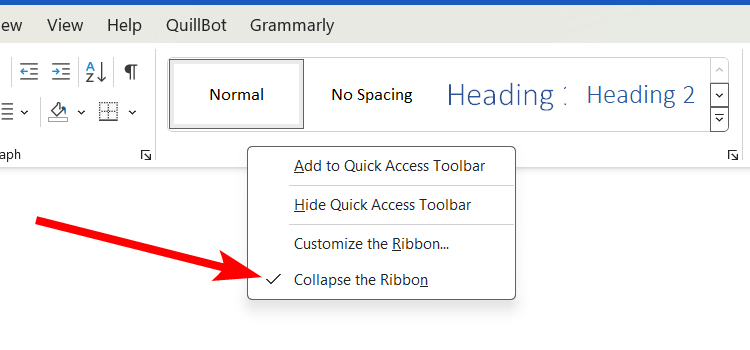
You can easily solve this by selecting any tab to bring up the ribbon. Then, right-click anywhere on the ribbon and check if the “Collapse the Ribbon” option has a check mark next to it. If it does, click it to uncheck it.
This will set the ribbon to always show. Alternatively, you can press Ctrl + F1 to bring up the ribbon. This will also ensure it always shows.
5 AutoRecover Failure
Sometimes you can accidentally close documents without saving them first, or Word or your computer may crash. Word has a feature called AutoRecover that temporarily stores a copy of the document at set intervals, allowing you to restore unsaved work when something unexpected happens.
However, you can lose unsaved work if the unexpected document closure happens before AutoRecover can make a copy.
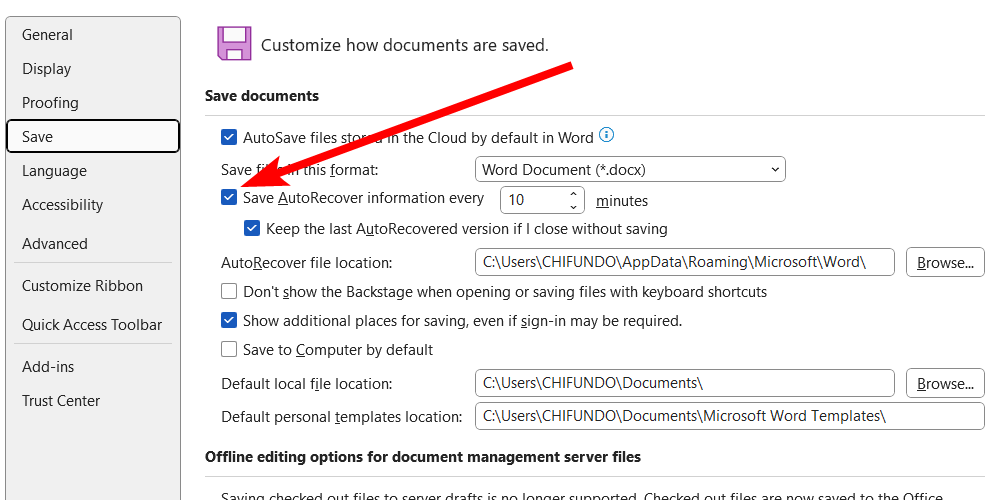
To fix this, you first need to ensure that AutoRecover is working. Go to File > Options > Save and ensure the checkbox next to “Save AutoRecover Information Every X Minutes” is checked. If not, check it.
If you fear this might happen again, you can reduce the time intervals between saves. Alternatively, you can turn on AutoSave to ensure that any change you make is saved automatically to OneDrive.
6 File Corruption
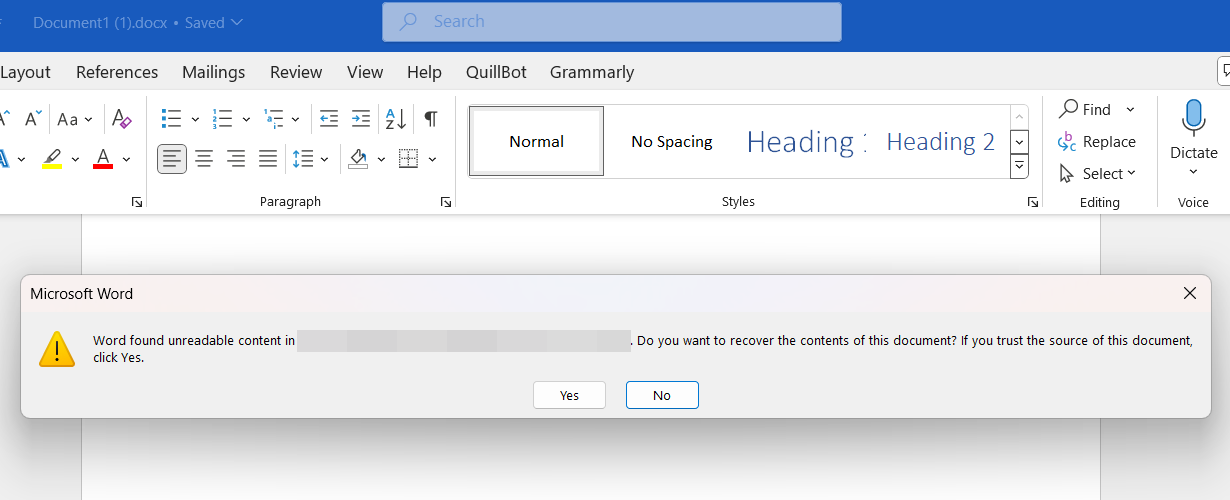
Sometimes, Word files can become corrupt. This can happen for several reasons, including crashes or file format incompatibilities. To fix this, you can use Word’s repair feature by opening the document and clicking “Yes” in the prompt asking if you want to recover it.
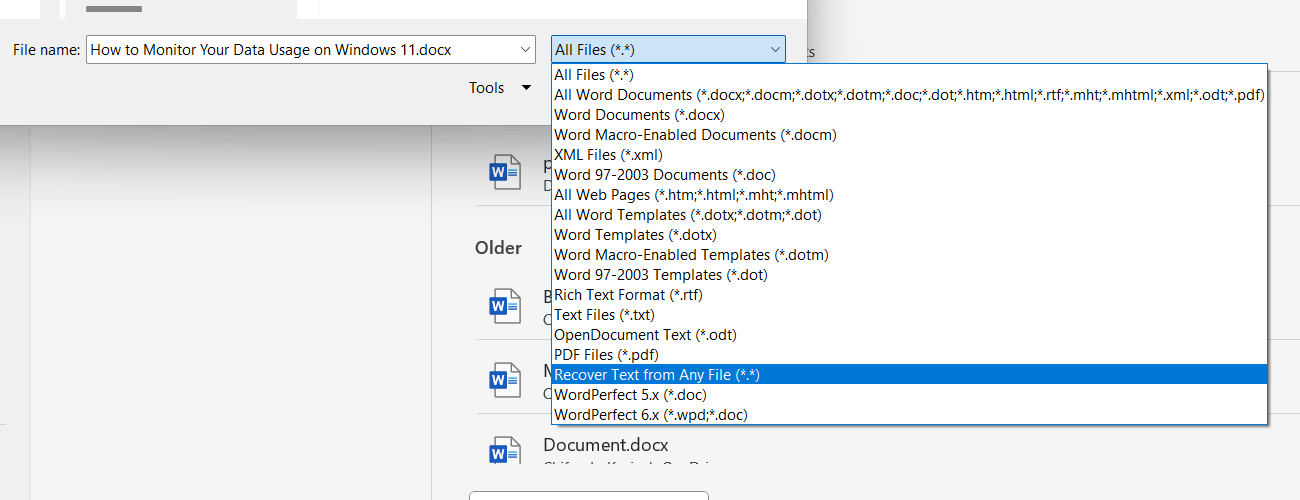
You can also use the Recover Text From Any File feature. This will remove any formatting in the document and only give you plain text.
To do that, click File > Open and select the file in the Open dialog box. Click the dropdown next to the File Name text box and select “Recover Text From Any File” in the menu.
Afterward, click the “Open” button to start the recovery process.
7 Slow Performance with Large Documents
A Word document with complex formatting and many elements (e.g., tables, images, shapes, charts, and graphs) is not a problem if it’s small. But in larger ones, this can make Word sluggish, especially when loading or saving documents.
Even typing and scrolling can become a chore, leading to frustration. These problems are especially noticeable on less powerful computers.
Besides waiting for Microsoft to make Word even more memory-efficient or purchasing a better computer, you can reduce the size of the document by making it less complex. For instance, you can simplify or clear the formatting, use smaller images, or replace large media files with links.
You can also speed up your Word document in other ways, such as turning off AutoSave or removing unnecessary add-ins and macros. You can even try breaking the document into two or more separate documents.
While Microsoft Word can be frustrating at times, understanding its common issues and their solutions can greatly improve your experience. By applying these tips when the issue arises, you’ll be able to use Word more efficiently and effectively in your daily work.


