I’ve been a Twitter (now X) user for almost a decade, but I recently installed Bluesky on my device, and I think it’s going to be my next X. While most of Bluesky’s default settings are fine, there are seven options I recommend you change right away if you make the switch.
1 Change the Dark Mode Settings
By default, Bluesky’s color scheme is set to match the system settings. This means if your smartphone is set to dark mode, Bluesky will also appear in dark mode.
However, I prefer keeping my smartphone in dark mode while using apps in light mode. That’s why the first thing I did after setting up Bluesky on my phone was to change the color scheme.
If you want to change Bluesky’s color scheme, tap the hamburger icon in the top-left corner and select “Settings” from the menu. In the Settings menu, go to “Appearance” under the Basic section. From there, you can choose your preferred color mode and theme. If you select the dark scheme, you’ll also have the option to choose between Dim and Dark themes.
Additionally, in the Appearance menu, you can customize the font theme and font size to your liking.
2 Adjust the Moderation Settings
I often hand my smartphone to my younger brother, and I really don’t want him exposed to any adult content or language when he checks out my Bluesky account. To prevent this, I’ve adjusted the moderation settings on Bluesky.
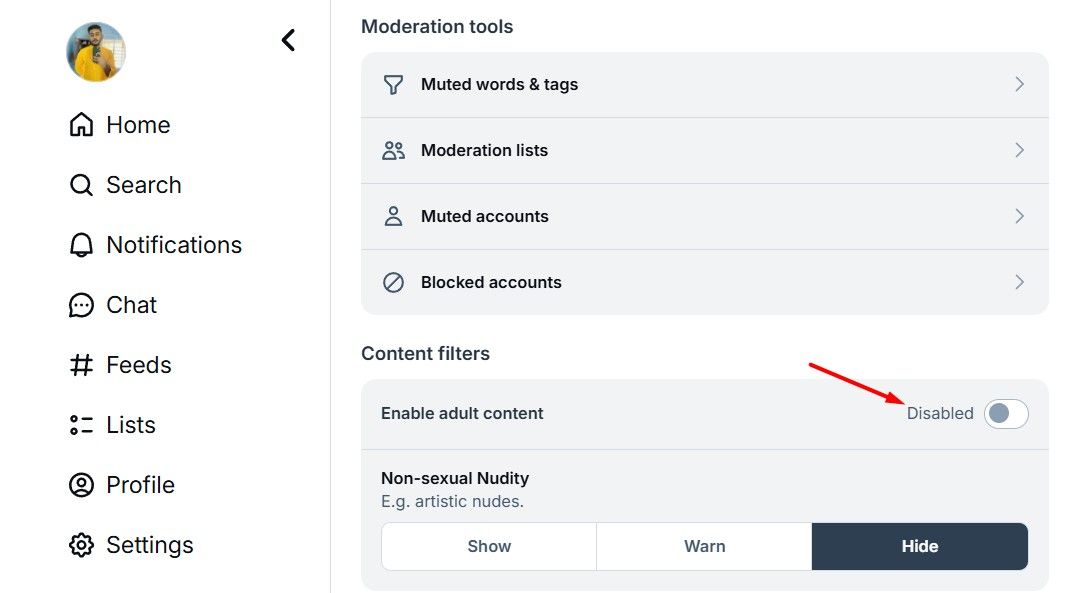
To hide adult content on Bluesky, go to the “Moderation” option in the Settings menu and tap the “Enable Adult Content” toggle. Then, under the Non-sexual Nudity option, select “Hide.”
In the future, if you want to enable adult content on Bluesky, you’ll need to do so through the web. Open Bluesky on your desktop, select “Settings” from the left sidebar, go to “Moderation,” and turn on the “Enable Adult Content” toggle.
To ensure Bluesky doesn’t show words or tags you don’t want appearing on your account, go to the “Muted Words & Tags” option in the Moderation window. Enter the words or tags you want to block, set the duration for which you want them muted, and tap the “Add” button.
If you decide to remove muted words from the list later, open the “Muted Words & Tags” option and tap the cross icon next to the word you want to unmute. This will allow you to see those words again.
3 Fix the Thread Sort Order
I’ve always believed that the more likes a reply gets, the more interesting it is. However, by default, when you view a thread on Bluesky, the platform shows you the oldest reply in the thread first. Since I prefer reading replies with the most likes, I’ve changed the thread preference settings to display the most liked replies first.
To update your thread preference settings, open the Settings and go to “Thread Preferences.” This may be under a “Content and Media” option, depending on your device. Now select “Most-Liked Replies First” under the Sort Replies section, or whichever sort order you want.
Additionally, if you want more of a Reddit-like experience while browsing threads on Bluesky, you can enable the “Threaded Mode” toggle, which is an experimental feature at the time of writing.
4 Choose Who Can Message You
Just like most social media apps, Bluesky lets you configure who can contact you via messages on the platform. Since I often receive collaboration requests from different companies, I’ve set this option to “Everyone,” which means anyone with a Bluesky account can reach out to me.
However, if you’d prefer that only your followers can message you, go to the Settings menu, select “Chat Settings,” and choose “Users I Follow.”
iPhone users need to open “Chat” from the hamburger menu and tap the “Filter” button in the top-right to find this option.
5 Set Up App Passwords
App Passwords is one of the most interesting features on Bluesky. These are per-application passwords that allow you to integrate platforms like SkyFeed, built by the Bluesky community, into the platform.
To use App Passwords, go to the Settings menu and select “App Passwords.” Depending on your device, this option may be under “Privacy and Security.” Then, tap “Add App Password.”
Enter a name for your app password. You should choose a name that makes it easy to identify the app the password is for. You’ll also see an “Allow Access to Your Direct Messages” checkbox. I recommend leaving this unchecked because if the app with this permission is compromised or hacked, an unauthorized individual could gain access to your personal messages. Once done, click the “Create App Password” button.
On the next screen, you’ll see a unique app password. Simply copy the password and paste it on the login page for the third-party Bluesky client, like SkyFeed, you want to use.
Using app passwords ensures you don’t have to enter your main Bluesky password when signing in to third-party clients. You’ll only need to provide your Bluesky username or email address and the generated app password to log in.
6 Adjust the Content Language Settings
Bluesky supports a wide range of languages. This means that no matter what your native language is, you can easily use the app. However, the added advantage of using Bluesky is its content language settings.
This feature allows you to configure the languages you want your subscribed feeds to include. By default, it is set to English and French. Since Hindi is my native language, I have configured the settings to English and Hindi.
You can customize the content language settings to your preference by selecting “Languages” in the Settings menu. Then, tap the selected language under Content Languages. Choose your preferred languages and tap the “Done” button.
7 Enable 2FA
Enabling two-factor authentication is one of the most important security steps you can take these days. It requires you to enter a special code received via your selected method to log into your account, stopping other people from logging in even if they have your password.
Bluesky supports two-factor authentication through email. This means you’ll receive the code on your registered email address.
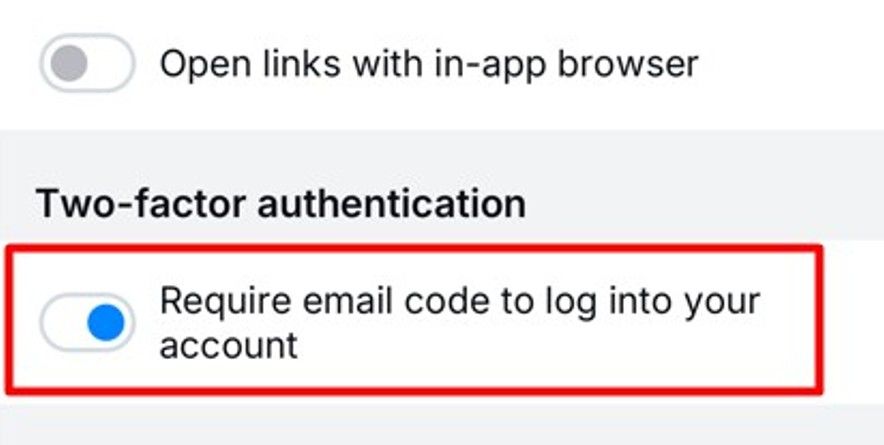
To enable two-factor authentication on Bluesky, turn on the “Require email code to log into your account” toggle under the two-factor authentication section. On iPhones, this is in the “Privacy and Security” settings.
Now, whenever someone tries to log into Bluesky on another platform, like on a desktop, you’ll receive a two-factor authentication code via email, which you’ll need to enter to complete the login process.
These are the first changes I made to my Bluesky account, and I’d suggest everyone takes a look at these options to get the app working best for them right away. There are also plenty of other settings on the platform that you can configure based on your preferences.


