Of the seemingly endless array of menus and tools for which Microsoft Word is well known, some have particularly ensured my loyalty over the years. Even though some of these features are in other word-processing programs, the fact that Microsoft Word offers them all makes it the number one for me.
What’s more, these features are available as default tools in Microsoft Word, where you would need to be confident using code if you wanted to use some of them in Word’s alternatives.
The tools I’m going to discuss relate specifically to the
Microsoft Word desktop app
. Some are also available on Word for the web for free, but not all.
Customizable Ribbon
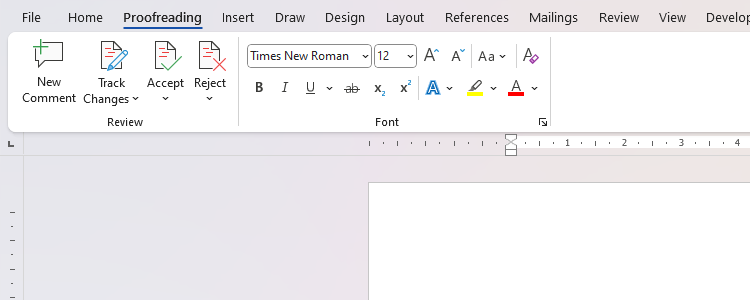
For me, Microsoft Word’s best offering is the ability to easily customize the tabs, groups, and commands you see on the ribbon (the part above where you do your work on Microsoft Word) and their order. You can even create new tabs and groups to suit the work you do, and it’s this level of detail that I particularly enjoy about the program.
In my case, as an academic proofreader, there are certain tools I use all the time, such as Comments, Tracking, and Changes, which are ordinarily in the Review tab, and Font and Style, which are in the Home tab. As a result, I’ve created a new tab called Proofreading, and inserted these tools into that new tab.
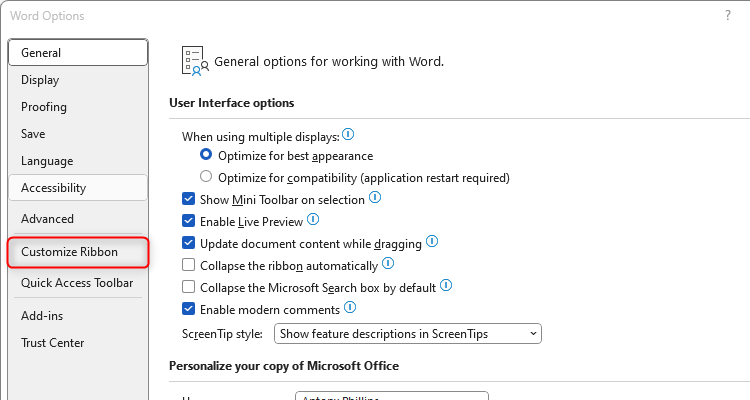
To do this, I clicked File > Options, and chose “Customize Ribbon” in the Word Options window.
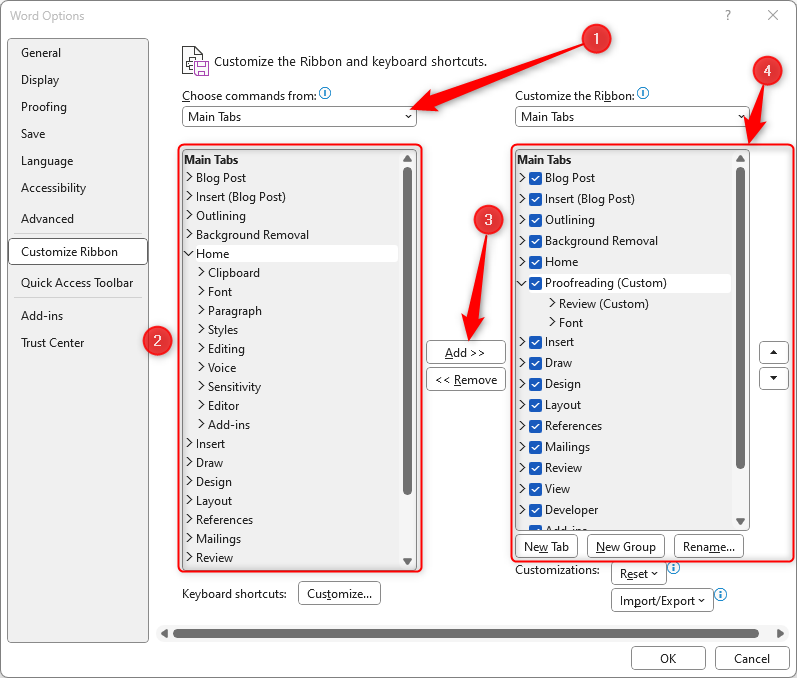
From there, you can make any necessary changes:
- Select “Main Tabs” in the Choose Commands From drop-down menu, as this lets you access the commands through the tabs you’re used to seeing on the ribbon.
- Locate and select a tab, group, or command you wish to add.
- Click “Add” to move it to the selected location.
- Reorganize the tabs, groups, and commands using the arrows on the right. Notice, also, the New Tab, New Group, and Rename options at the bottom, which you can click to further personalize your ribbon.
Finally, click “OK” to close the window and see the changes.
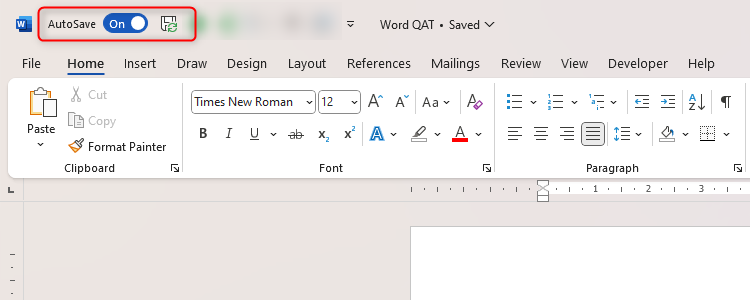
By default, the Quick Access Toolbar (QAT) is at the very top of your Word window, and it stores shortcuts to commands and options you use often. If remembering Word’s keyboard shortcuts isn’t your thing, Word’s QAT is the quickest way to do things that would otherwise take a few clicks, and it’s certainly one of Word’s features I find the most useful.
In my case, I’ve got tools such as the bullet-point list icon and a shortcut to the Style Gallery, as I use these tools every day.
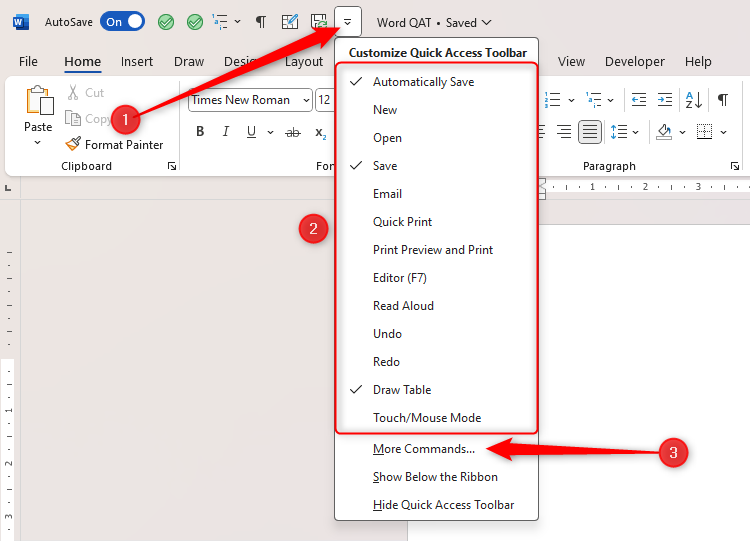
To customize your QAT, click the Customize Quick Access Toolbar down arrow on the right-hand side of the QAT. Then, you can either check or uncheck some of the default tools in the drop-down menu, or click “More Commands” to see more options.
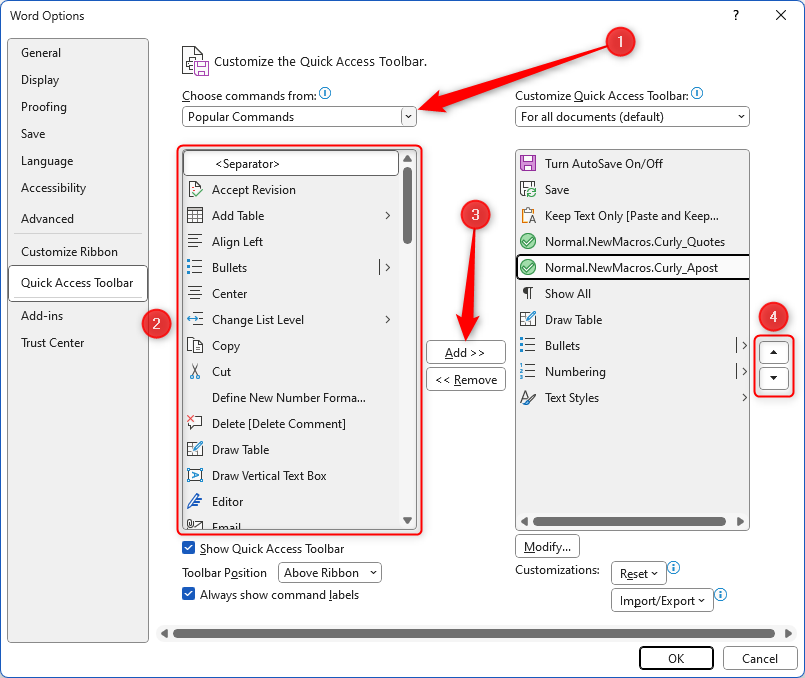
Next, choose either “Popular Commands” or “All Commands” in the Choose Commands From drop-down, locate and select a command, click “Add,” and use the arrows to reorder them.
When you’re happy, click “OK,” and immediately appreciate how much more quickly you get your work done!
Convert Text to Table and Vice Versa
Sometimes, I realize the information I’ve typed might look better as a table. Similarly, I might want to remove the table altogether, keeping just the text. Word is incredibly efficient at completing either process, whereas doing so manually would take time and likely result in errors.
This tool might seem like a niche pull factor, but it’s surprising how many times I’ve used it. What’s more, it’s not just the ability to convert text to and from tables that I appreciate—it’s the level of detail the program goes into concerning how this process is to be executed that makes it a cut above the rest.
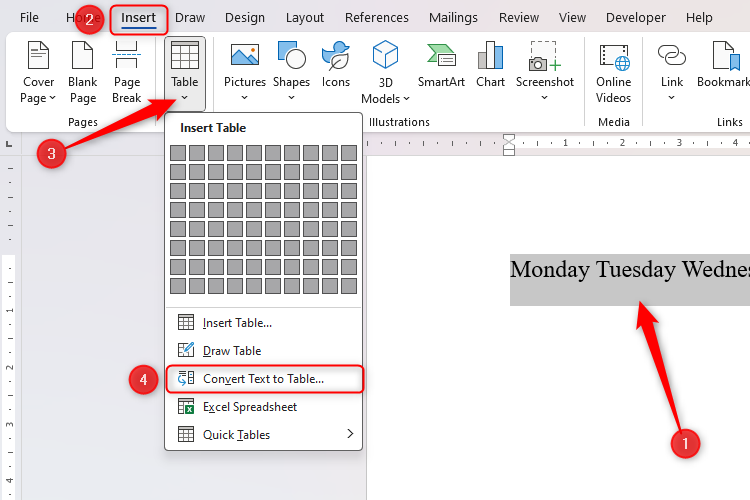
In this example, I want each of the days to go in a separate cell, forming what will be the header row of a table I’m about to create.
To convert this to a table, I need to select the text, and click the “Table” icon in the Insert tab on the ribbon. Then, I’ll select “Convert Text To Table.”
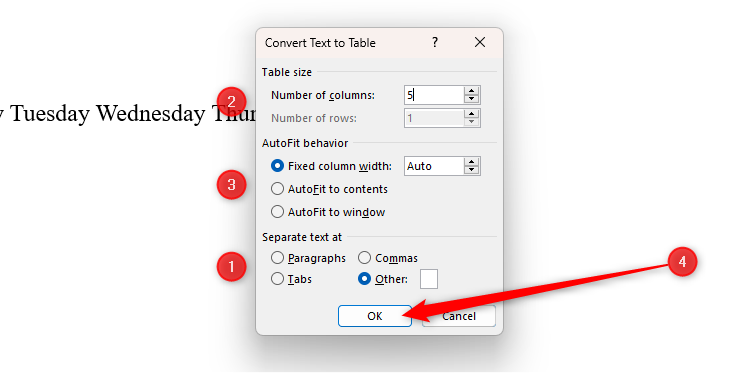
The resultant Convert Text To Table Dialog box is where the magic happens!
Even though you would expect to go through the options from top to bottom, I recommend starting with the Separate Text At section. This is because the first step is to decide where the table cell boundaries will go. In my case, I placed a space between each word, so I need to ensure the cell boundaries are defined at the spaces. Since this isn’t a default option, I checked “Other,” and typed a space in the empty field.
Then, the Table Size section at the top of the dialog box will update automatically to reflect what I selected at the bottom. Finally, for the AutoFit Behavior, I always go with automatically fixed column widths. Once I’ve checked I’m happy with the options, I’ll click “OK.”
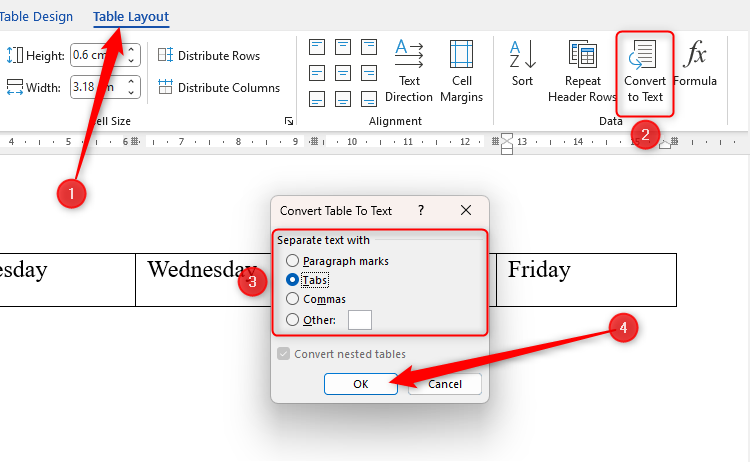
It’s just as easy to convert a table back to text. With your cursor anywhere within the table, click “Convert To Text” in the Layout tab. Then, choose how you want the text to be separated once the table has been removed, and click “OK.”
Merge Documents
While you could copy and paste text from one document to another, using Word’s merging tool takes less time, primarily because you only need the destination document open. It also omits the possibility of accidentally missing some content from the other documents.
As the tool’s name suggests, it’s for merging text. While pictures might be included in the merge, they might not display correctly.
I find this particularly useful for combining related documents. For example, after receiving chapters 1 and 2 of a paper separately, merging them means I can ensure they’re formatted consistently and written cohesively. Doing this in other programs, such as Google Docs, would require me to install an add-on, but Word enables this action within the desktop app.
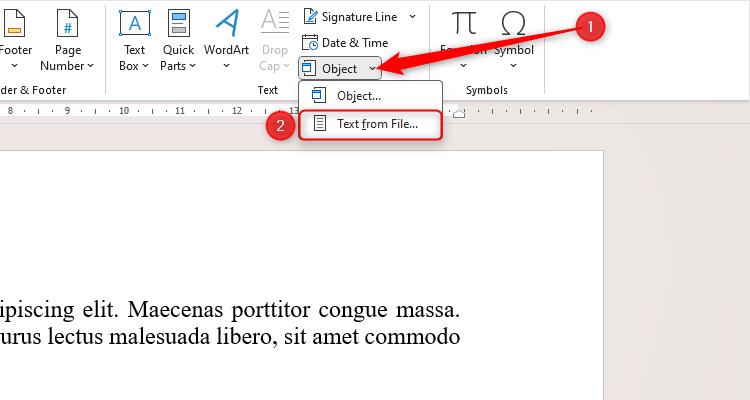
To do this, first place your cursor in the master Word document where you want the merged document to appear. Then, click the “Object” drop-down arrow in the Text group of the Insert tab, and choose “Text From File.”
Next, locate and select the relevant file, and click “Insert.” Hold Ctrl to select more than one document, and make sure you select them in the order you want them to appear when merged. When you click “Open,” the selected file(s) will be added to the active document.
Integration With Other Microsoft Apps
If you’re more of a G-Suite type of person, you could justifiably argue that Google Docs integrates seamlessly with other Google programs. However, since I use Excel, Outlook, PowerPoint, and other Microsoft apps, I appreciate how well they work together, especially since this relationship doesn’t require an internet connection to work harmoniously.
For example, I’ve often created a chart in Excel, knowing that it’ll cut and paste perfectly into Word. Similarly, I’ve used Word’s close relationship with Excel and Outlook through the program’s Mail Merge tool. You can also easily embed an existing or new Excel worksheet or PowerPoint slide into your Word document.
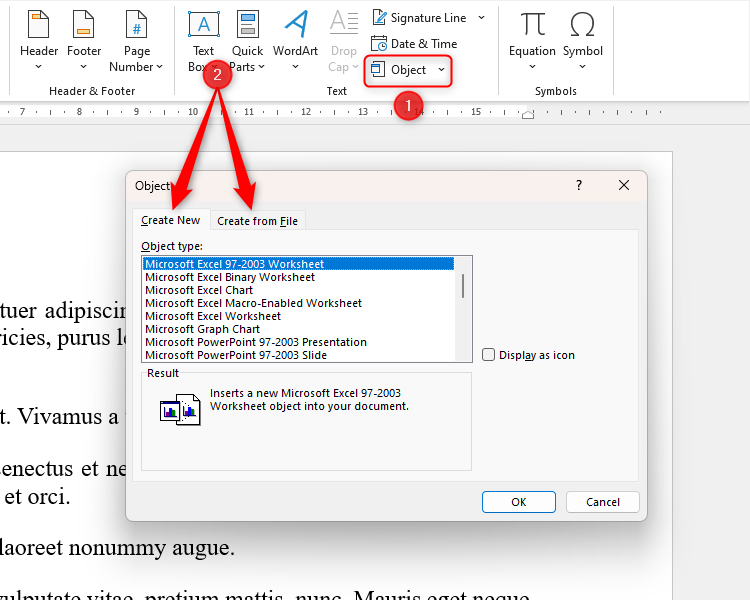
To do this, click “Object” in the Insert tab on the ribbon, and navigate to either the “Create New” or “Create From File” tab, depending on what you want to do. Then, choose the file or file type you want to embed, and click “OK.”
What I like most about this integration is that Word’s version of the embedding updates to match the source any time you close and reopen the document (unless you deactivate this function by clicking File > Options > Advanced, and unchecking “Update Automatic Links At Open”).
Even though I love using the Microsoft Word desktop app, I’m not going to argue it’s ideal for everyone, especially since it’s complex, resource-intensive, and costly. There are some good, free alternatives to Microsoft Word that you should try if you fancy a change.


