As the end of 2024 is fast approaching, if we look back, Windows 11 has received a number of improvements throughout the years, many of which became available through monthly cumulative updates, while many others rolled out (and are still rolling out) with the release of version 2024.
Some changes are entirely new, like the Sudo command for Windows 11, the ability to reverse mouse scrolling and Wi-Fi 7 support. Others, such as the archival creation wizard, File Explorer context menu labels, and shorter Taskbar date and time, are enhancements for existing features.
Also, this was a significant year for AI advancements on Windows 11. However, this recap will focus on my favorite AI experiences, excluding “Windows Recall,” as it wasn’t released to the Stable Channel.
In this guide, I’ll share my recap of features and changes that became available in 2024 for Windows 11.
Windows 11 features recap for 2024
The following list of Windows 11 changes is not presented in any particular order and only represents my subjective viewpoint.
1. Sudo command
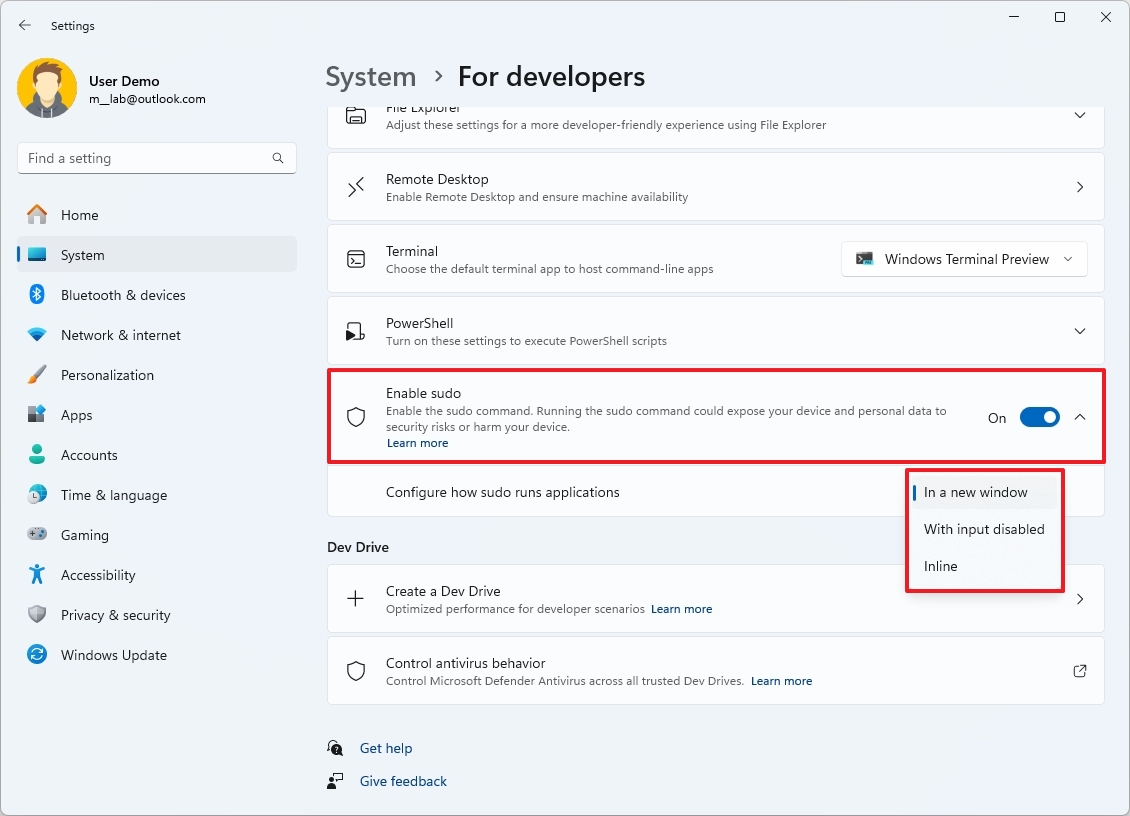
One of my favorite features for Windows 11 that became available in 2024 is the Sudo command. Sudo or “Superuser Do” is a command that allows you to run commands with elevated privileges without launching the Windows Terminal as an administrator.
The Sudo command has been available for many decades in Linux, macOS, and other Unix-based operating systems. However, the version available on Windows 11 is similar but limited to the one from other platforms.
You must manually enable the option from Settings > System > For developers and turn on the “Enable sudo” setting.
Once the feature is turned on, you have to choose one of the modes, including “In a new window,” “With input disabled,” or “Inline.” If you want to use it as you would in macOS and Linux, you must choose the “Inline” option.
2. Energy Saver
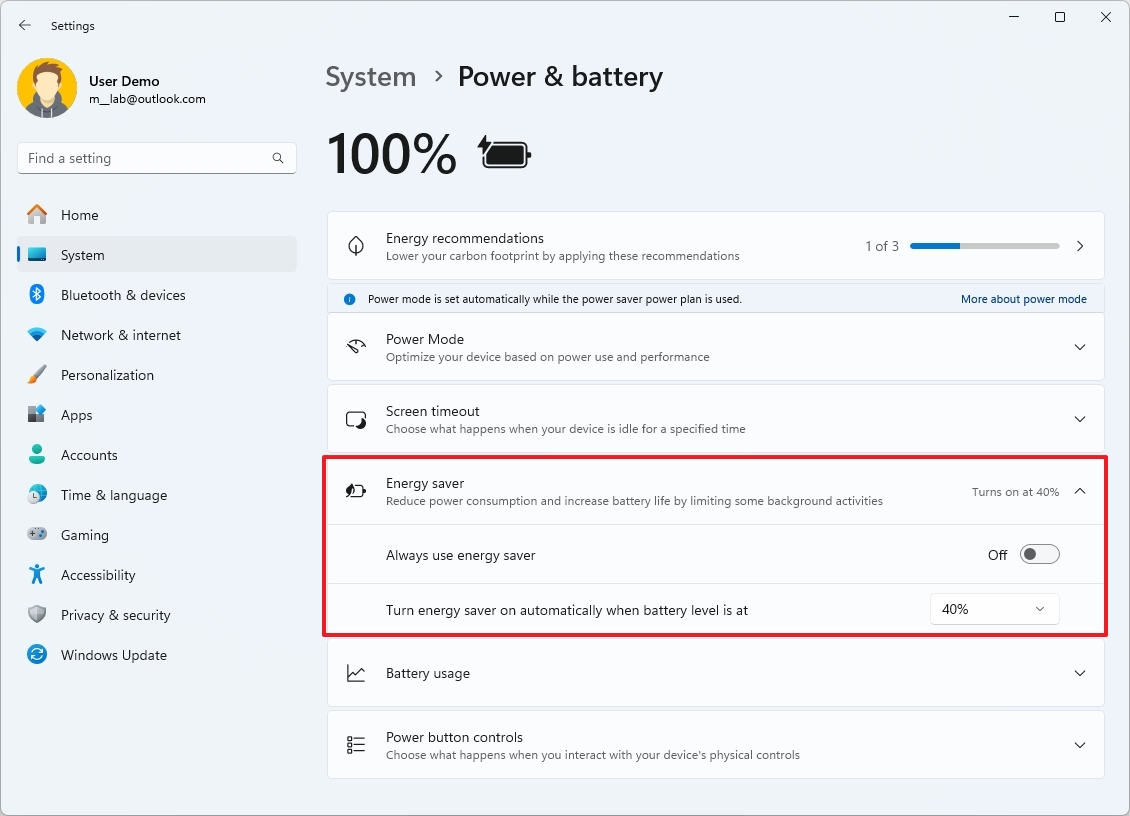
On Windows 11, “Energy Saver” is a new power-saving mode that helps conserve battery life and reduce energy consumption. The feature isn’t entirely new, as it combines the “Battery Saver” and “Power Mode” features already available in the operating system.
The best part of this new mode is that it works for laptops as well as for computers without a battery.
You can enable this feature from Settings > System > Power & battery (or Power), and turn on the “Always use energy saver” toggle switch or configure the battery level to turn it on automatically.
It’s also possible to turn on the “Lower screen brightness when using every saver” toggle switch to preserve even more energy.
3. Power button controls
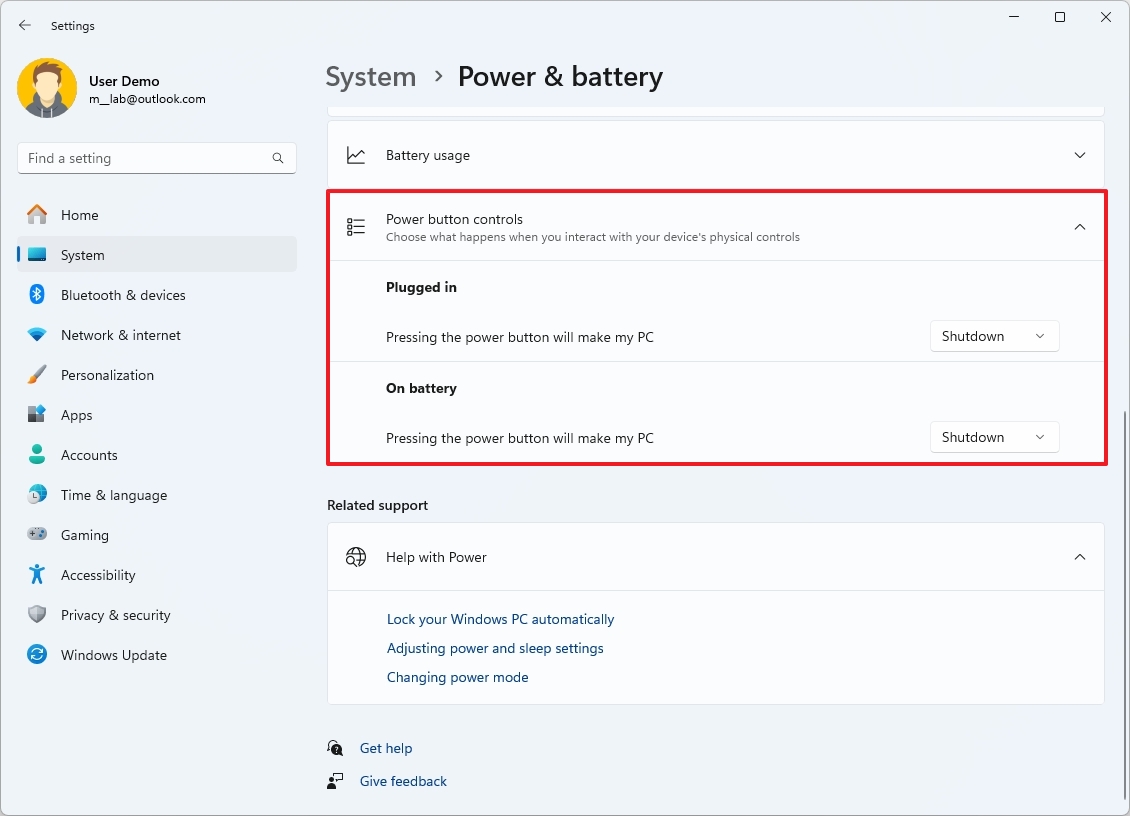
On Windows 11, you no longer have to open the legacy Control Panel to change the action of the power button or when closing the lid of a laptop.
If you have the latest release of the operating system, you can now open Settings > System> Power & battery (or Power), and on this page, you will find the new controls. If you have a laptop, you’ll find the “Lid & power button controls” setting or the “Power button controls” setting on your desktop computer.
In this section, you can choose the action for the button when the device is plugged in or running on battery. The options available include “Sleep,” “Hibernate,” “Shutdown,” “Display Off,” and “Do Nothing.”
4. Shorter date and time
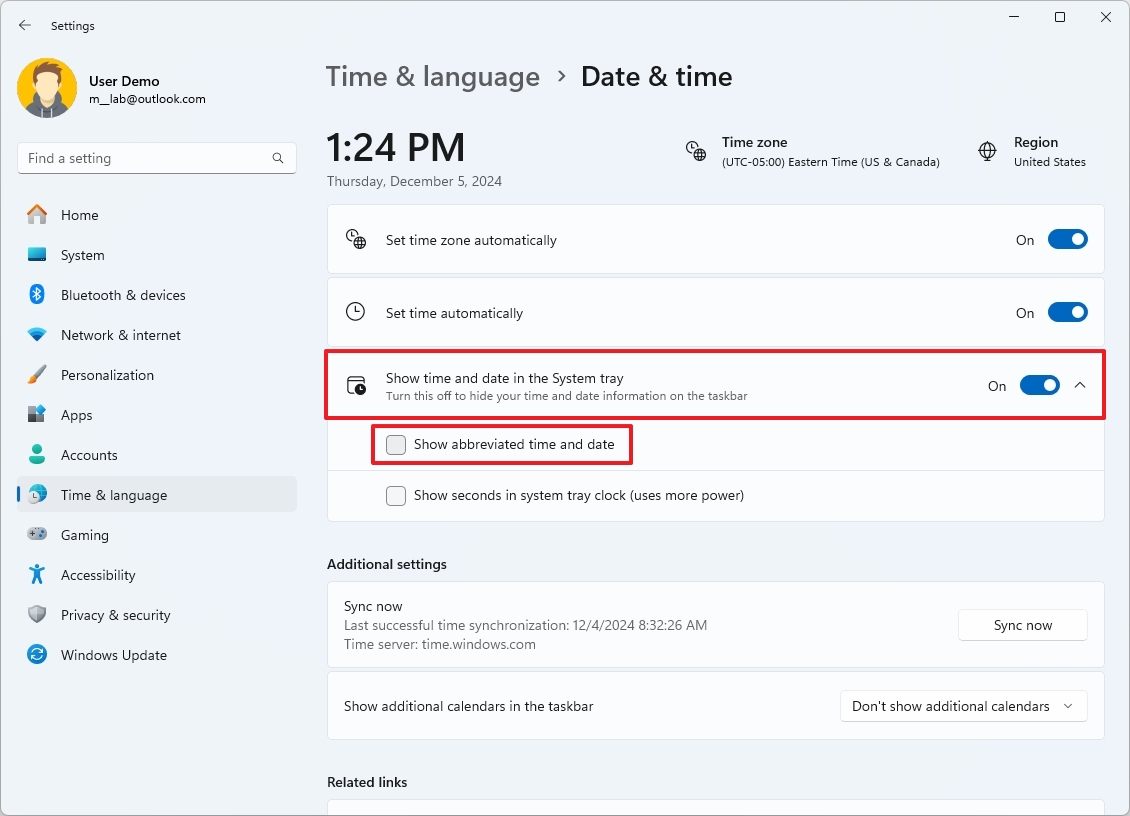
The next time you look at the System Tray in the Taskbar, you will notice that the date and time now appear in a shorter format, which means that you will no longer see the AM/PM annotation or the four digits for year in the date information.
This is actually the new default format for the clock in the Taskbar, but if you want to roll back to the legacy format, you have to open Settings > Time & language > Date & time, click on “Show time and date in the System tray,” and clear the “Show abbreviated time and date” option.
5. Taskbar shortcut navigation
Microsoft has been adding other improvements to the Taskbar, including the ability to navigate the apps using their first letter. For example, if you use the “Windows key + T” keyboard shortcut to bring up the Taskbar to focus, you can now press the first letter of the name of an application to bring it to focus.
If you keep pressing the same letter, you’ll be able to cycle through all the apps that begin with that first letter.
If you’re using the uncombined option for apps in the Taskbar, the first letter will be the name of the window. Also, if you press the “Home” and “End” keys, the focus will go to the first and last item in the Taskbar.
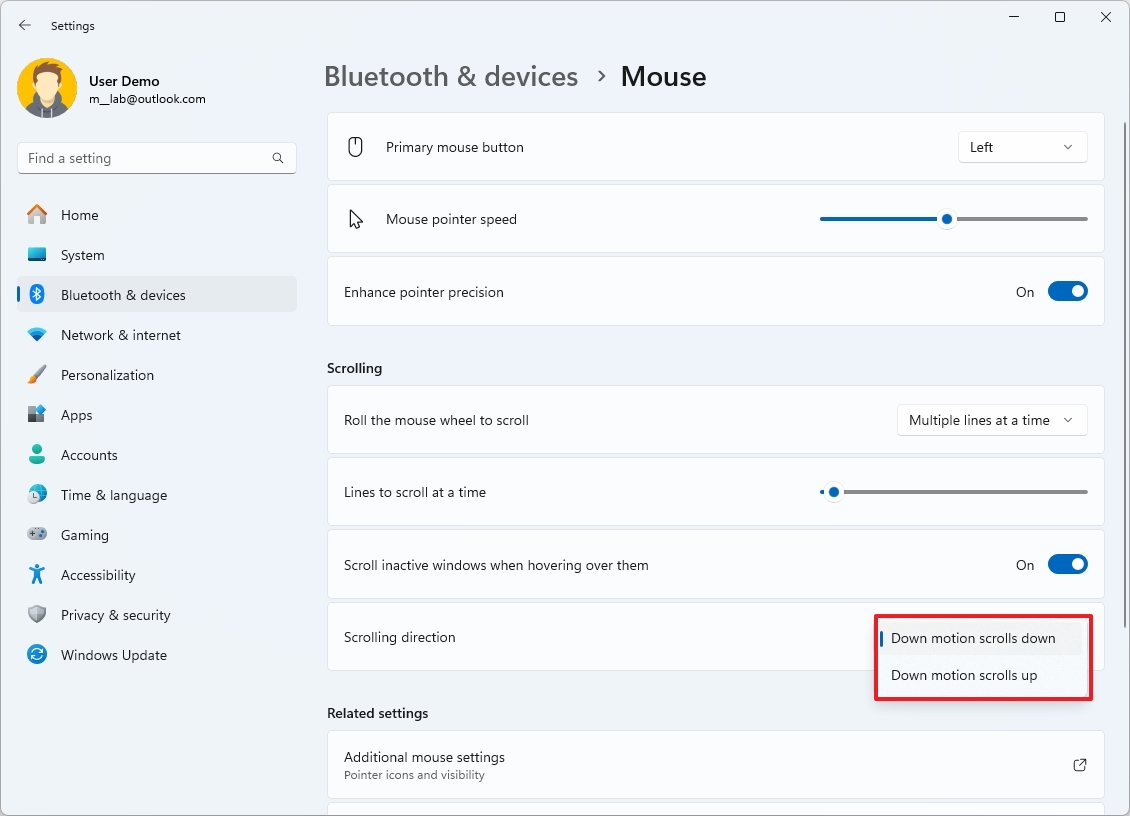
If you ever wanted to change the scrolling direction of the mouse wheel, you needed to modify the Registry. However, Windows 11 now includes a setting to customize the scrolling direction.
If you want to change the mouse scrolling direction, open Settings > Bluetooth & devices > Mouse, and then choose the “Down motion scrolls down” or the “Down motion scrolls up” option.
In addition, the “Mouse” page also allows you to enable or disable the “Enhance pointer precision” feature without the need of opening the legacy Control Panel.
7. Wi-Fi 7 support
In 2024, Microsoft also added Wi-Fi 7 wireless networking support to Windows 11. Wi-Fi 7 (IEEE 802.11be Extremely High Throughput (EHT)) is based on the Wi-Fi 6 and 6E networking standards, and it offers a theoretical speed of over 40 Gbps. In contrast, Wi-Fi 6 offers 9.6 Gbps.
You don’t have to enable any settings to use this wireless technology, but you will need a network adapter with support for Wi-Fi 7.
8. Network refresh button
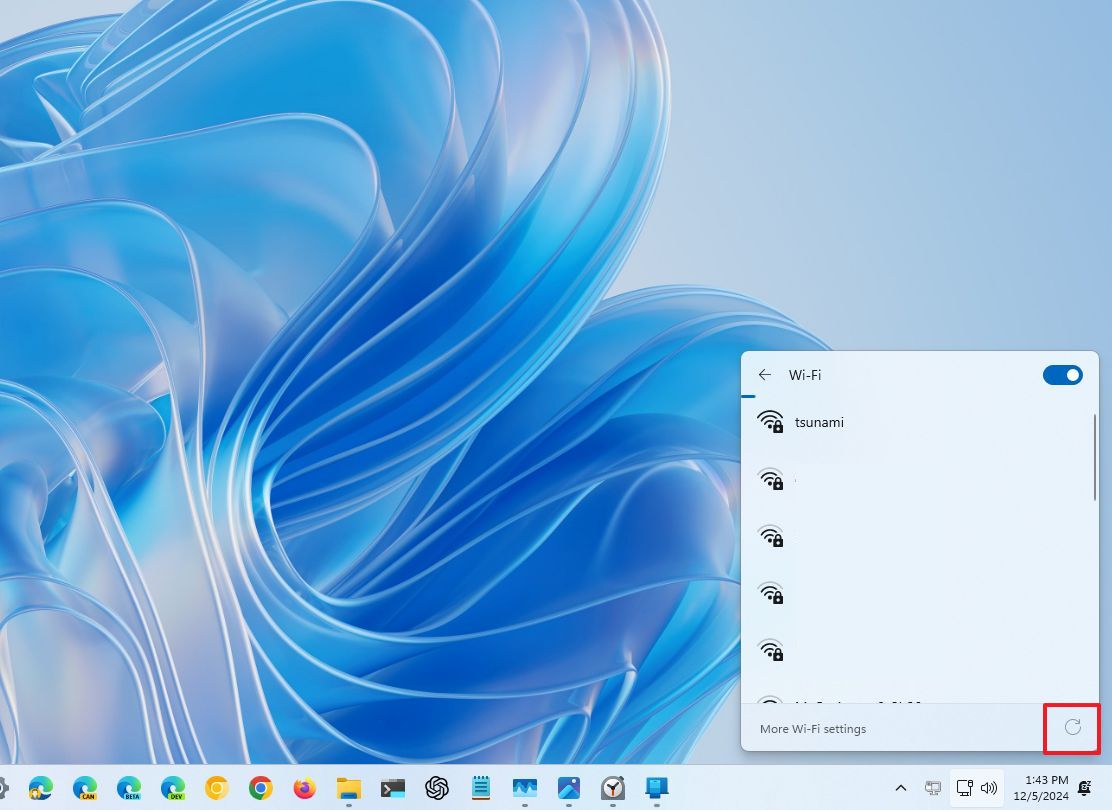
This is a subtle improvement but a meaningful one. If you ever wanted to connect to a wireless network from the Quick Settings flyout, if the network wasn’t listed, you needed to wait or disable and enable the adapter to force a scan to find the wireless network in question, but now, the Quick Settings flyout includes a button to force the system to rescan for new networks.
If you have to use this feature, click the network area in the System Tray of the Taskbar, open the Wi-Fi page, and if you don’t find the network, click the “Refresh” button from the bottom-right.
9. Auto Super Resolution
Although this feature is exclusive to Copilot+ PCs, Auto Super Resolution (Auto SR) is one of my favorite features because it uses on-device AI to upscale games to improve image quality and frame rates.
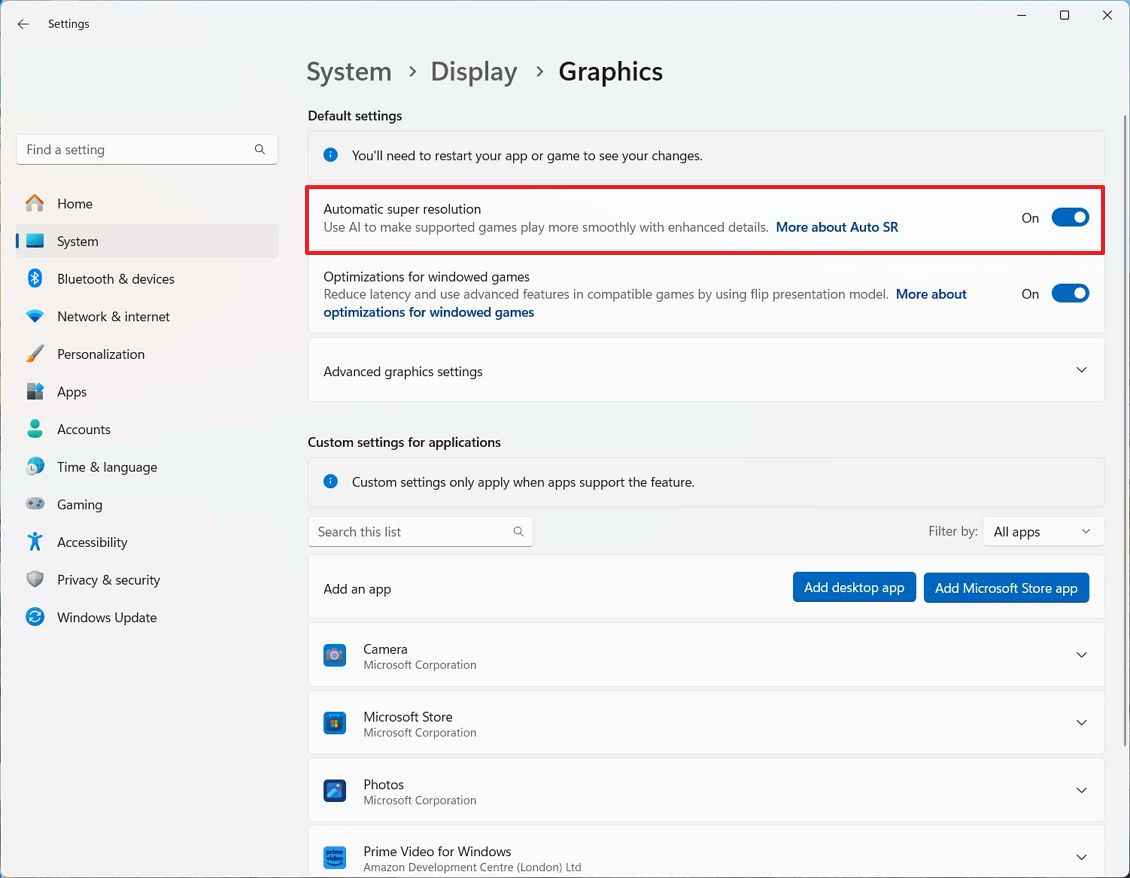
If you want to enable this feature, open Settings > Display > Graphics, and turn on the “Automatic super resolution” toggle switch.
The above instructions will enable the feature globally for every supported game. If you want to configure Auto SR on a specific game, open Settings > Display > Graphics, and add and select the game under the “Custom settings for applications” section.
After you enable the feature, choose the “On” option for the “Automatic super resolution” setting.
10. Windows Studio effects
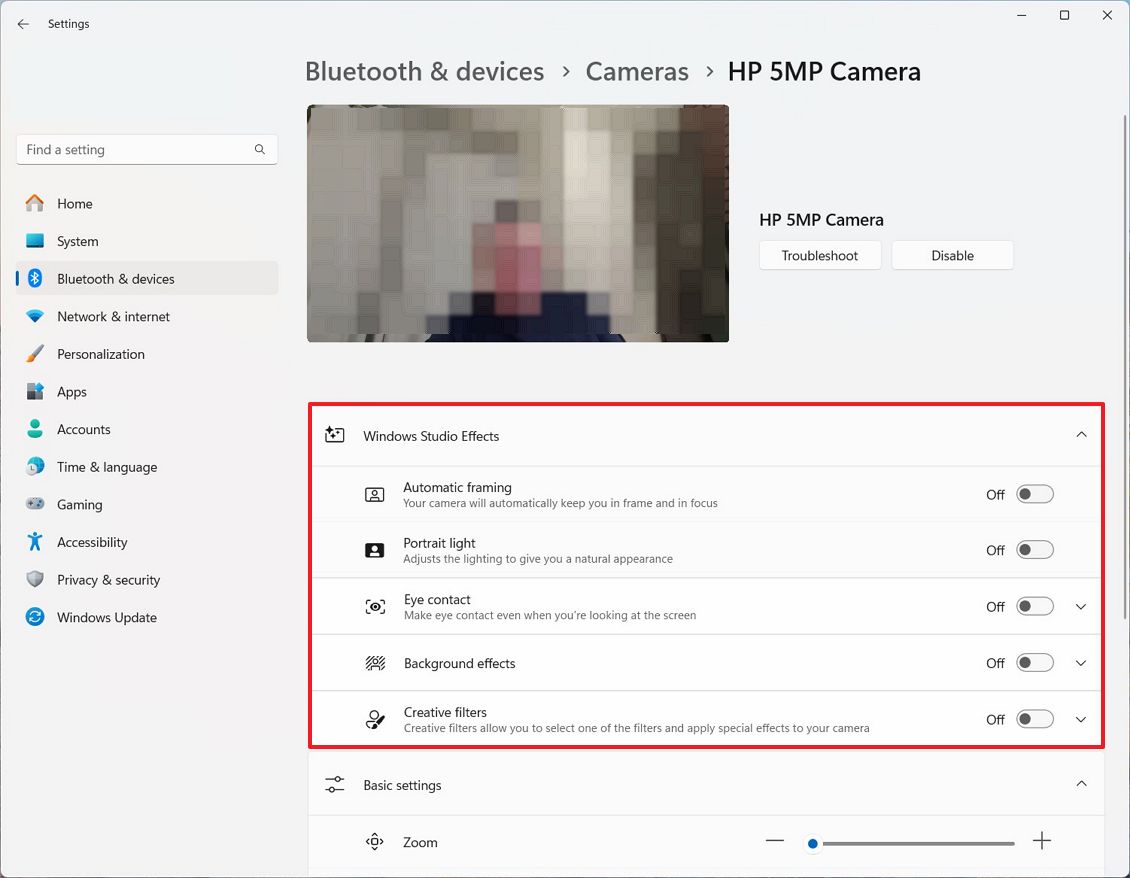
Windows Studio effects are a set of features that use on-device AI to improve the experience while making video and audio calls. There are six effects in total, including automatic framing, background blur, eye contact, voice focus, portrait light, and creative filters.
This feature isn’t entirely new since it was an offering for certain Surface devices, but now, it’s available for all Copilot+ PCs.
If you want to access the Windows Studio effects features, open Settings > Bluetooth & devices > Camera, click the “Camera Effects” setting, and enable or disable the effects you want to use.
You can also open Settings > System > Sound, and from the microphone settings, choose the “Microsoft Windows Studio Voice Focus” option in the “Audio enhancements” setting. It’s also possible to turn on “Voice Focus” toggle switch to filter out background noises.
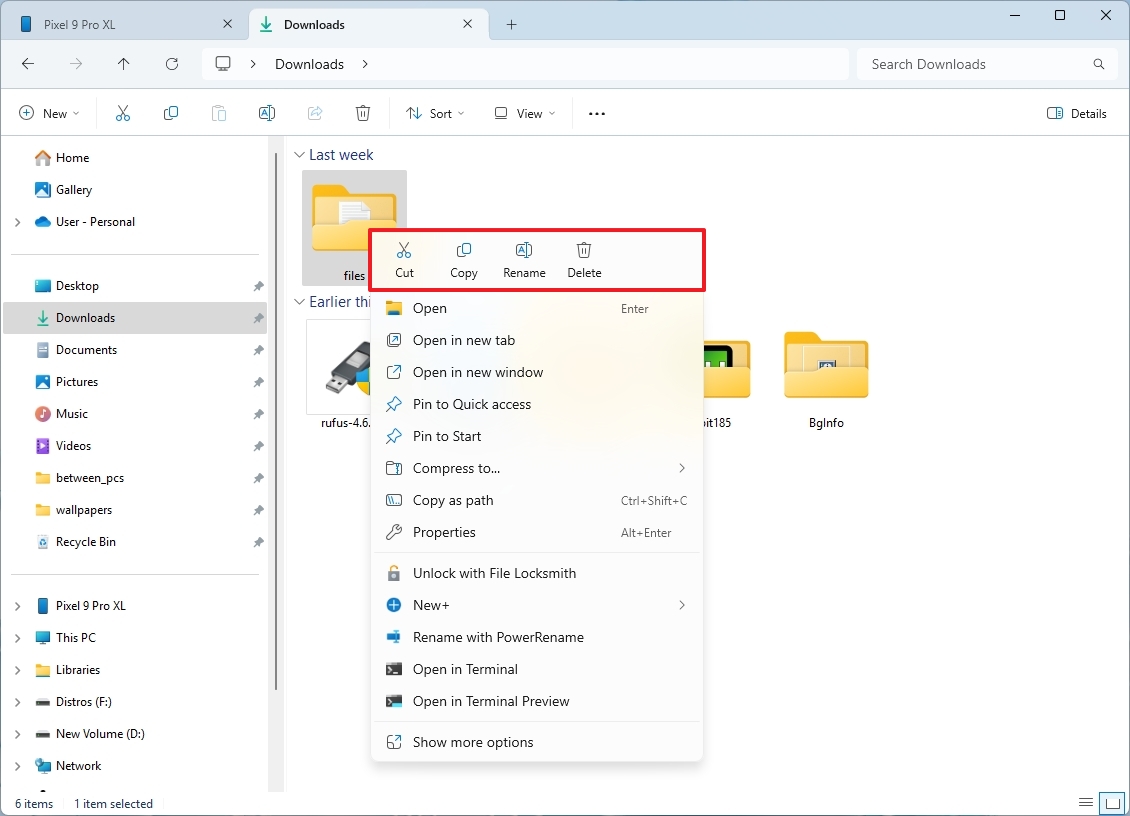
As part of changes for Windows 11, Microsoft introduced an updated version of the context menu for File Explorer that made the options for Cut, Copy, Rename, and Delete more prominent. However, the problem was that the options only included icons, which made them a bit different to understand without labels.
A subtle change in 2024 includes labels for those common tasks so you can quickly identify each action.
12. Archive compression wizard
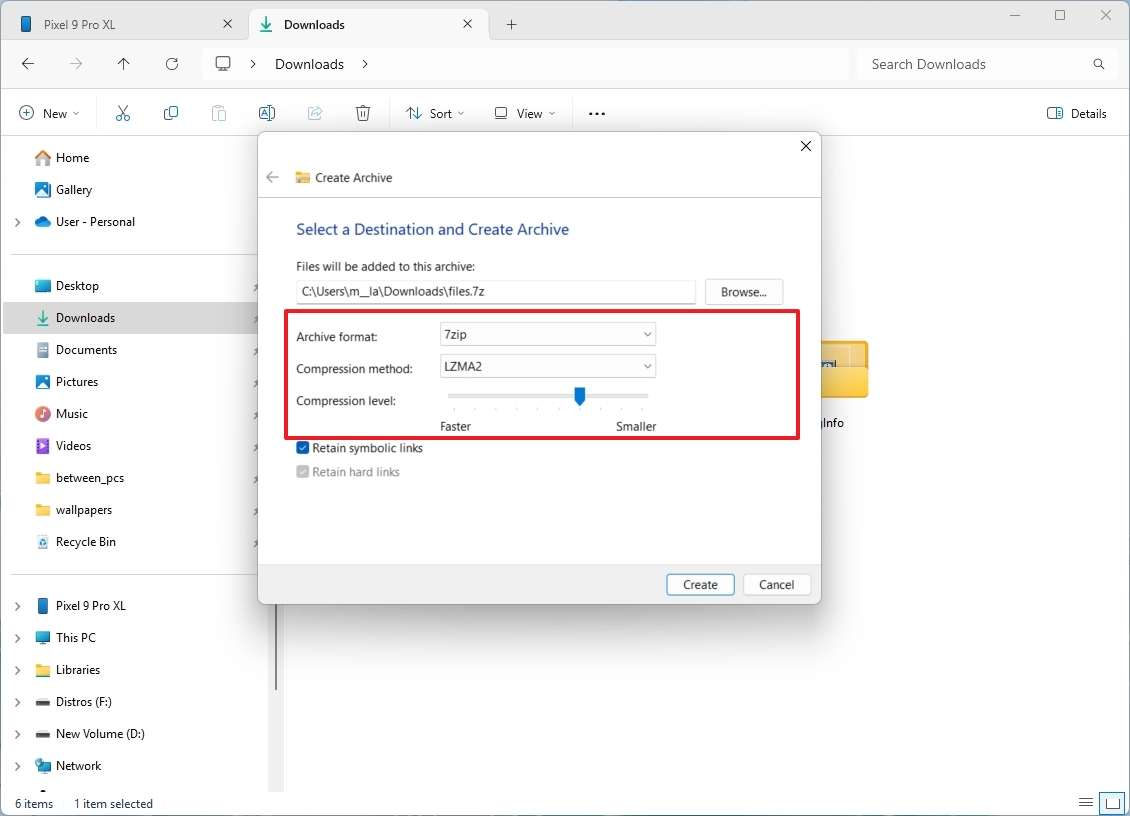
File Explorer introduced the ability to extract archival format files (such as Zip, RAR, TAR, and 7zip) with the release of version 23H2, but on version 24H2, Microsoft completed the feature with a new wizard to create archival formats, including Zip, TAR, and 7zip.
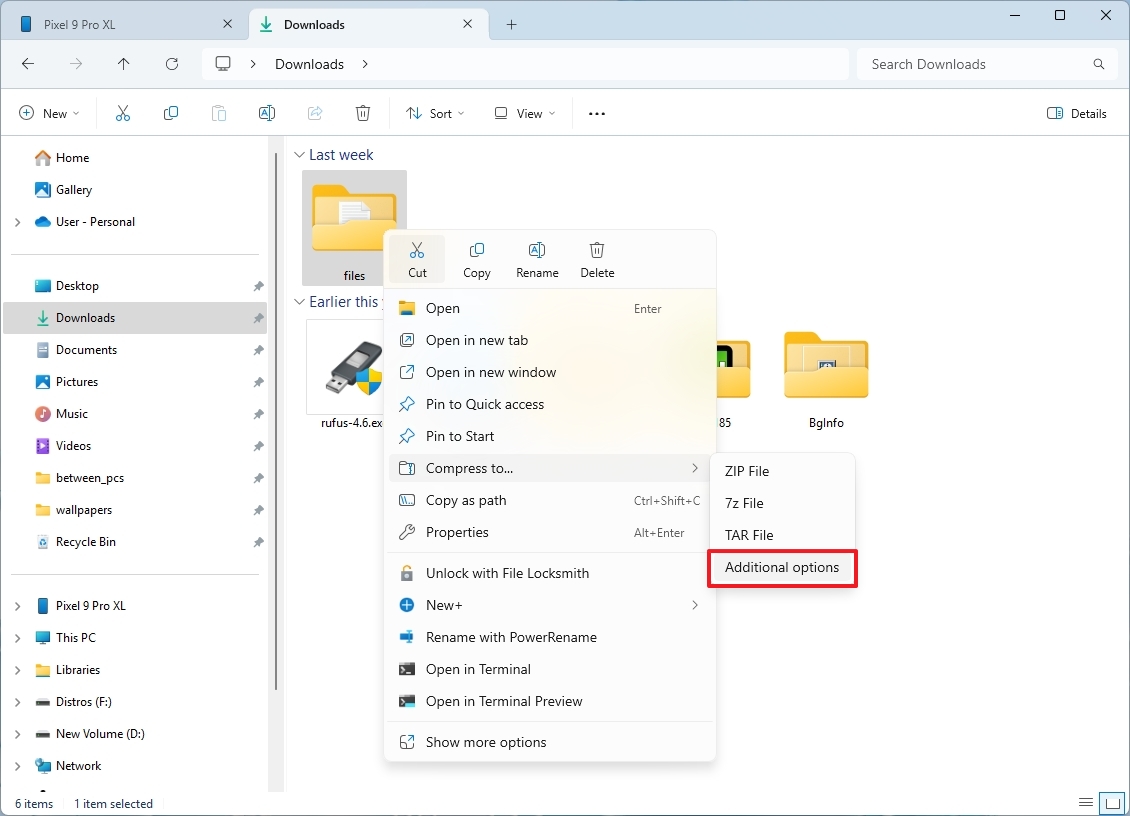
To use the compression wizard, open File Explorer in the location where you have the files and folders, select the items you want to include in the archival, right-click the selection, choose “Compress to,” and select “Additional options.”
In the wizard, choose the archival format, compression method, and level, depending on the format you’re using, and click the “Create” button.
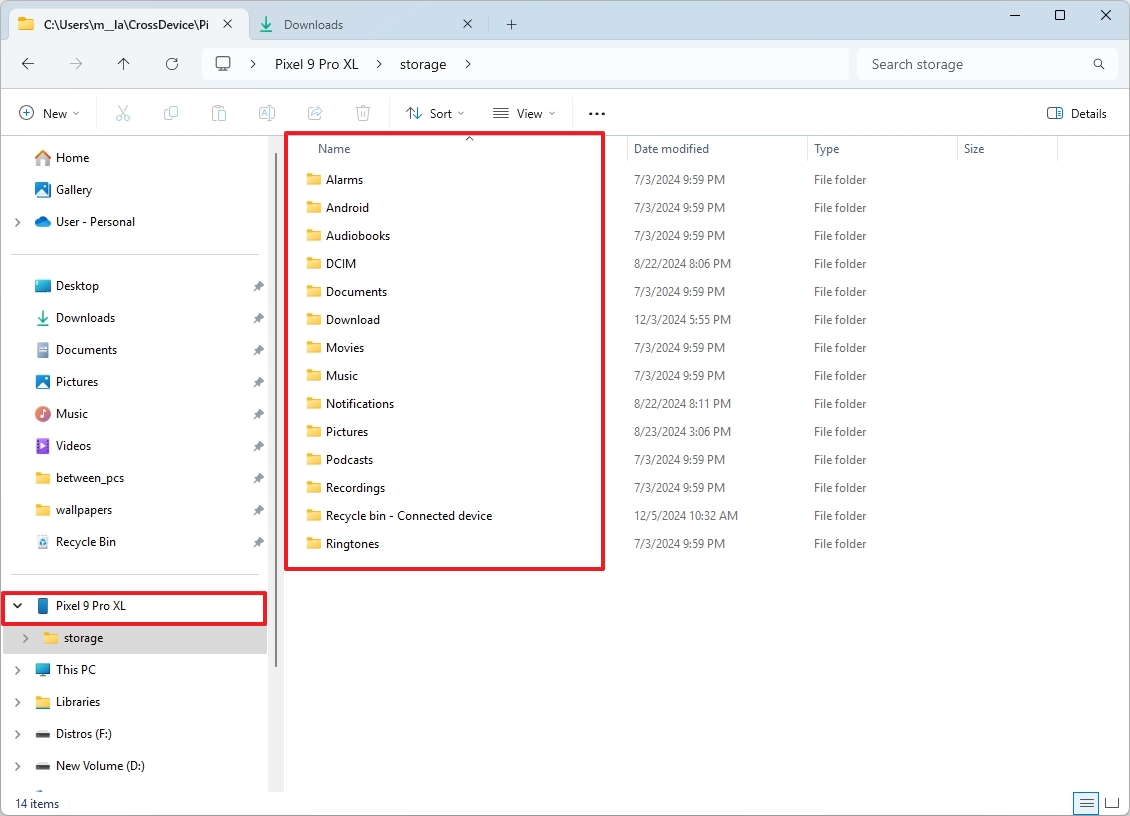
13. Android storage navigation
In the past, if you wanted to transfer files from your phone to your computer, you needed to connect the mobile device to your computer using a USB cable. However, in 2024, Microsoft updated the “Link to Windows” option for Android devices and introduced the “Manage devices” feature on Windows 11 to allow you to connect your phone to your computer to browse and transfer files.
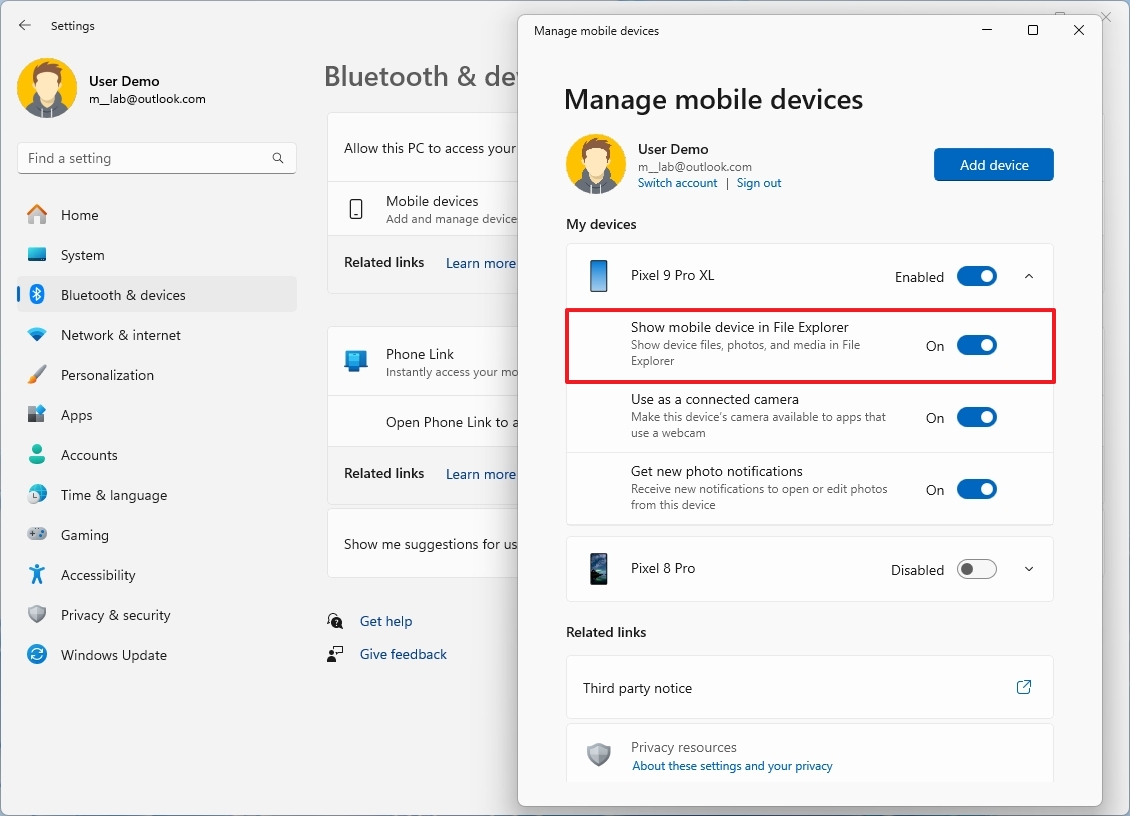
To connect your phone to your computer, install and configure the “Link to Windows” app with the same Microsoft account that you use on Windows 11, and then, on Windows 11, open Settings > Bluetooth & devices > Mobile devices, turn on “Allow this PC to access your mobile devices” toggle switch, click the “Manage devices” button, click the “Add device” button, continue with the on-screen directions to connect your phone.
Finally, on the “Manage mobile devices” settings, enable your phone, turn on the “Show mobile device in File Explorer” toggle switch, click the “Allow permissions” option, and continue with the on-screen directions on your phone to allow access to your mobile device files.
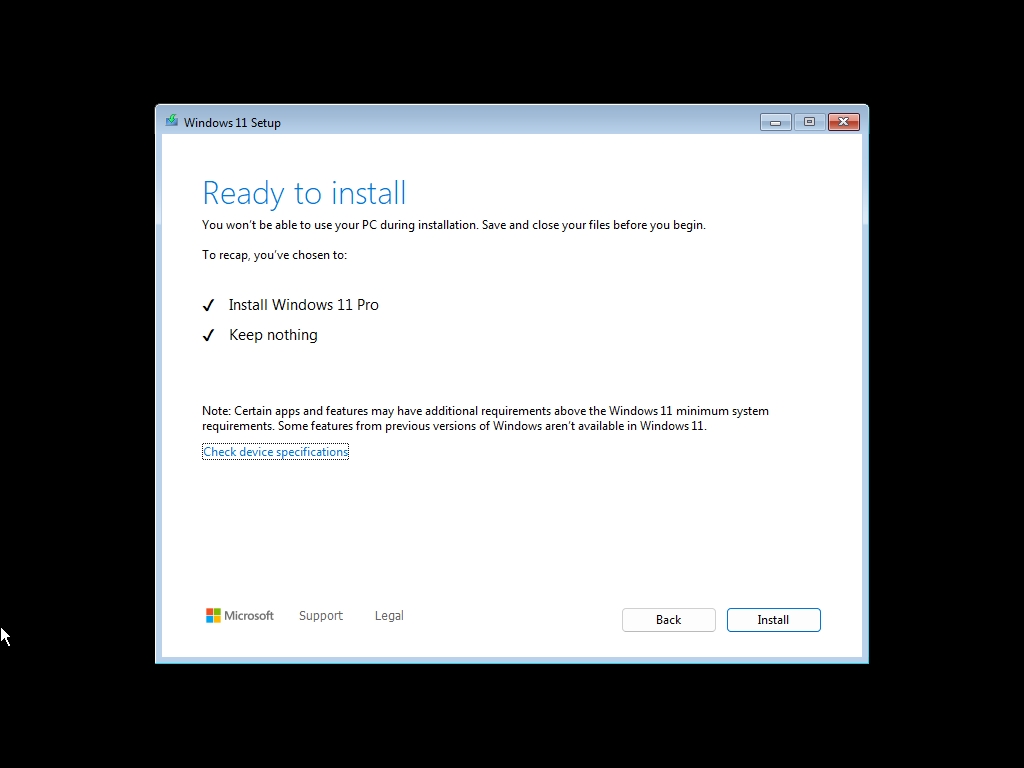
14. Windows Setup new interface
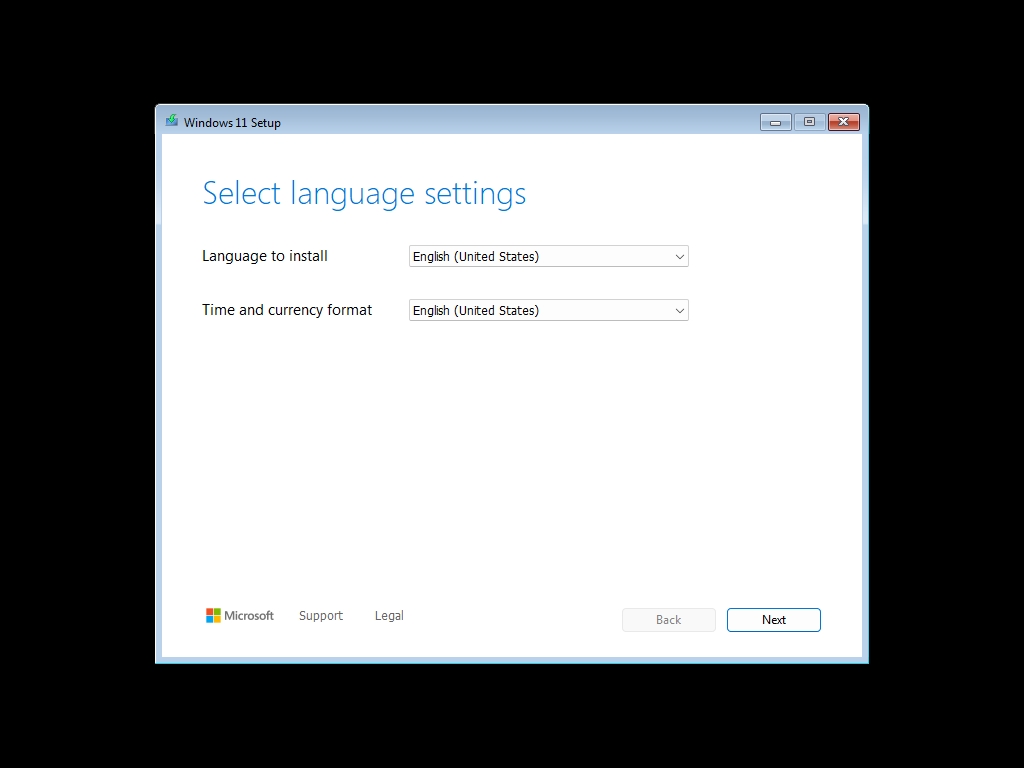
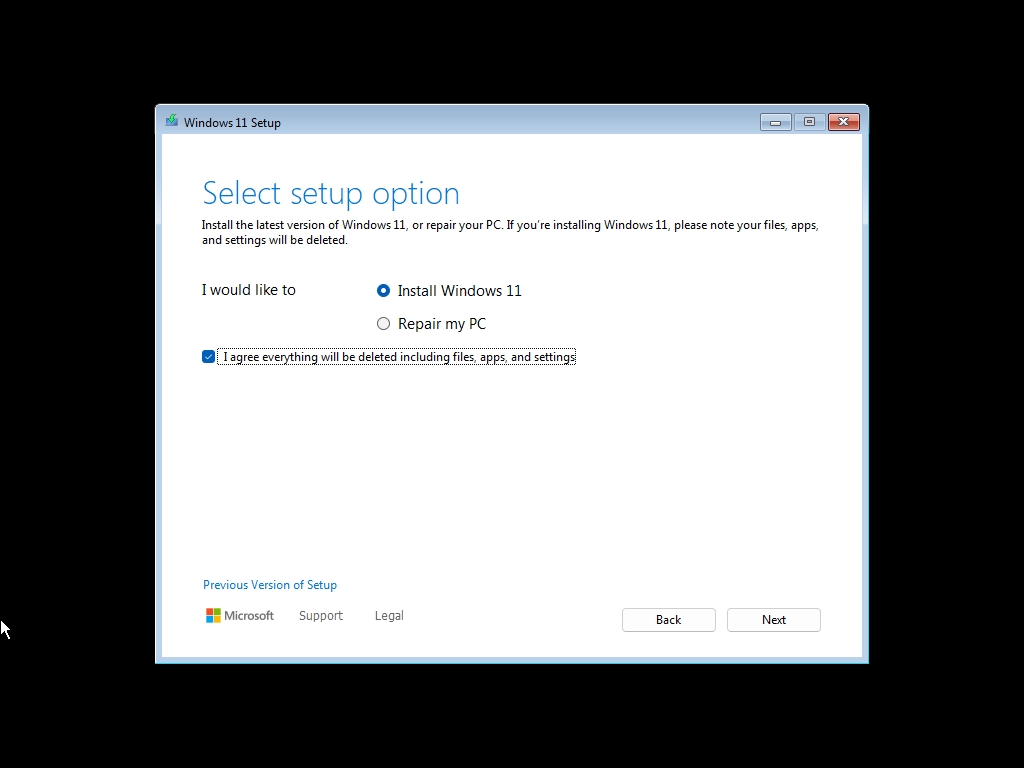
After many years with the same design, starting with version 24H2, Microsoft has finally updated the “Windows Setup.” Although the new design is similar to the legacy version, the updated version adopts a white color theme and streamlines the installation process.
When comparing the old and the new design, the option to select the keyboard setting has its own page. You no longer have the option to perform an upgrade or custom installation. Instead, in the “Select setup option” page, you can choose to install the operating system using a clean installation, or you can access the recovery environment.
Also, after selecting the drive to install the operating system, you will have to confirm the installation.
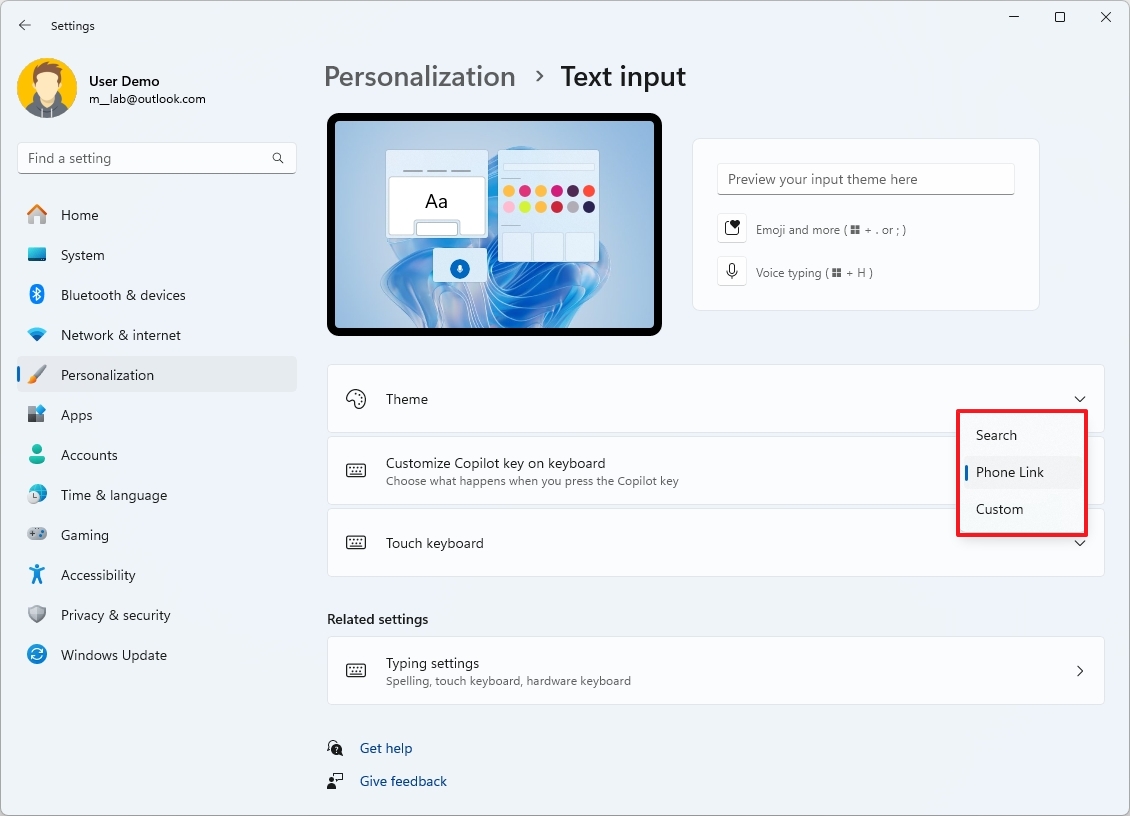
15. Copilot key customizer option
You may notice the new Copilot key on keyboards on some new devices. Originally, Microsoft wanted to provide quick access to the Copilot chatbot, but soon after, the company changed its AI strategy, which resulted in the physical key not having any action.
However, the company had an idea, which was an option to allow users to remap the key to any application from the Microsoft Store.
If you happen to have a Copilot+ PC or another device with the physical Copilot key, you can remap to another action by going to Settings > Personalization > Text input and changing the “Customize Copilot key to keyboard” setting to “Custom” if you want to control a specific app, or you can choose to open the “Phone link” app or the “Search” experience.
Now, why am I adding this as one of my favorite features? It’s because I feel this was a good way to salvage the physical key without having to recall the devices to make changes to devices, which could have been more costly.
You can also assign virtually any app you want as long as it meets the system security requirements. You can even install other chatbots and launch them with the Copilot key.
More resources
For more in-depth insights, troubleshooting tips, and the latest updates on Windows 11 and 10, be sure to explore these resources:


