

I install Windows 11 a lot. Be it for a clean slate on a PC that’s acting up or a brand new PC, anyone who tinkers with computers will find themselves interacting with the Windows installer quite a bit. And it’s far from perfect.
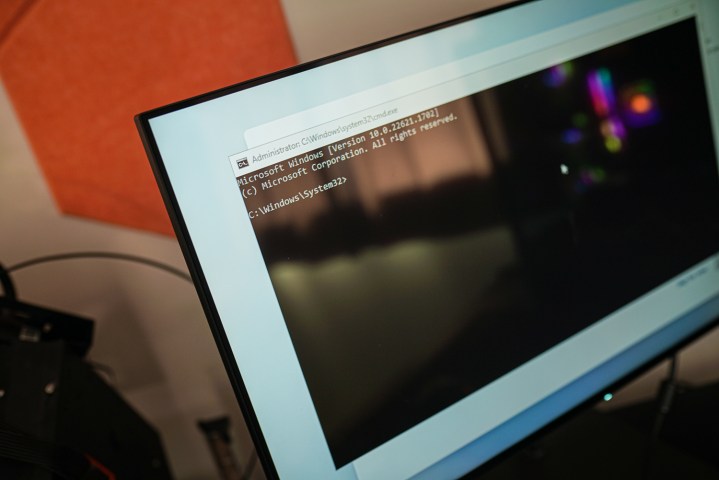
Over the past year, it’s gotten worse, too. This is because Windows 11 now requires you to connect to the internet before proceeding with installation. If you don’t have a connection (or another issues occurs, as I’ll get to in a moment), you’re out of luck. You’re stuck. Thankfully, there’s a Windows 11 shortcut that can crack open the installer and give you a lot more power: Shift + F10.
This isn’t a new shortcut. It’s been around in the Windows installer for years, but you may have never known it existed. This shortcut pulls up the Command Prompt during installation, allowing you to do things like access the Task Manager.
You’ll need to know some commands to get any use out of the Command Prompt, or have another PC handy to look up what you need. But this keyboard shortcut solved a massive headache for me while trying to set up for Windows 11 for the umpteenth time.
In my case, the Windows 11 installer didn’t grab drivers for my network connection during its initial setup. That wasn’t a big deal in the past, as the Windows installer included a handy I don’t have internet button that allowed you to proceed with a limited setup and grab updates later. For some reason, Microsoft decided to remove that button with the Windows 11 22H2 update that released in the middle of last year.
I hope you see the problem here. Windows didn’t grab the basic networking driver, so I wasn’t able to connect to the internet. And without an internet connection, I couldn’t proceed with the installation. A reboot doesn’t help here, either. No matter how many times I forced the PC to shut down, created new Windows installation media, and banged my head against the wall, I got stuck at the same page asking me to connect to the internet.
But, we do have Shift+F10. I’ll walk you through a series of steps I had to take to eventually get the Windows 11 train back on its tracks, so you hopefully don’t have to suffer through the troubleshooting I did.
Task Manager to the rescue
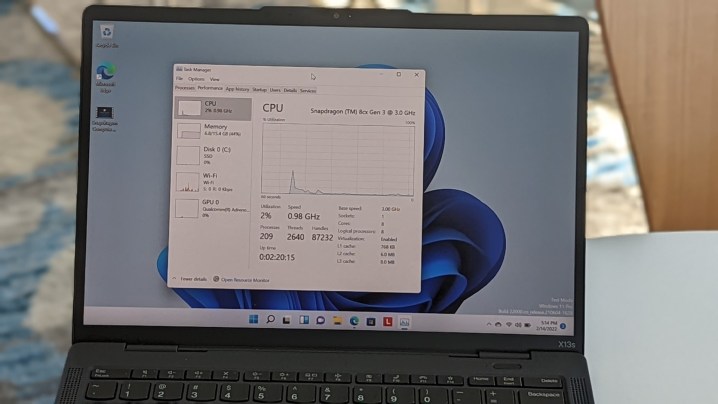
The simplest thing you can do is end the network process in Task Manager. It will force Windows 11’s network check to fail and give you another chance to try. It’s like restarting your router when your internet is acting up.
Press Shift+F10 to pull up Command Prompt and click into it. Note that you need to actually click into Command Prompt. It won’t pick up your keyboard automatically. Once there, type in taskmgr and hit Enter. This will pull up a Task Manager window.
Select Show details and go down to the NetworkFlow process. Right-click and end it before closing both windows. You should be at a failure page. Hit Retry and hope your internet shows up.
Doing drivers the hard way
If that doesn’t do the trick, you’ll need to install your drivers manually. It’s annoying, but not too difficult. Grab a second USB drive and download the network drivers from either your PC or motherboard manufacturer on a separate PC. Unzip the folder and drag the files into the root of a formatted USB drive. You’ll probably see several subfolders in the driver package. Poke around until you find the area with all the .inf files. That’s what you’re looking for.
Drag them over, eject the drive, and insert it into the PC you’re installing Windows on. Pull up Command Prompt with our friend Shift+F10 and enter Diskpart before hitting Enter. This will list all the drives connected. Note the letter of the USB drive with your drivers and close the window.
Pull up another Command Prompt window with Shift+F10, and enter pnputil /add-driver [drive letter]:\*.inf. Replace the drive letter with the one you noted. The final code should look something like this: pnputil /add-driver E:\*.inf.
The driver should automatically install. After that, try closing NetworkFlow to force the process to close and connect to the internet. If even that doesn’t work, there’s thankfully a kill switch you can hit.
The kill switch
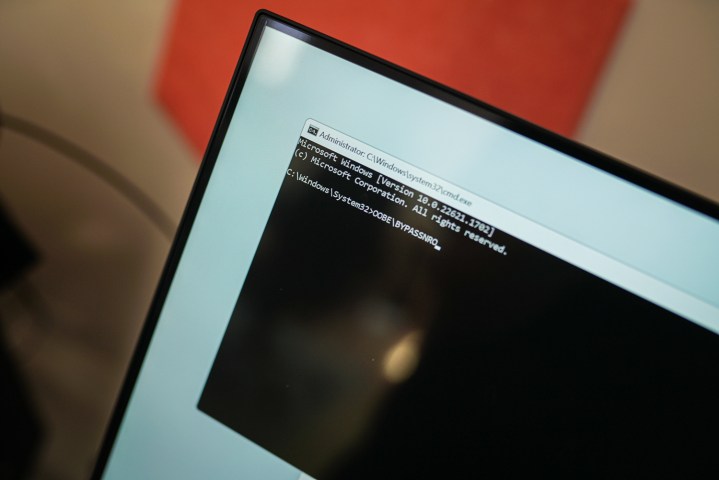
If you’re fed up and just want to nuke the Windows installation, you can. Pull up Command Prompt with Shift+F10 and enter OOBE\BYPASSNRO. Hit Enter and the Windows 11 installation will restart from the beginning.
This time, however, when you get to the page to set up your internet, you’ll see the familiar I don’t have internet button at the bottom, allowing you to proceed with setup and install your network drivers later. Now, if only Microsoft could just have things this way from the beginning!
You’re still in control
Over the past several versions of Windows, Microsoft has wrestled control away from users in an attempt to make Windows more accessible. That’s not a bad thing inherently, but it can lead to situations where you feel like you’re stuck without much recourse. Thankfully, there are still ways to troubleshoot Windows, even if they’re buried behind a series of shortcuts and console commands.
Regardless, Shift+F10 is a great resource to keep in your back pocket if you find yourself installing or reinstalling Windows 11 frequently. Let’s just hope that future versions of the installer make it so you don’t have to resort to the Command Prompt.
Editors’ Recommendations


