

Key Takeaways
- Tonieboxes are child-friendly audio players that allow children to easily listen to their favorite tunes and stories. They have a soft fabric covering and a touch box at the top where Tonies, which are toy figurines with NFC technology, can be placed to activate audio playback.
- Tonieboxes offer a safe and engaging way for children to interact with audio content. The integration of tangible toys with digital media creates a magical experience, and the Tonies can be customized with personalized recordings or filled with stories and music from popular shows or movies.
- Setting up a Toniebox is a simple process that can be done through the My Tonies app on a smartphone or through the Toniebox setup webpage on a desktop. Once set up, Tonies can be placed on the Toniebox to download and play content, and Creative-Tonies allow for personalized recordings to be added. A wide range of Tonies, including characters from Disney and popular children’s franchises, are available to choose from.
Music or audio-based stories like podcasts are something that almost everybody enjoys, young or old. They’re a great way to relax after a stressful day or to unwind after some exciting activities.

Tonie Cyber Monday deals: Get a Toniebox on sale while you still can
Cyber Monday is ending soon. Act fast to score these big deals on Tonies and Tonieboxes, Amazon’s top storytelling gift for kids.
Listening experiences are also great for children – it helps develop creativity, has a great impact on their attention spans, and is also simply a great way for them to spend some screen-free time enjoying their favorite tunes either from popular shows or simply great albums that they like. However, regular speakers might be a little too complicated – not to mention dangerous – for the little ones to operate. They have a lot of buttons to push (and maybe break off), different holes to squeeze something in, and ports to explore.
Plus, there is no way your child would be able to play some tunes on their own. That’s where things like Tonies and Tonieboxes come into play. They’re frequently mentioned as some of the hottest holiday toys of 2023, and they even top Amazon’s Best Storytelling Toys list for kids. If you want to learn more about these viral toys seen all over your TikTok For You Page, including how they work, read our guide.
 What are Tonieboxes and how do they work?
 What are Tonieboxes and how do they work?
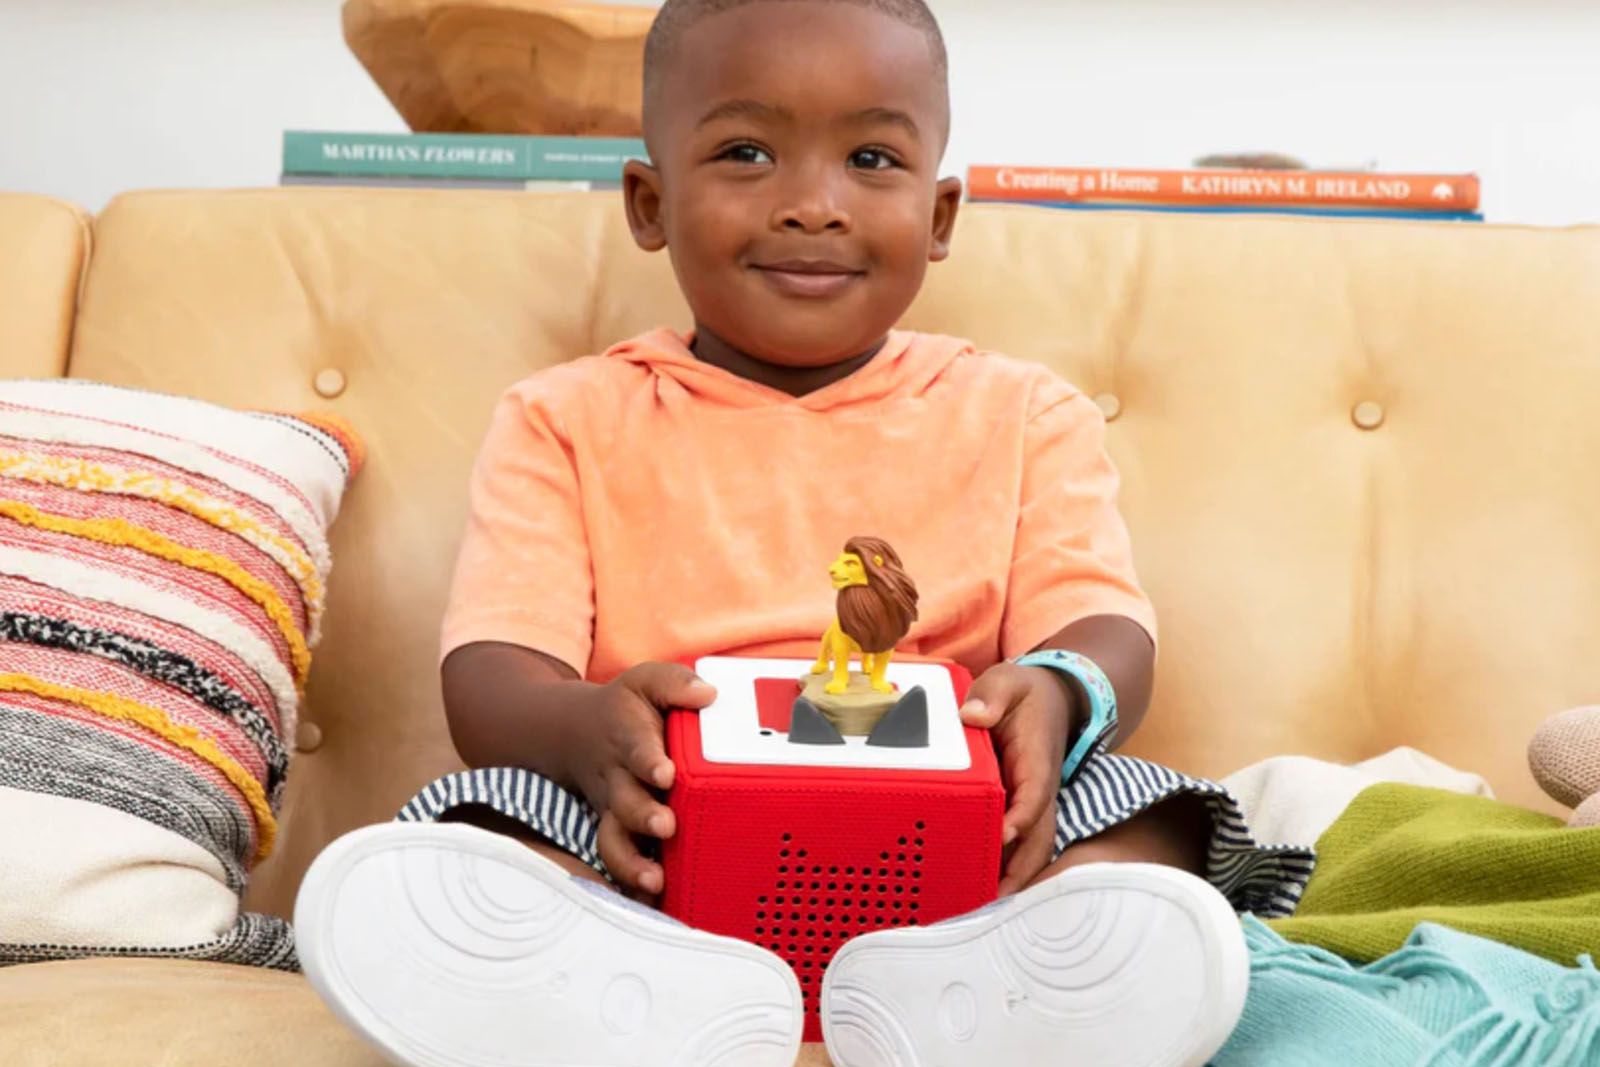
 Tonieboxes are child-friendly audio players that make it easy for your child to play their favorite tunes and listen to stories whenever they wish. In general, it allows them to have a much easier time interacting with audio than using a regular Bluetooth speaker. It’s a small, cube-shaped device that comes covered in a fabric lining, which protects the speaker and covers all the sharp edges and makes it soft to hug. The two main characteristics of the Toniebox itself are obviously the speaker half but also the touch box at the top of the device.

Toniebox starter set (featuring Elsa, Anna, Olaf, and Playtime Puppy)
$140 $154 Save $14
The Toniebox Audio Player Starter Set features characters like Elsa, Anna, and Olaf in a light blue design. It’s a screen-free, creativity-enhancing experience with a range of stories and songs. The Playtime Puppy Tonie in this set even has tunes like “Wheels on the Bus” and “If You’re Happy and You Know It.” The bundle provides a charging station for the Toniebox, too, which offers up to 7 hours of battery life.
While the speaker part is obvious, it’s the upper touch surface that is creating the magic of the Toniebox. It’s a place where you put Tonies, which in turn makes the Toniebox play audio that is “recorded” onto Tonies. This way, the kids have to physically interact with their Toniebox in order to play sounds – just like putting in a CD or setting up a vinyl record – but the entire action is much safer and accompanied by cool figurines that are more engaging. Kids can mix up listening to music or stories via the act of playing with the figurines or the Toniebox itself.

Tonies
What are Tonies and can you add your own content?
“But what are those Tonies?” might you ask. Well, they’re crucial to Toniebox’s magic. On the one hand, Tonies are just toy figurines. But they’re also techy.
NFC figurines with audio
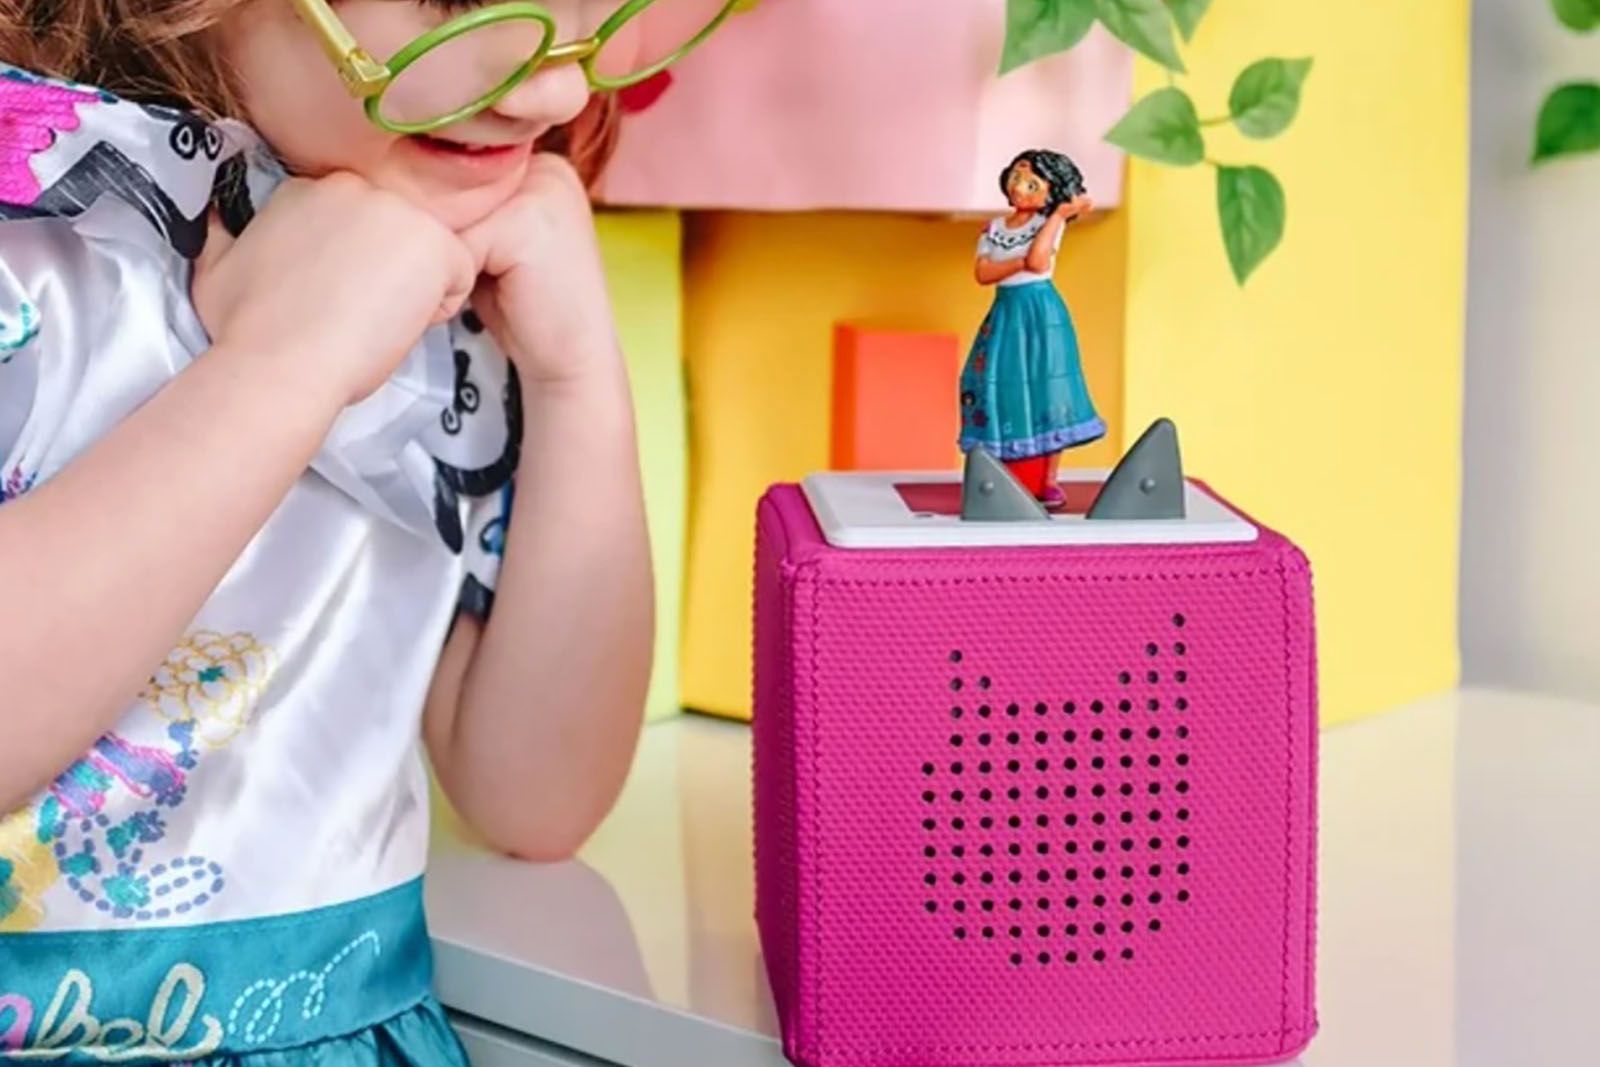
There are a lot of characters you can get – Disney heroines and villains,childhood mascots, and more. They are eye-catching and work great as small toys to add to your child’s collection. However, Tonies have an ace up their sleeve: NFC technology. Each Tonie figurine, when placed on a Toniebox, activates audio playback, much like a physical record.
The Toniebox, an essential part of this system, reads the NFC chip embedded in each figurine and plays audio content associated with that specific character. This feature is particularly enchanting with themed Tonies, such as Disney princesses, which play songs and stories from their respective movies. This integration of tangible toys with digital content creates an engaging and magical experience, combining the charm of physical play with the convenience and versatility of digital media.
Record your own audio
That’s not all though. You can also get yourself what’s called a Creative-Tonie. These are, basically, your own, customizable Tonies that you can record whatever you want on, making them a great starter for your child’s Tonie collection. What’s more, you are not limited to just filling them up with music from your child’s favorite shows or musicians. Tonies can also contain stories, so they are a great tool to keep your child entertained, be it by music, or by playing some great narration to spice up their day.
The contents of these Creative-Tonies can be changed at any time, so you don’t need to worry about your kids getting bored of the one story; you can simply swap it out for another one in just a few clicks. Each Creative-Tonie allows you to store up to 90 minutes of personalized content, so you can record anything your heart desires – even yourself reading a bedtime story.

Toniebox
How to set up a Toniebox with your phone
If you’re interested in getting your child a Toniebox, or you’ve already pulled the trigger – the next part of the process is setting up your Toniebox to get it ready for your children. Here’s how to set up your Toniebox, step by step.
Get the My Tonies app
Start the setup process
- On the main screen, tap the Collection icon at the bottom right.
- Next to the Toniebox section, tap the + icon.
- At the bottom of the next screen, tap the Start Setup Process bar.
- You now have to provide your Toniebox ID. This is the 8-digit code that you can find at the bottom of your Toniebox, used to pair your device to your account. Click Continue once you’re done.
- The next step is naming your Toniebox – it’s extremely useful if you go for more than one device. Input the name for your Toniebox and tap Continue.
- The next step is to name the Household that the Toniebox will be added to. Pick a name and click Continue.
Enter pairing mode
- Now you have to put your Toniebox in pairing mode. To do so, first turn it on (by putting it on a charger). Then, pinch both of its ears for around 5 seconds, until an LED begins to flash blue and you hear a chime. Then, wait for some time until you hear a second chime. Once that happens, tap Continue in the app.
- You should now get a notification on your phone that the Toniebox is trying to connect to your device. You should allow that in order to continue with the setup.
Connect to Wi-Fi
- Next, you’ll see a list of Wi-Fi networks to connect to. Tap the name of your network for the Toniebox to connect to, enter your password and tap Continue. Remember that the Toniebox only works with 2.4 GHz networks.
- The Toniebox will now connect to your Wi-Fi. It might take a few minutes, and you might hear some sounds coming from the device – that’s totally normal. Once it connects, the device will automatically update its software.
- Once that’s done, you should hear a welcome message and the LED on the device will turn green, signaling that it’s ready to go and paired with your app.
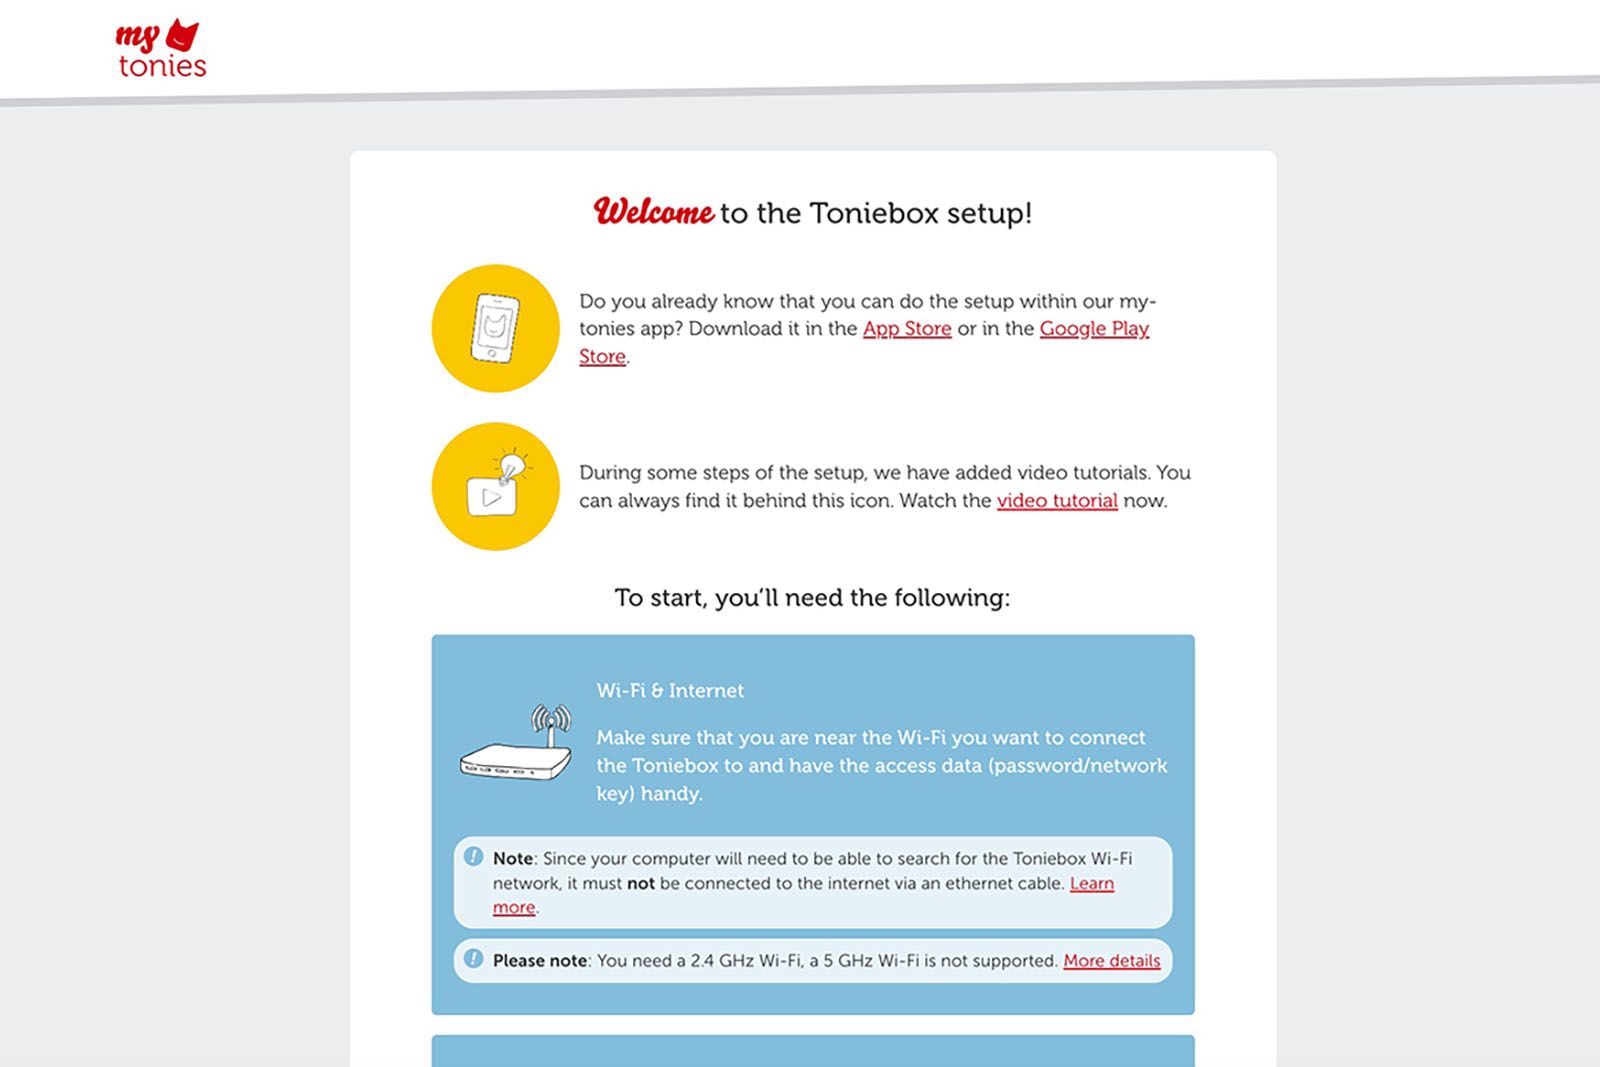
How to set up a Toniebox with your desktop
You can also set up the Toniebox while on your PC or Mac. Here’s how:
Go to the My Tonies website
- Go to the Toniebox setup page here. Log in or create your account if it’s your first time there.
- Make sure your PC is connected to the internet via Wi-Fi, not directly with an ethernet cable. Also, remember to connect to your 2.4 GHz network. Toniebox does not support 5 GHz Wi-Fi. When you’re ready, click I want to begin!
- Enter your Toniebox ID, which you can find at the bottom of your Toniebox. It’s an 8-digit number next to the charging port. Once you’ve entered it, click on Great, go ahead.
- Pick a name for your Toniebox and click Onwards!
Enter pairing mode
- Place your Toniebox on the charger to turn it on. Then, pinch both of the ears for around 5 seconds to turn on pairing mode. Tthe LED should start flashing blue, and you should hear a chime. Next, wait for around 20 seconds for another chime. Once the audio plays, click on Then get started on your desktop.
Connect to Wi-Fi
- Connect to your Toniebox using its specific Wi-Fi signal. You’ll need to open your Wi-Fi settings and connect to the Wi-Fi network that starts with “Toniebox-”, followed by four numbers.
- Once you’ve connected to the Toniebox network, go back to the setup webpage and click on the Continue button that should appear there.
- The next step is connecting to your home’s 2.4 GHz network. Pick your network from the drop-down list, put in your password and click Continue.
- The connection process may take some time, as the Toniebox will connect and update. You can also hear some audio chimes in the meantime.
- When it’s done updating, you should see the LED light turn green, and a message on your device’s screen saying Congratulations.
That’s the end of the setup and you can now start using your Toniebox!
How to setup and use a Tonie with a Toniebox
Once you’ve set up your Toniebox, you need to set up your Tonies – whether they are Creative-Tonies with your own sounds or Tonies with songs and stories from other animations or media. Here’s how to use either one with your Toniebox.
- After you’ve set up your Toniebox and it’s connected to Wi-Fi, place your new Tonie on the magnetic pad on top of the device.
- The Toniebox will begin downloading content that’s connected to the Tonie you’ve placed on top of it and the LED will start blinking blue. Do not remove the Tonie yet.
- Once the download is finished, the LED will turn green, and you will hear a notification sound telling you that it’s done.
- You can now play music from your Toniebox offline by simply placing the Tonie on top of the magnetic pad.
How to download your own audio or music to Creative-Tonies
With Creative-Tonies, you can also set them up with your own music and recordings. Here’s how to do it:
Open My Tonies app
- Open the mytonies app on your phone.
- Tap the Collection icon in the bottom right corner.
Find your Creative-Tonie
- Under the Collection header, tap on the Creative-Tonies subheader at the top of the page.
- Here you’ll find your Creative-Tonies. Tap on the one that you want to upload your recordings to.
- You’ll be shown the free space available on your Creative-Tonie, as well as the content that’s already on it.
Record your audio
- If you want to add something to the Tonie, you need to tap the microphone button or the upload button on the right of the picture of your Tonie.
- If you want to record your own voice message right there in the app, tap on the microphone button.
- In the recording menu, tapping the red circle will start your recording. When you’re done, simply tap the red square button to stop.
- You can now listen to the recording, or delete and re-record it. You can also tap Save and assign if you’re happy with the results and want to save the recording to your Tonie.
Upload your audio
- You can also upload things that you’ve already got saved on your device to the Tonie. To do so, simply choose the Upload button, the one under the microphone icon in the Creative-Tonie menu. A pop-up will appear, letting you choose which file to upload to your Tonie.
- Once you’ve chosen either a new recording or a saved sound, to add to your Tonie, you now have to sync it with your Toniebox.
- Turn on your Toniebox and pinch one of its ears for three seconds – until you hear a chime and the LED starts flashing blue. This means the Toniebox started downloading updates.
- Once the LED turns green, place your Creative-Tonie on top of the Toniebox. The new content will start playing immediately.
What are some Tonies available to buy now?
Tonies are hand-painted figurines, each distinct in their design, serve as both a playful toy and an interactive audio experience. When placed on a Toniebox, they unlock a variety of audio content ranging from classic fairytales and popular children’s songs to educational stories. There are dozens and dozens of Tonies to choose from, including officially licensed partners such as Disney. You can get characters from franchises such as Frozen and Moana, or even timeless classics like The Velveteen Rabbit and Charlie and the Chocolate Factory.

Best Amazon Echo devices for kids: Smart speakers, displays, and lamps
If you’re looking for a smart speaker or display for your little one, Amazon has a line of devices designed with children’s taste in mind.
Tonies on Amazon
Here are some of the best Tonies we’ve spotted on Amazon:
You can also buy Tonies directly from the Tonies website.

