Microsoft is rolling out the first feature update of the Windows 11 2022 Update (opens in new tab) (version 22H2) to compatible devices, which means new potential problems during and after the upgrade.
Although the company now will release one feature update per year to minimize disruptions and have more time to test the update, every version of Windows 11 (opens in new tab) includes new and updated code that can introduce a new set of problems. For example, compatibility issues with drivers, software, and existing features.
Since version 22H2 requires a complete reinstallation, devices can encounter other problems unrelated to the new version. For example, the computer may fail to complete because of a driver issue, incompatible program, custom configurations, or hardware problems.
This guide will outline some problems during and after the upgrade and the instructions to resolve them.
How to fix Windows 11 2022 Update common problems
On Windows 11 2022 Update, you may see two types of problems. You can encounter common issues during and after the upgrade (such as problems with storage and activation) that are not directly tied to the new version of Windows.
As part of the second type, we have those problems that occur because of bugs with the new release, such as hardware and software compatibility issues that cause the installation to fail or issues related to drivers, security solutions, etc.
This guide focuses on Windows 11, but the majority of the troubleshooting steps will also apply to Windows 10 devices upgrading to version 22H2.
Fix problems with Windows Update
The safest method to download and install a new feature update is through Windows Update. However, even this update mechanism sometimes doesn’t work as expected.
If you are dealing with problems trying to upgrade using Windows Update, you have some troubleshooting steps that may help fix the issue.
Update troubleshooter
To fix problems on Windows Update trying to apply version 22H2, use these steps:
- Open Settings.
- Click on System.
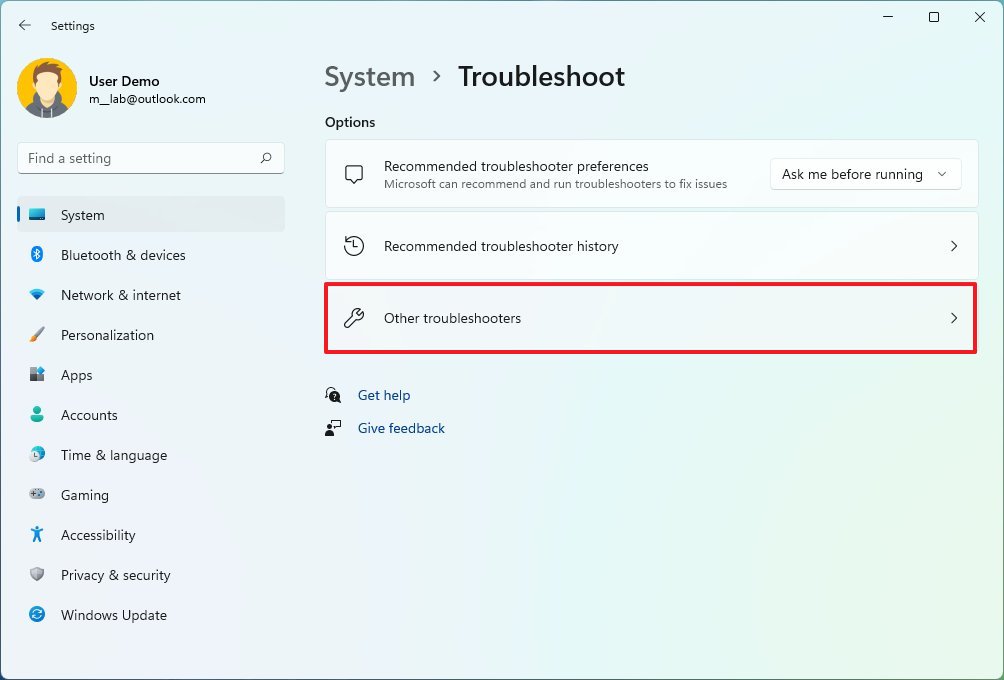
- Click the Troubleshoot page on the right side.
- Click the Other troubleshooters setting.
- Click the Run button for the “Windows Update” troubleshooter.
- Click the “Apply this fix” option (if applicable).
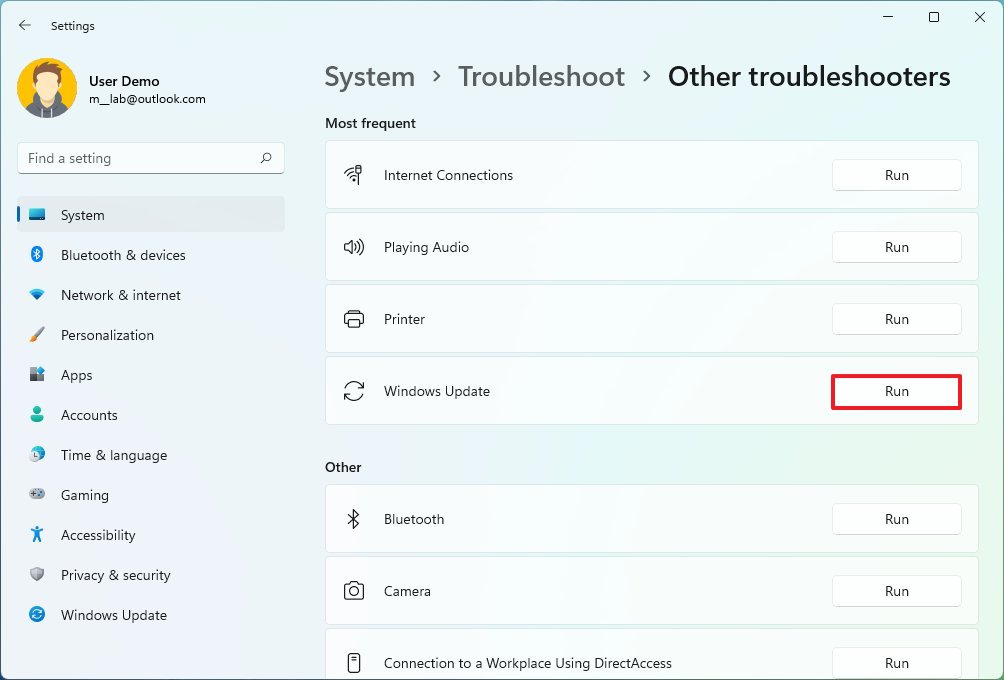
- Quick note: If you don’t see the option to apply a fix, it does not mean that nothing hasn’t been fixed. The tool will run a series of fixes, and if there’s something else you need to repair, the option to apply the fix will appear.
- Continue with the on-screen directions (if applicable).
- Click the Close button.
- Restart the computer.
Once you complete the steps, you can try applying the update one more time from the Windows Update settings.
In the case that you see the error code 0xc1900223, the system has a problem downloading and installing the update. Windows Update will try to upgrade at a different time.
Error code 0x80073712
When you see the error code 0x80073712, one or more installation files could be damaged or missing, as the installation won’t continue.
To get around this issue, remove the temporary files and redownload the version 22H2 files from Windows Update with these steps:
- Open Settings.
- Click on System.
- Click the Storage page on the right side.
- Click the Temporary files setting.
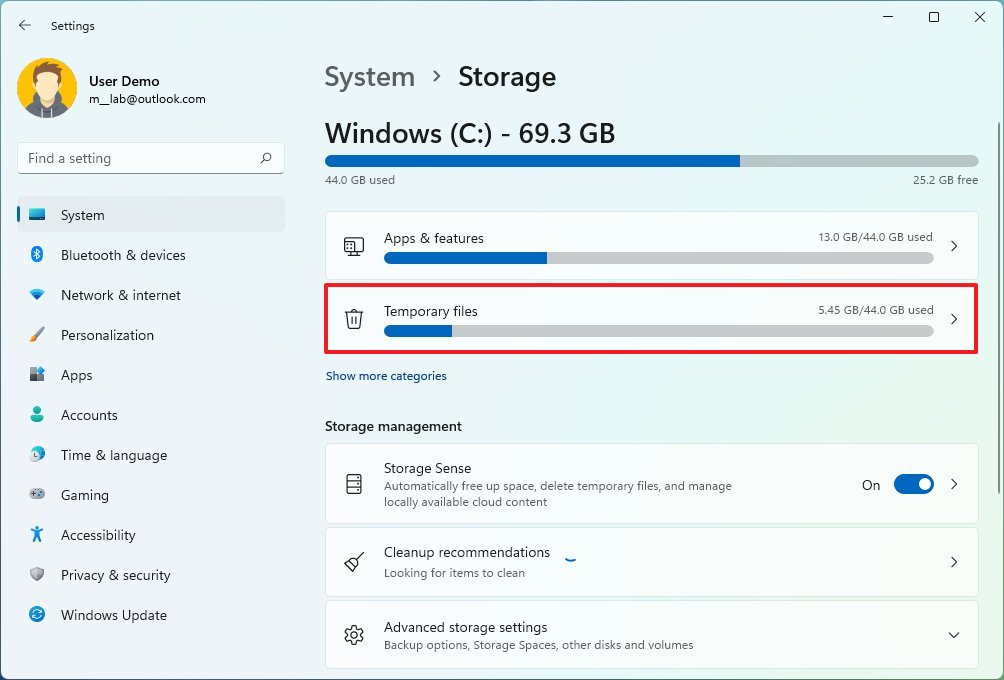
- Clear the current selections.
- Check the Temporary Windows Installation files or Windows Setup temporary files item.
- Click the Remove files button.
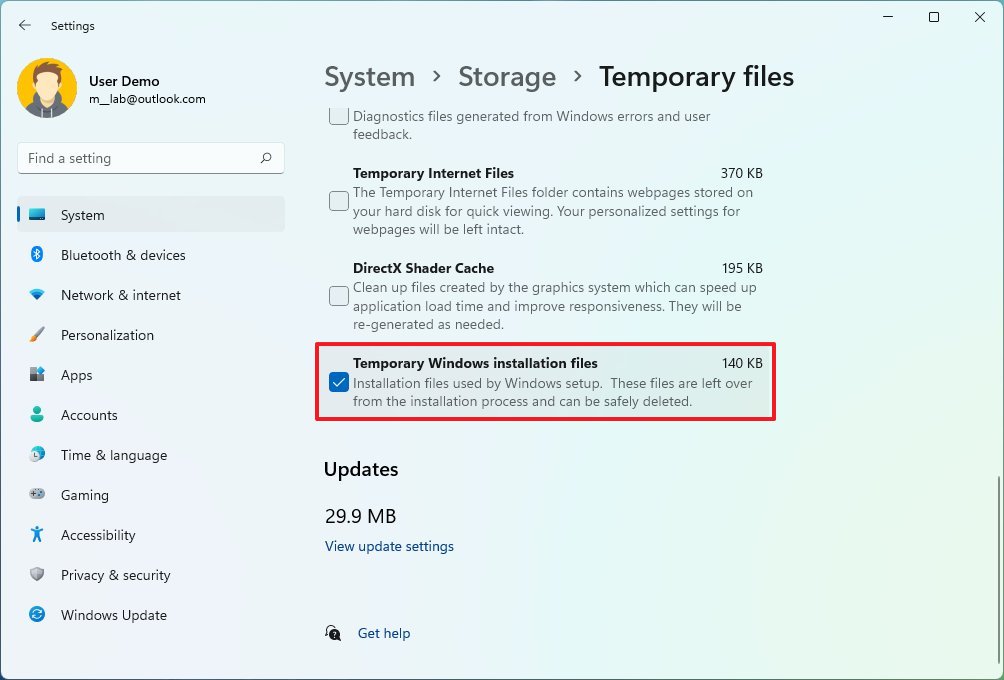
After completing the steps, Windows Update will download the installation files again to upgrade to version 22H2.
If the problem continues, use an alternative upgrade method, including the ISO file or Installation Assistant.
Error code 0x800F0922
The error code 0x800F0922 indicates that the computer can’t connect to the download servers. However, it could also mean that the system reserved partition doesn’t have enough space.
Fix server connection
If the computer cannot connect to the download servers, it’s typically a problem with a VPN connection. If this is the case, disconnect the device from the VPN server and then try to upgrade.
Fix reserved partition
If the reserved partition doesn’t have enough space, you will need to use a third-party tool to change the partition side to something larger than 500MB. Or continue with the upgrade using a clean installation.
Fix problems with Windows 11 Setup
When upgrading to version 22H2 through Windows Update, Installation Assistant, ISO file, or any other method, the setup may get stuck due to other processes running in the background that can result in the error code 0x8007042B or 0x800700B7.
You can resolve this problem in at least three ways. You can identify and terminate the process with Task Manager, perform a clean boot of Windows 11, or temporarily uninstall those conflicting apps. Usually, the problem is third-party security software like antivirus.
Terminate process using Task Manager
To terminate a process with Task Manager, use these steps:
- Open Start.
- Search for Task Manager and click the top result to open the app.
- Click the More details button (if applicable).
- Select the conflicting app or process.
- Click the End task button.
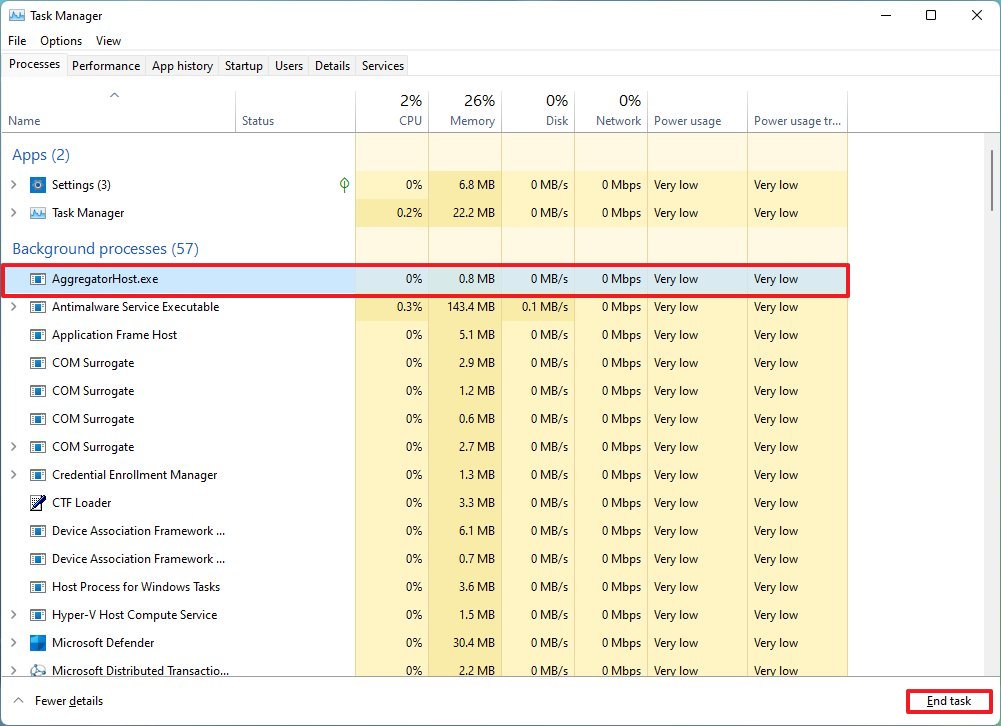
You may need to repeat the steps to terminate other processes. Once you complete the steps, you can proceed with the upgrade again.
Uninstall apps
To remove an app, use these steps:
- Open Settings.
- Click on Apps.
- Click the Apps & features page on the right side.
- Click the menu button for the app and select the Uninstall button.
- Click the Uninstall button again.
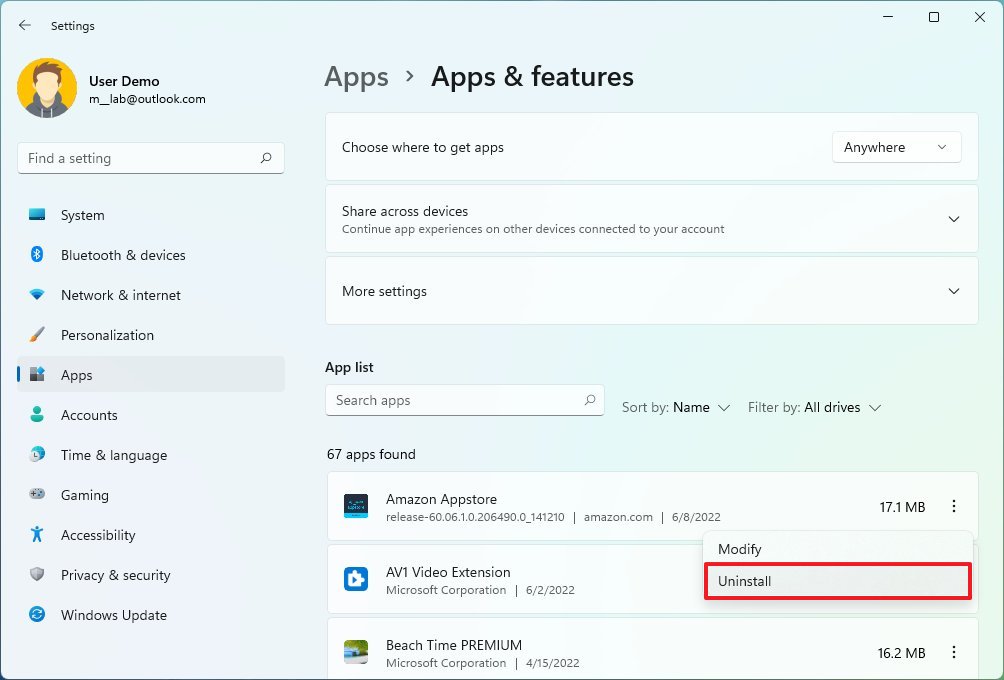
You may need to repeat the steps to uninstall other apps. After you complete the steps, you can continue with the upgrade again.
Fix problems with USB media on Windows 11 2022 Update
If you plan to install the Windows 11 2022 Update with a USB flash drive, but the setup fails, it means that one or more files are missing or damaged. The best thing you can do is to create another installation media.
To create a USB flash drive to install version 22H2, use these steps:
- Open Microsoft download page (opens in new tab).
- Under the “Create Windows 11 installation media” section, click the Download Now button.
- Double-click the MediaCrationToolW11.exe file to launch the tool.
- Click the Accept button.
- Click the Next button.
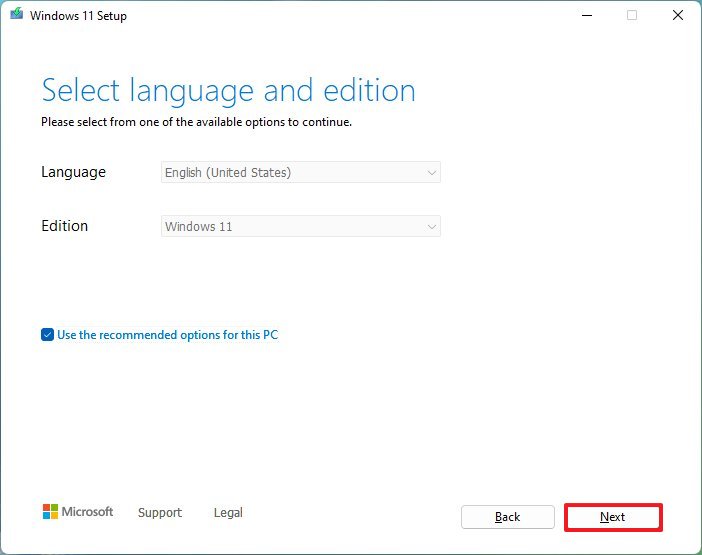
- Select the USB flash drive option.
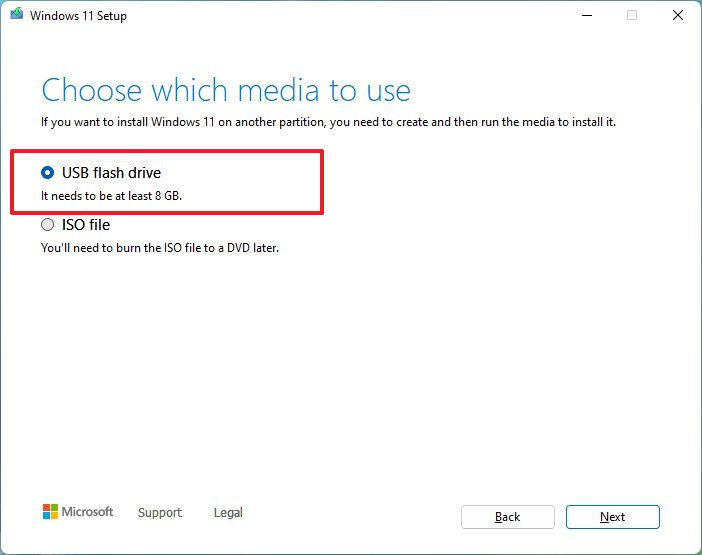
- Click the Next button.
- Select the USB flash drive from the list.
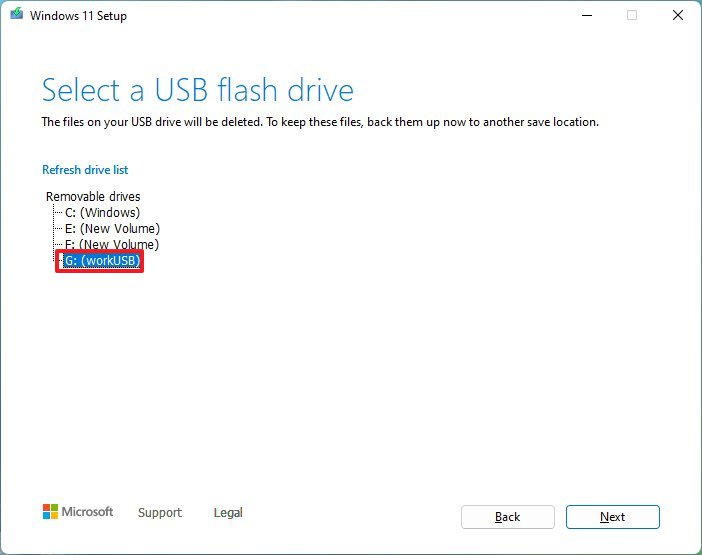
- Click the Next button.
- Click the Finish button.
If the installation keeps failing, you could alternatively download and mount the ISO file to launch the setup and continue with the upgrade.
Fix problems with Installation Assistant on Windows 11 2022 Update
The Installation Assistant is a tool designed to upgrade a system to the latest version of Windows 11 when the Windows Update settings are not working.
Usually, problems with the tool are related to networking. If this is the case, use these troubleshooting steps:
- Close the Installation Assistant, disconnect the network cable or disconnect the device from the wireless network. Wait sixty seconds, reconnect the adapter, and restart the tool.
- Restart your computer, reopen the Installation Assistant, and continue with the upgrade.
If you can’t fix the problem, it’s best to mount the ISO file to File Explorer or create a USB flash drive to launch the upgrade wizard.
Fix error code 0xC1900101 upgrading to Windows 11 2022 Update
The error codes with 0xC1900101 or 0x80090011 indicate a problem during the upgrade process.
You may come across one of the other following errors:
- 0xC1900101 – 0x2000c
- 0xC1900101 – 0x20017
- 0xC1900101 – 0x30017
- 0xC1900101 – 0x30018
- 0xC1900101 – 0x3000D
- 0xC1900101 – 0x4000D
- 0xC1900101 – 0x40017
Disconnect devices
Disconnect any peripherals (such as external drives, printers, Bluetooth devices, USB devices, and cameras) from your computer to minimize the chances of problems during the Windows 11 2022 Update installation.
After the upgrade, you can reconnect the devices one at a time.
Cleanup storage space
Usually, a new feature update installation requires around 20GB of available space. If the system runs out of space during the upgrade, you will see one of the errors above.
You can use this guide (opens in new tab) to find the best tips to free up storage space on your device.
Uninstall apps
If the problem is a third-party security program, you will likely see one of the 0xC1900101 0x20017 or 0xC1900101 0x30017 error codes.
You can quickly resolve this problem by removing the antivirus, anti-spyware, or any other security application.
To temporarily remove security software, use these steps:
- Open Settings.
- Click on Apps.
- Click the Apps & features page on the right side.
- Click the menu button for the app and select the Uninstall button.

- Click the Uninstall button again.
- Continue with the on-screen directions (if applicable).
Once you complete the steps, you should be able to upgrade without problems. After the installation, you may be able to install the apps again.
Update drivers
If the issue is a driver, you will likely see an error code that starts with 0xC1900101 or 0x80090011. You can always update the driver in question to resolve the issue.
You should always use the manufacturer’s instructions when updating a device driver. If you can’t find them, you can refer to these steps:
- Open Settings.
- Click on Windows Update.
- Click the Advanced options page on the right side.
- Under the “Additional options” section, click the Optional updates setting.
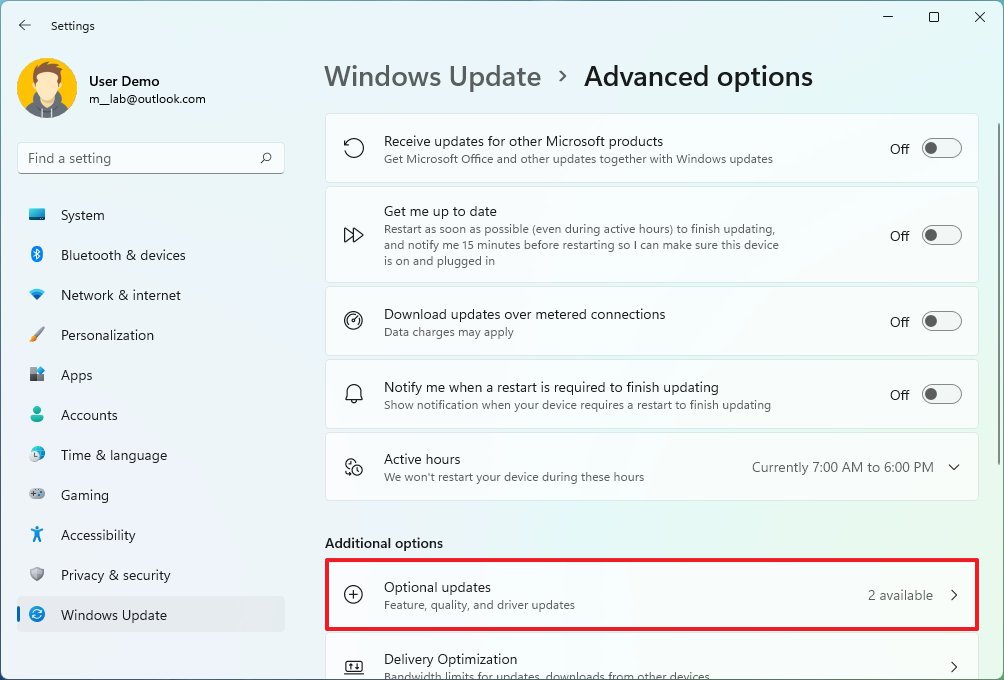
- Select the available driver update.
- Click the Download and install button.
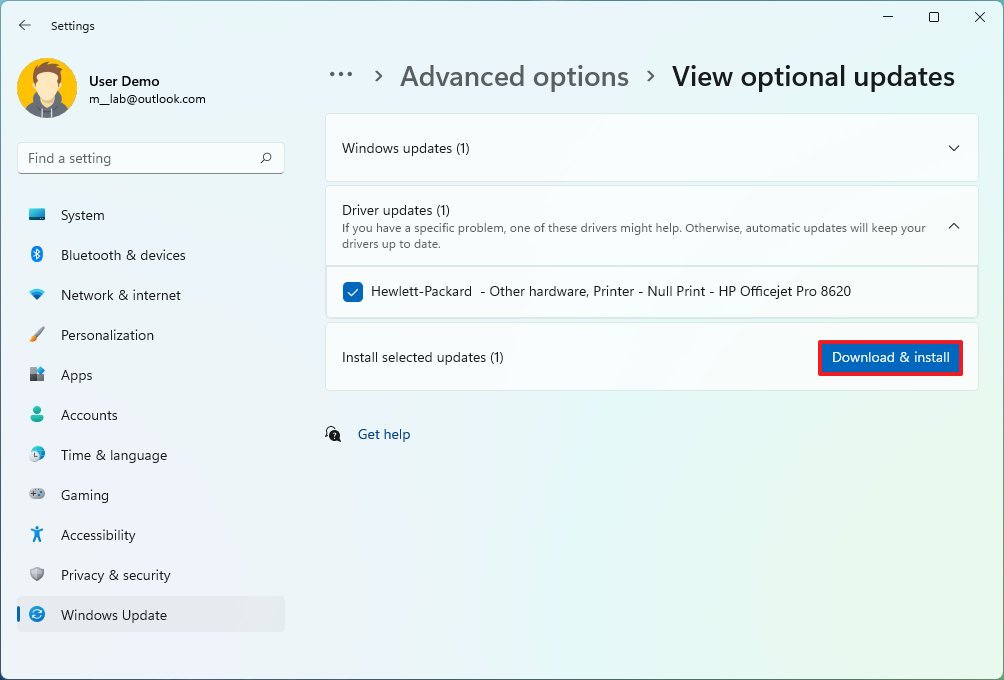
After completing the steps, the device should no longer encounter the error as you upgrade to version 22H2.
Repair setup
An error code with 0xC1900101 might also mean that you have a problem with the current installation. In this case, you can use the Deployment Servicing and Management (DISM) and the System File Checker (SFC) tools to repair the setup.
To fix Windows Update problems with DISM and SFC, use these steps:
- Open Start.
- Search for Command Prompt, right-click the top result, and select the Run as administrator option.
- Type the following command and press Enter: dism /Online /Cleanup-image /Restorehealth
- Type the following command to repair the installation and press Enter: SFC /scannow
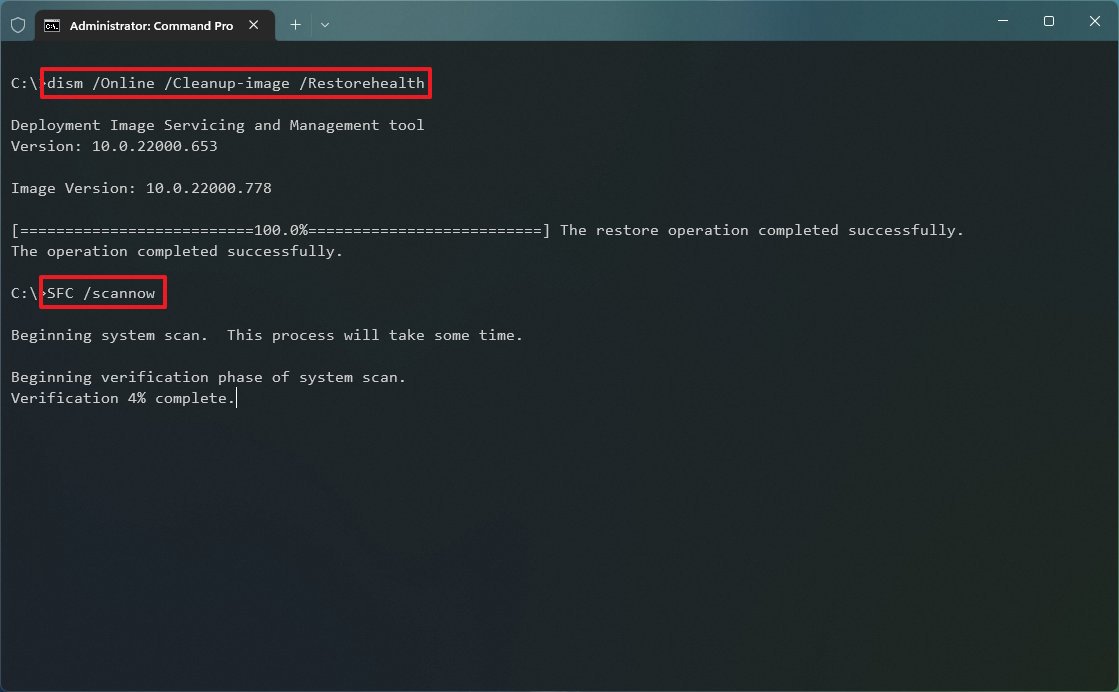
Once you complete the steps, the DISM command will repair the files of the local image, and the SFC command will use the local image to repair the current installation so you can proceed with the upgrade to version 22H2 without issues.
You can refer to this guide (opens in new tab) to use the tools to repair the installation.
Repair installation drive
In addition to the DISM and SFC tools, you can also use the CHKDSK command to fix logical and specific physical errors on the installation drive.
To repair the hard drive with the CHKDSK tool, use these steps:
- Open Start.
- Search for Command Prompt, right-click the top result, and select the Run as administrator option.
- Type the following command and press Enter: chkdsk/f c:
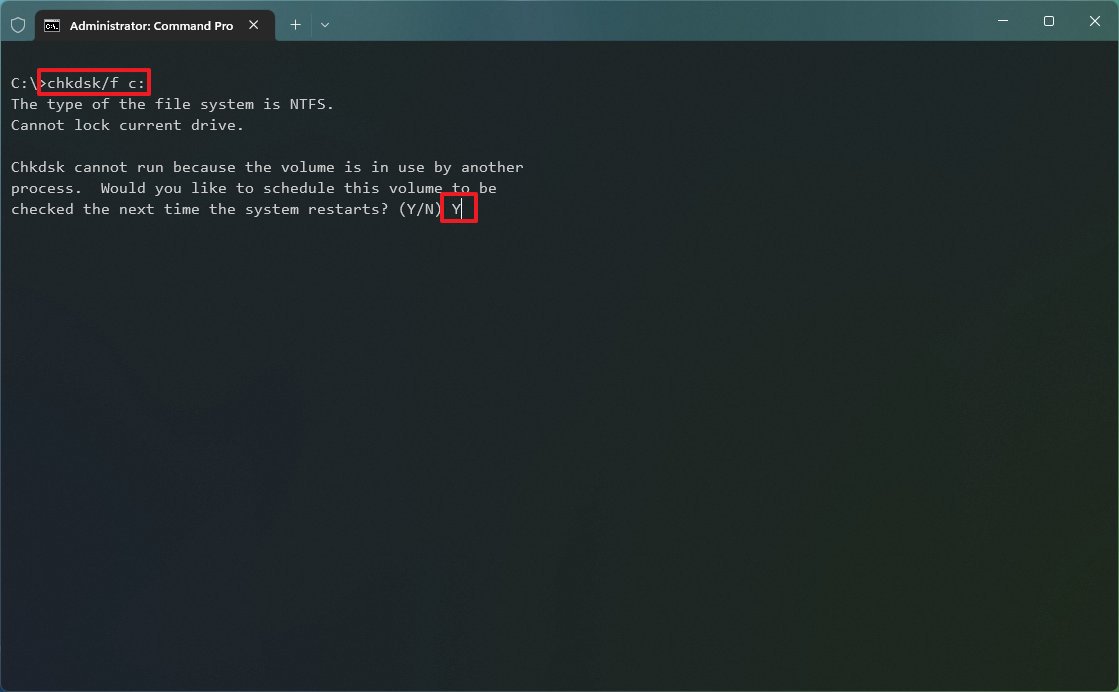
- Type Y and press Enter to schedule a scan.
- Restart the computer.
Once you complete the steps, the device will start in the Windows Recovery Environment to run the tool and repair the hard drive.
Clean install
If the problem persists, you should perform a clean installation (opens in new tab) with an ISO file or USB flash drive to upgrade to the Windows 11 2022 Update.
Fix error code 0x80070002 0x20009 upgrading to Windows 11 2022 Update
The error code 0x80070002 0x20009 may occur during the upgrade to Windows 11 version 22H2 if the installation wizard can’t find one or more of the setup files.
Usually, disconnecting the external drives, except the USB installation media, can resolve the issue. (You may need to restart the process after disconnecting the peripheral.)
Fix error code 0x80070070 upgrading to Windows 11 2022 Update
The error code 0x80070070 – 0x50011, 0x80070070 – 0x50012, or 0x80070070 – 0x60000 mean that the device does not have enough storage to continue with the installation. Using the storage settings to free up space can fix the problem.
To free up space on your computer, use these steps:
- Open Settings.
- Click on System.
- Click the Storage page on the right side.
- Click the Temporary files setting.
- Check the items to clear from the hard drive.
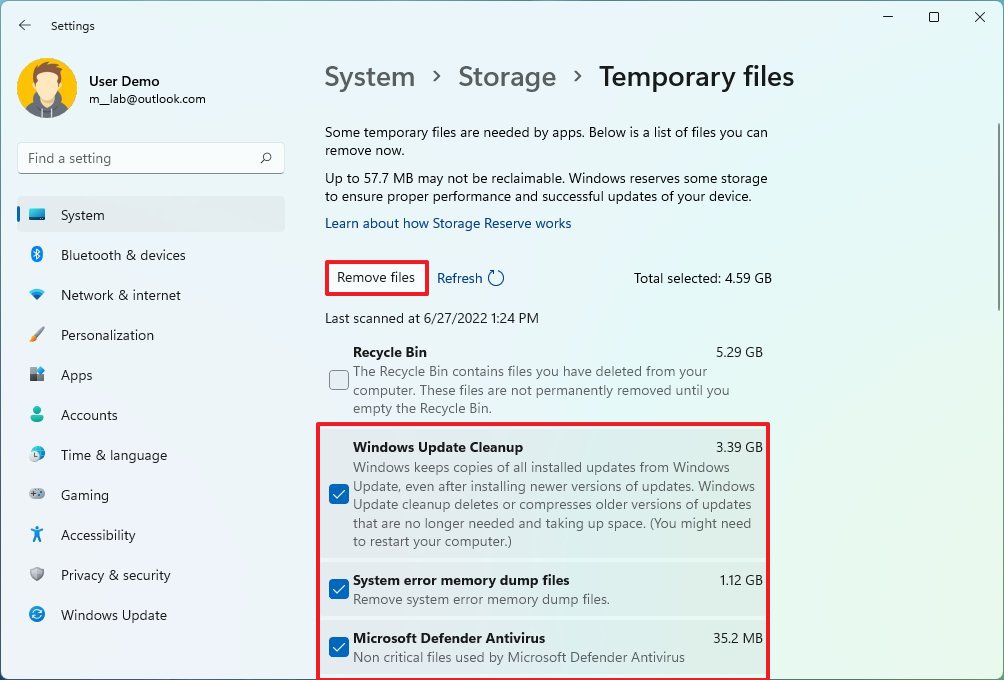
- Quick note: When selecting the items, do not choose the “Windows Setup temporary files” or “Windows ESD installation files” options since these are the upgrade files.
- Click the Remove files button.
After you complete the steps, continue with the upgrade of Windows 11 version 22H2.
Alternatively, you can connect any USB drive with at least 16GB of storage that the setup can use as temporary space to perform the upgrade.
Fix error code 0x800F0923 installing to Windows 11 2022 Update
When there’s a compatibility problem with an application or driver, you will probably see the error code 0x800F0923.
This error could be caused by many applications (outdated programs, old drivers, or third-party antivirus), but it is usually a problem with the graphics driver.
If the problem is known, the Windows 11 Setup should be able to describe the issue.
The best recommendation when dealing with a driver is to update the component. If the manufacturer doesn’t have an updated version of the driver, you can download the latest beta release (if applicable).
Alternatively, you can uninstall the driver to proceed with the installation. However, if this is a known issue, it’s best to wait until a permanent fix is available and then upgrade.
Uninstall driver
To uninstall a device driver on Windows 11, use these steps:
- Open Start.
- Search for Device Manager, and click the top result to open the app.
- Expand the branch with the device having issues.
- Right-click the component and select the Uninstall device option.
- Click the Uninstall button again.
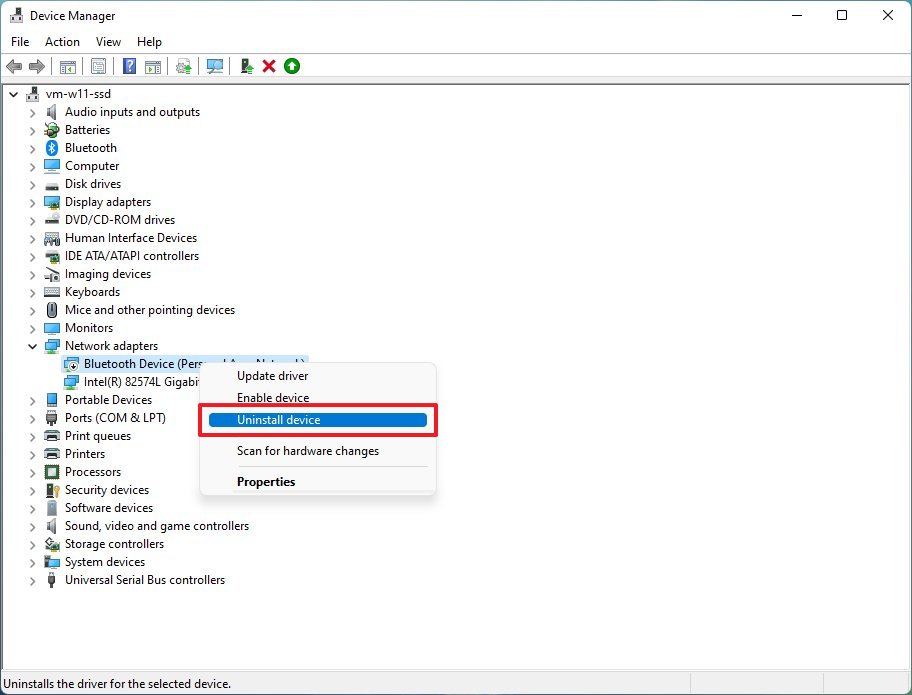
After completing the steps, the Windows 11 version 22H2 should install without issues.
Uninstall app
To uninstall an app on Windows 11, use these steps:
- Open Settings.
- Click on Apps.
- Click the Apps & features page on the right side.
- Click the menu button for the app and select the Uninstall button.
- Click the Uninstall button again.

Once you complete the steps, you can continue with the version 22H2 setup.
The error code 0xC1900208 – 0x4000C also indicates a conflict with an application. You can use the above steps to uninstall the app.
Fix error code 0x80300024 installing to Windows 11 2022 Update
When you come across the error 0x80300024, it indicates that there’s a problem with the target drive, partition, or volume.
You can try different troubleshooting steps if the Windows 11 version 22H2 setup is shouting the error 0x80300024. For example, try disconnecting all unnecessary drives if the device contains more than one drive. If the partition doesn’t have at least 64GB of space or it has errors, delete the partition and let the setup create the necessary partitions. In the case that nothing seems to work, the drive may be damaged, and you may need to replace it.
Fix failure to complete installation of Windows 11 2022 Update
When upgrading from the original release of Windows 11 to version 22H2, you may also see two unclear messages:
- Error: We couldn’t complete the updates. Undoing changes. Don’t turn off your computer.
- Error: Failure configuring Windows Updates. Reverting changes.
If you receive one of these messages, you will need to dig into the Windows Update settings to find out the error, which you will have to research online to find a solution to.
To retrieve the error code blocking the installation of the Windows 11 2022 Update, use these steps:
- Open Settings.
- Click on Windows Update.
- Under the “More options” section, click the Update history setting.
- Confirm the error code under the update that failed to install.
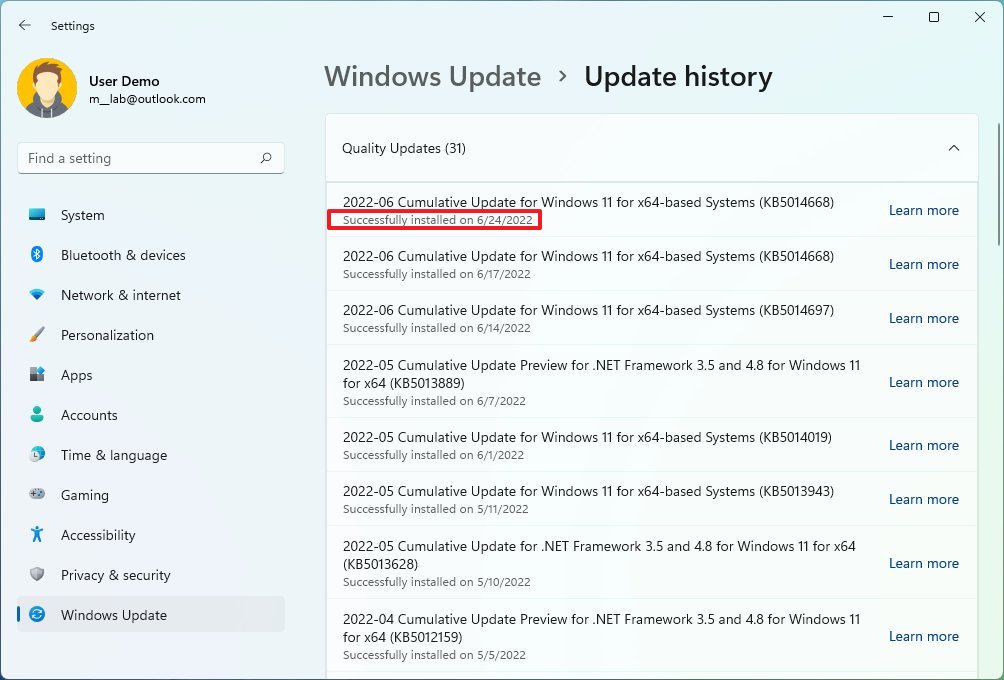
- Copy the code and research online for a possible solution.
After you complete the steps, you may be able to find details about the problem and instructions to resolve it.
Fix black screen on Windows 11 2022 Update
A black screen can sometimes occur during or after a new installation. Usually, it’s the graphic driver or another problem with the upgrade process.
Since it can be challenging to determine the reason, the easiest way to deal with this situation is to roll back to the previous version.
To uninstall and roll back to the previous version of Windows, use these steps:
- Open Settings.
- Click on System.
- Click the Recovery page on the right side.
- Under the “Recovery options” section, click the Go back button in the “Previous version of Windows” settings.
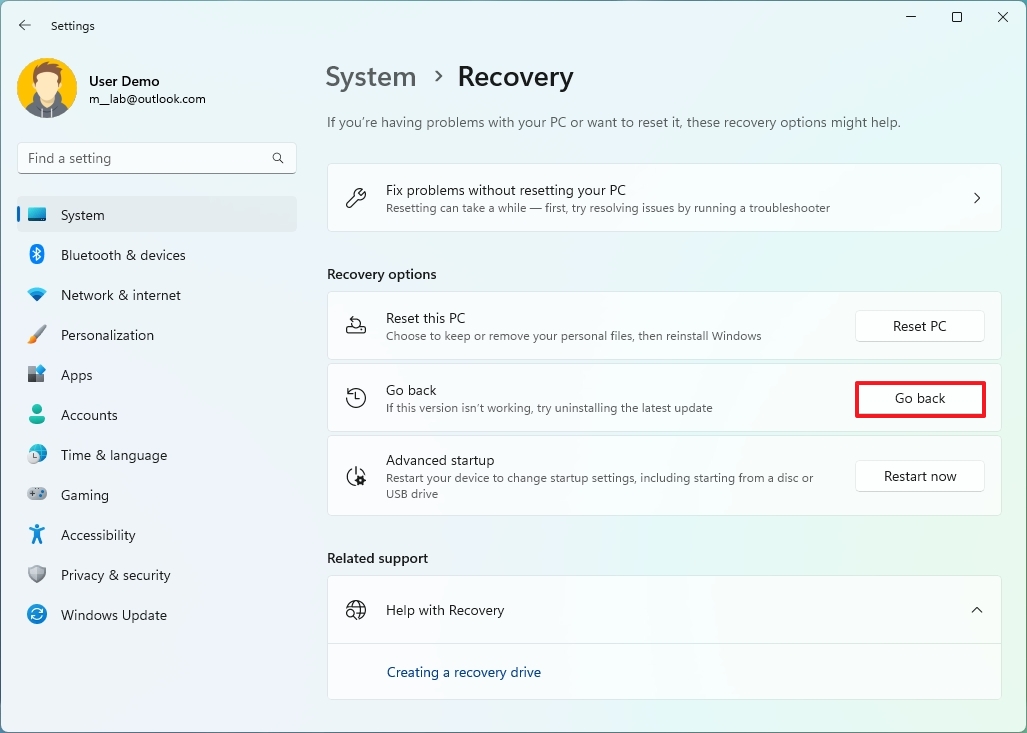
- Quick note: If the option is unavailable, you may need to use the reinstallation process outlined below.
- Select any of the reasons available.
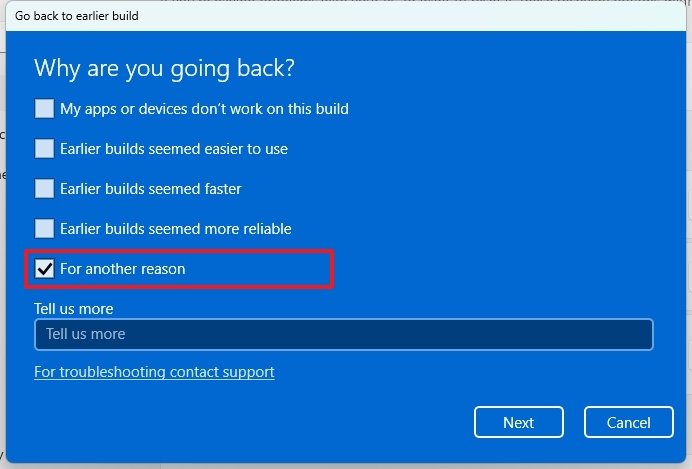
- Click the Next button.
- Click the No, thanks button.
- Click the Next button.
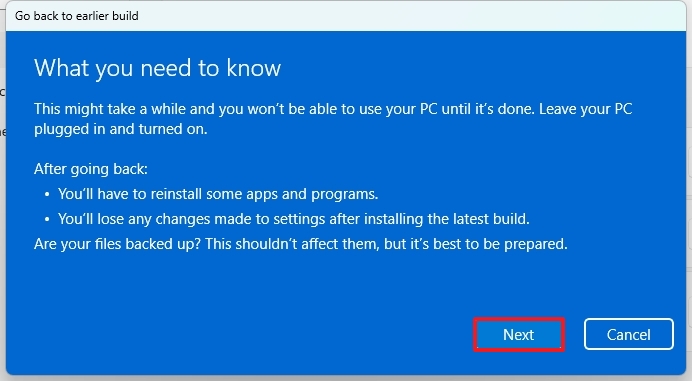
- Click the Next button again.
- Click the Go back to earlier build button.
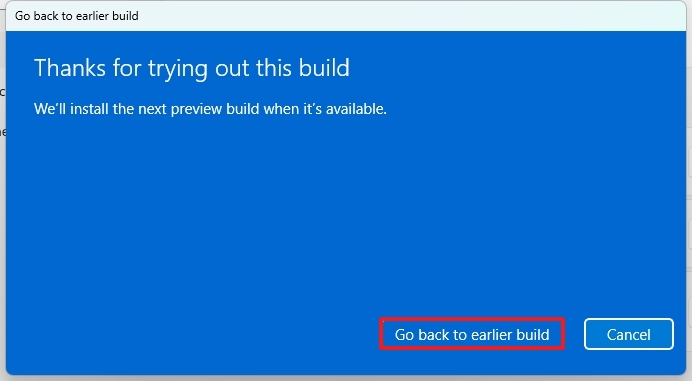
After completing the steps, consider waiting until an update that fixes the problem before upgrading.
Fix networking issues on Windows 11 2022 Update
Problems with Ethernet and Wi-Fi adapters are among the most common issues after upgrading to a new version of Windows.
Although networking problems can occur by many factors like drivers, settings, wireless signal, cable, switch, router, and Internet Service Provider (ISP), it could also be a bug inside the latest feature update.
The problem could be a driver or configuration if the device was recently upgraded to Windows 11 version 22H2. You may be able to fix this issue using the network troubleshooter or the network reset feature.
Network troubleshooter
To fix network adapter problems after upgrading to Windows 11 2022 Update, use these steps:
- Open Settings.
- Click on System.
- Click the Troubleshoot page on the right side.
- Click the Other troubleshooters setting.

- Under the “Other” section, click the Run button for the “Network Adapter.”
- Continue with the on-screen directions (if applicable).
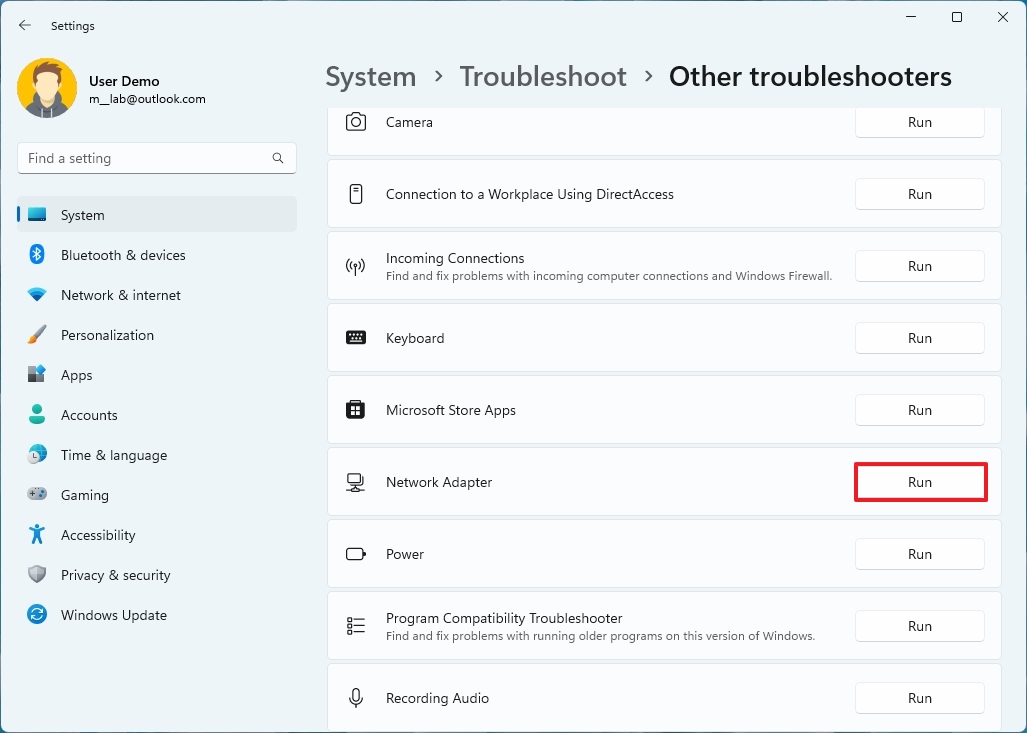
Once you complete the steps, the computer should reconnect to the network as usual.
Network reset
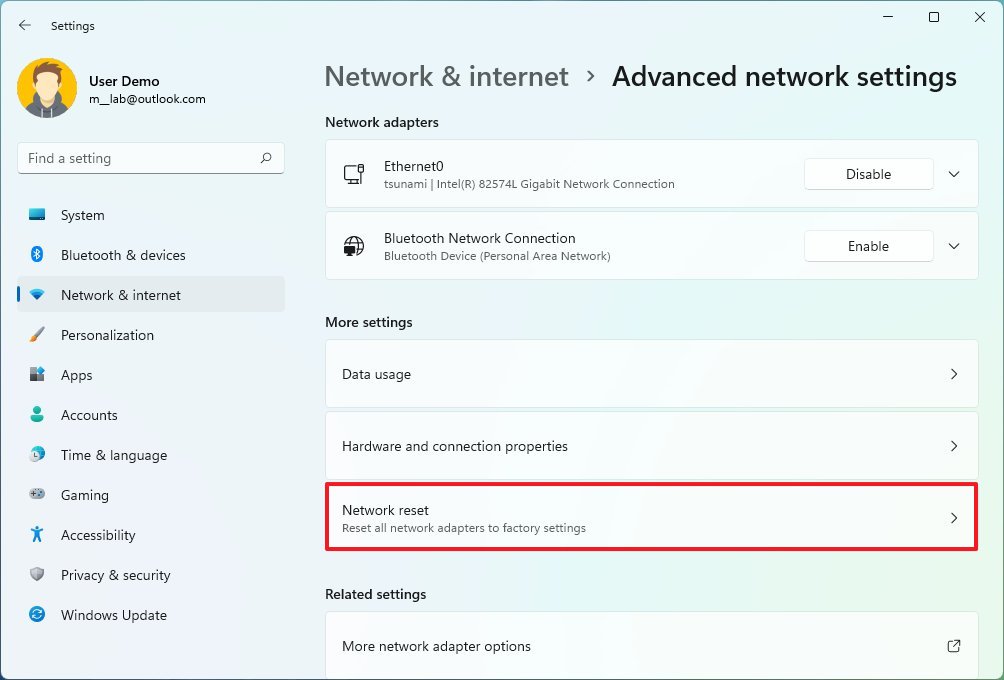
To reset network adapters on Windows 11 to their default settings, use these steps:
- Open Settings.
- Click on Network & internet.
- Click the Advanced network settings page on the right side.
- Under the More settings section, click the Network reset setting.
- Click the Reset now button.
- Click the Yes button.
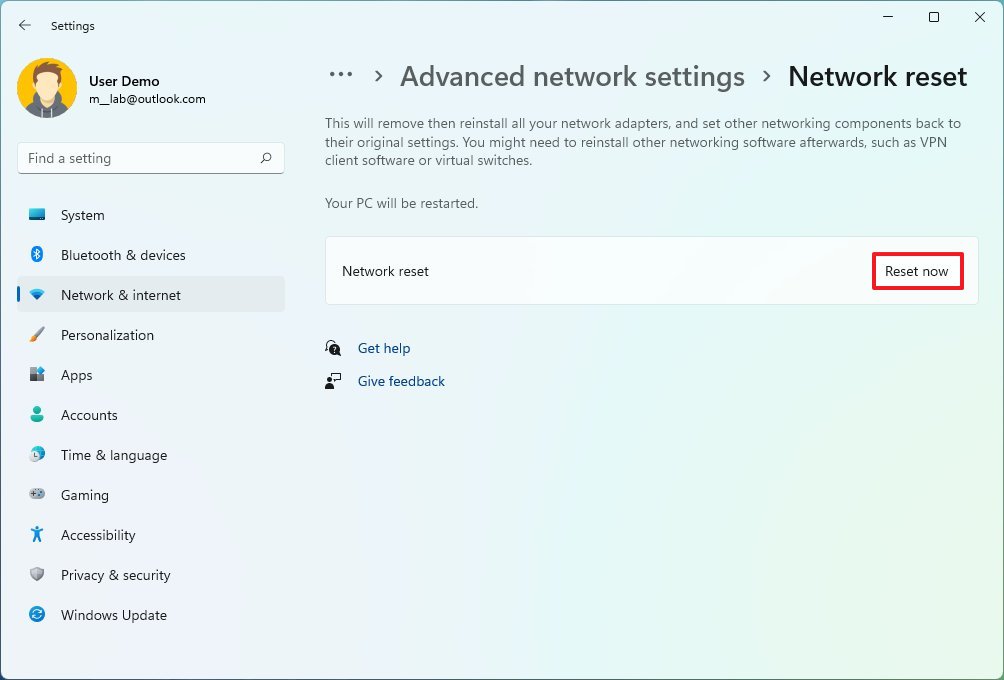
After completing the steps, the system will reinstall all the adapters and restore the default settings. You may need to re-enter the password to connect if you use a wireless connection.
Fix unsupported hardware problems on Windows 11 2022 Update
If you try to upgrade an older system (for example, a computer running Windows 10), you may get the “Error this PC doesn’t currently meet Windows 11 system requirements” message.
If you receive this message, the setup will list the problems that make your computer incompatible. Usually, it means that TPM and Secure Boot are disabled or non-present in the system. It could also indicate the processor is not in the supported list.
The error codes 0xC1900200 – 0x20008 and 0xC1900202 – 0x20008 will also appear if the computer doesn’t meet the minimum requirements for version 22H2.
Enable TPM and Secure Boot
If the computer supports TPM 2.0 and Secure Boot, you can enable these features in the UEFI firmware of the motherboard. Here’s how:
- Open Settings.
- Click on Update & Security.
- Click on Recovery.
- Under the “Advanced startup” section, click the Restart now button.
- Click the Restart now button again.
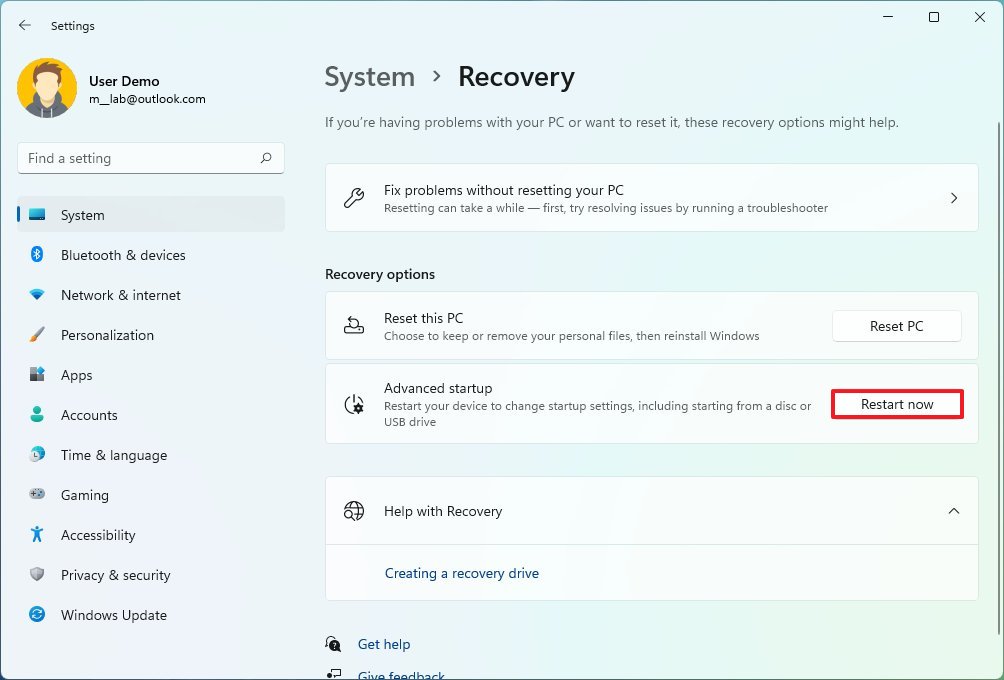
- Click on Troubleshoot.
- Click on Advanced options.
- Click the UEFI Firmware Settings option.
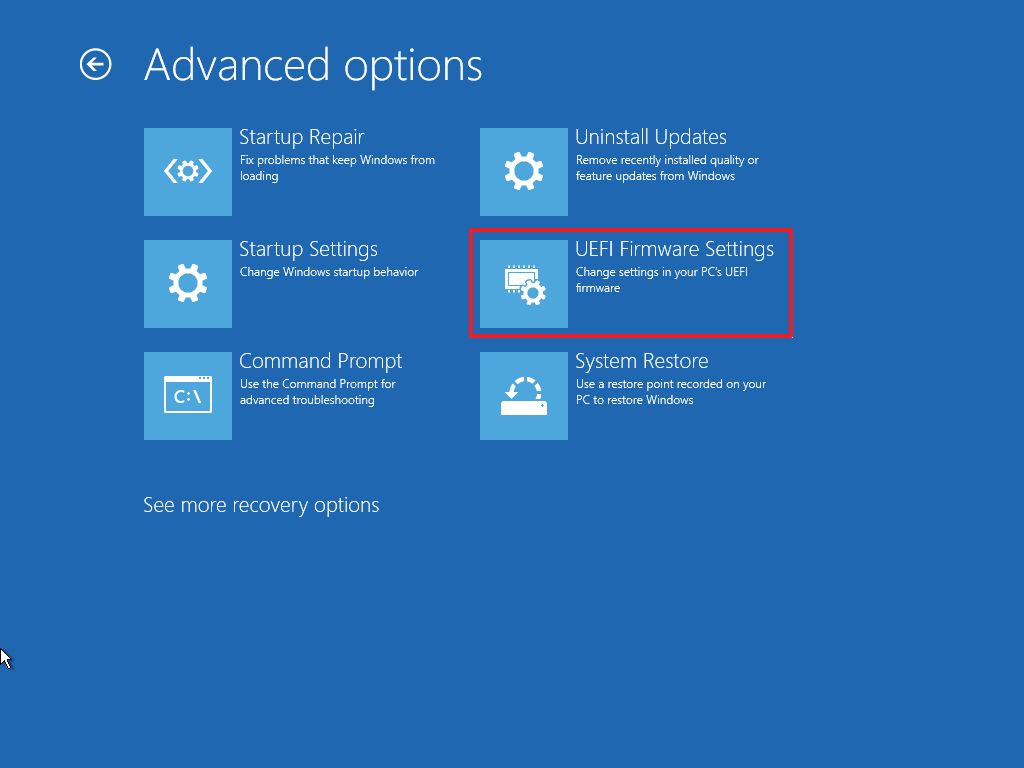
- Click the Restart button.
- Open the security or boot settings and enable TPM 2.0 (if applicable).
- Enable Secure Boot (if applicable).
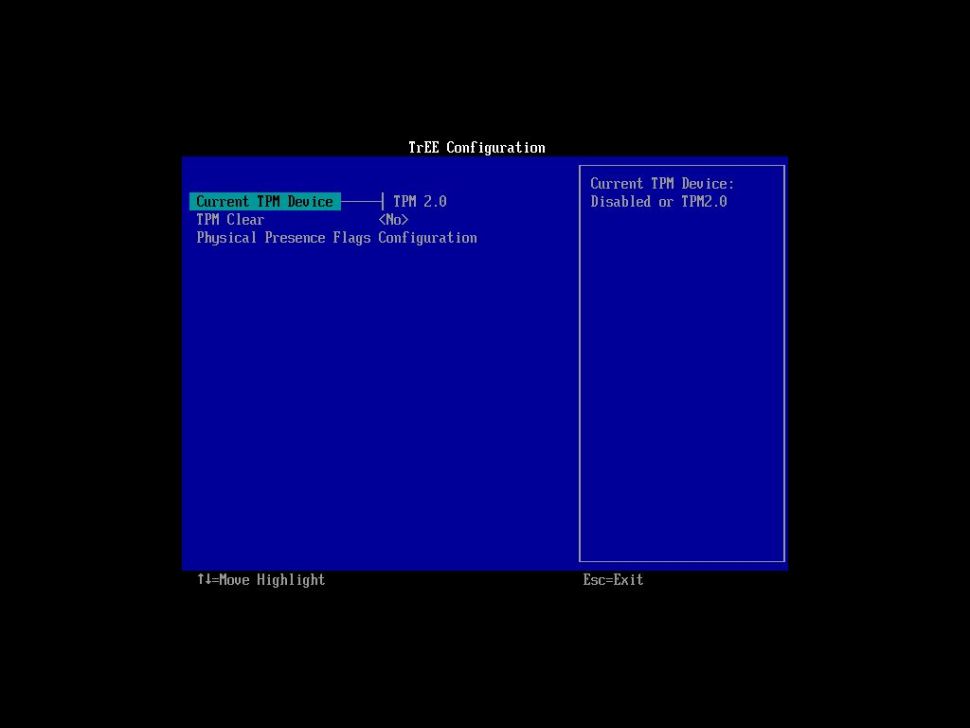
The feature may be available in the processor on motherboards that don’t incorporate a TPM chip. For example, on AMD processors, the feature will appear as “fTPM” or “AMD fTPM switch,” and on Intel processors as “PPT.”
Windows 11 2022 Update official requirements
These are the minimum requirements to install any version of Windows 11:
- Processor: 1GHz or faster CPU or System on a Chip (SoC) with two or more cores.
- Memory: 4GB.
- Storage: 64GB or larger.
- System firmware: UEFI with Secure Boot enabled.
- Graphics: Compatible with DirectX 12 or later with WDDM 2.0 driver.
- TPM: Trusted Platform Module (TPM) version 2.0.
- Display resolution: High definition (720p) display greater than 9 inches diagonally, 8 bits per color channel.
Windows 11 version 22H2 install recommendations
Although the Windows 11 2022 Update will roll out slowly, starting with devices known to have a smooth upgrade experience, there are always risks of stumbling upon problems during and after the installation. However, doing some simple preparation ahead of time can minimize the risks. Also, if the new version causes problems, you will be able to recover quickly without losing your files.
Create a backup
When you plan to upgrade to a newer version of Windows 11, creating a full backup is one of the best recovery strategies if something goes wrong and you need to roll back or recover your files.
You use any third-party backup software to complete this task. However, you can always create a temporary backup (opens in new tab) using the imaging tool available on Windows 11.
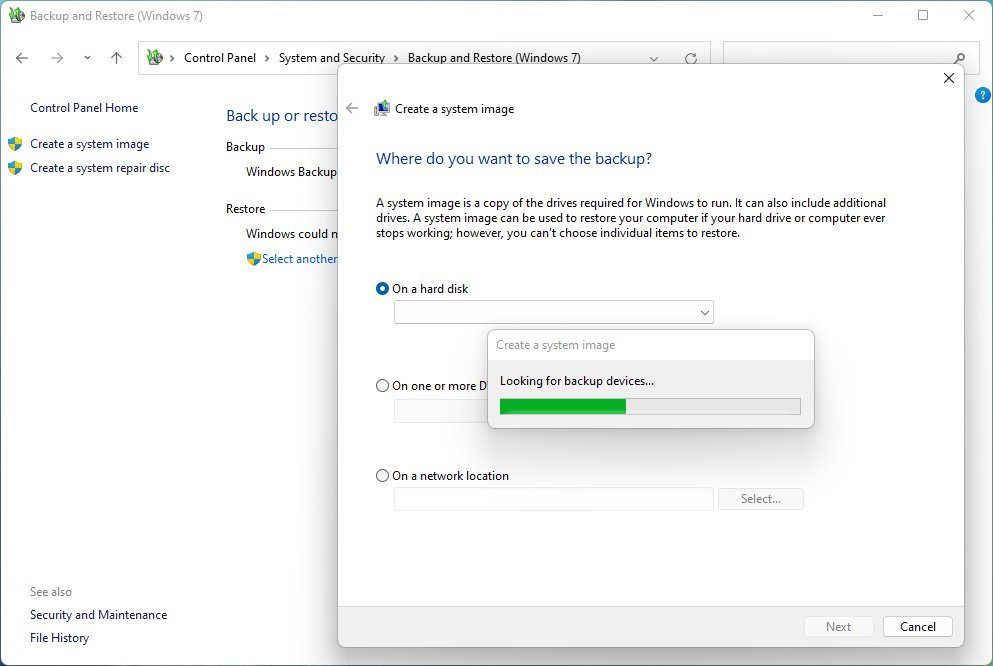
Furthermore, creating a file backup to an external drive or cloud is recommended using OneDrive.
Uninstall nonessential software
Those apps that were not designed for Windows 11 can cause compatibility problems. You can always avoid issues by removing apps (such as third-party security solutions) that may cause problems before the installation.
To uninstall apps on Windows 11, use these steps:
- Open Settings.
- Click on Apps.
- Click the Apps & features page on the right side.
- Click the menu button for the app and select the Uninstall button.
- Click the Uninstall button again.

After completing the steps, repeat the instructions to uninstall other apps as necessary.
Also, if you use a third-party antivirus or firewall, check the software support website for specific details on how to disable or uninstall the application. After the installation, you can install them again.
Disconnect nonessential peripherals
Usually, it’s a good idea to disconnect nonessential peripherals (USB flash drives, external hard drives, printers, scanners, dongles, and Bluetooth devices) because they can cause issues. You only need a monitor, keyboard, mouse, and internet connection.
After the installation, you can connect them again to the computer.
Clean install
Alternatively, you can perform a clean installation of Windows 11 if nothing has worked to address the problem.
Usually, a clean installation (opens in new tab) is the best approach to upgrading to a new version of Windows because you will be starting with a fresh copy that can also solve other problems from the previous setup. (The upgrade process modifies the previous installation, which sometimes can cause issues.)
More Windows resources
For more helpful articles, coverage, and answers to common questions about Windows 10 and Windows 11, visit the following resources:


