

Despite the growing prevalence of emails and other tech-based forms of communication, everyone will have to type a formal letter at some point in their lives. Whether you’re writing a letter of complaint, applying for a job, or formally expressing gratitude, it’s a handy tool to have in your locker.
Although Microsoft Word has hundreds of templates, I prefer to create most of my documents—including my letters—from scratch. This means I can tailor them more specifically to my requirements and save my formatting and layout for later use.
Different countries have slightly different letter-writing conventions. In this step-by-step guide, I will use the British style, but you can use all the tips wherever you are. If you’re writing a job application letter, the best bet is to study the website of the company you’re applying to, and check their spelling, punctuation, and general style.
1 Adding a Letterhead
Creating and using a letterhead at the top of your Microsoft Word letter helps you to give a good impression, establish an identity, and make your letter stand out. While usually reserved for business-related communications, whether you choose to include a letterhead on a personal letter depends on its purpose.
For example, when writing a job application letter, I like to include a mugshot and a simple strip of color to add a touch of professionalism. Similarly, adding this stylistic feature can add an air of authority if, for example, you’re writing a reference letter or complaint.

To create a letterhead, double-click anywhere in the header and check “Different First Page” in the Header and Footer tab on the ribbon to ensure your letterhead is on the first page only.
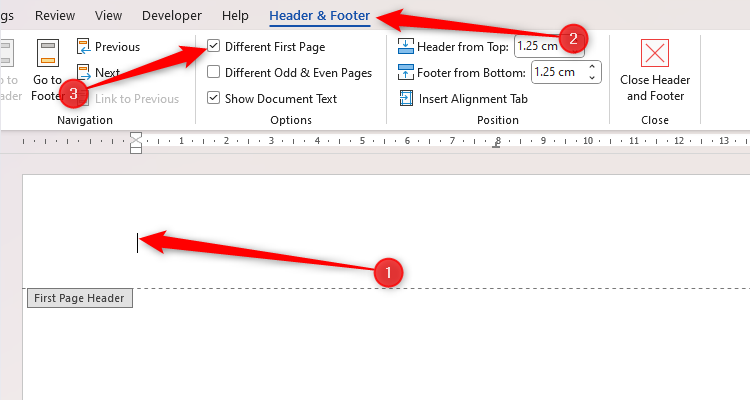
Then, adjust the header margins, so that you can use the full width of the page.

Now, create your letterhead design within the header. When you’ve finished, double-click anywhere underneath the header to reactivate the main area of your Word document, where you will begin typing your letter.
2 Defining the Styles
No matter what type of document I’m creating, I always think about the different styles I want to use before I start typing. For example, in a letter, I know I’ll need a Normal style for the main body, right-aligned text for my address, the List Paragraph style for bullet-pointed lists, and a bold style for stand-out text, such as the subject line.
While you can apply direct formatting to create your letter layout, using styles saves time and aids consistency, because you can apply several formatting changes to text with a single click.
Start by modifying the Normal style, focusing on the typeface (font) and paragraph spacing. Since the Normal style is the default style in Word, the changes you make will ripple through the other styles. To do this, right-click “Normal” in the Style Gallery on the Home tab, and click “Modify.”

I like to use justified alignment (meaning the text will be square to the left and right margins), a sans-serif font (such as Aptos, Calibri, or Arial), and size 12 font.
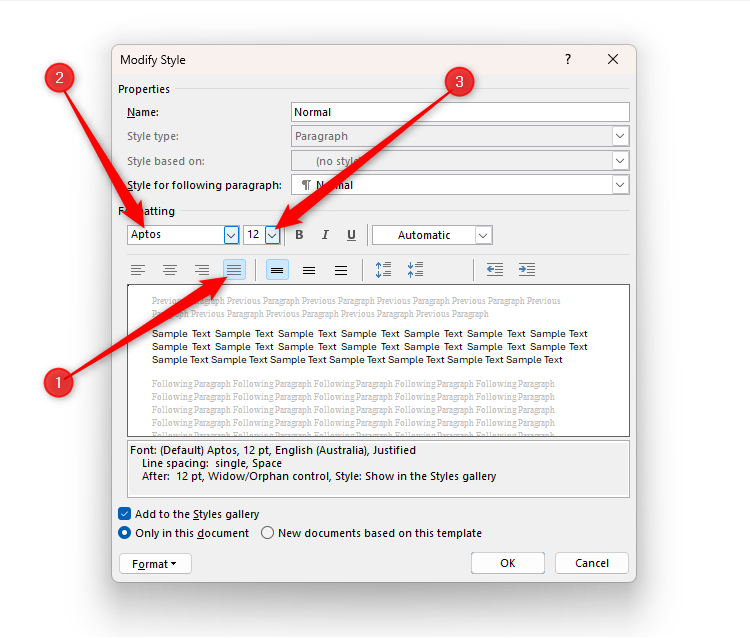
Next, click the “Format” drop-down menu at the bottom of the Modify Style dialog box, and click “Paragraph.”

There, change Spacing After to match the font size you chose in the previous step, choose your Line Spacing (I prefer to use single or 1.5 lines), make sure the “Don’t Add Space…” checkbox is unchecked, and click “OK” twice to close both dialog boxes.

Now that you’ve created your Normal style, you’re ready to create your other styles. One method is to press Ctrl+Alt+Shift+S to launch the Style Pane, where you can review and modify the existing styles.

Alternatively, begin typing your letter with placeholders where necessary, and press the Ctrl+Shift+S Word keyboard shortcut to create a new style by typing a new style name and clicking “Modify.” In the example below, I typed my own address, pressed Ctrl+Shift+S, and created a new style called MyAddress, with the text aligned to the right, and the “Don’t Add Space…” checkbox checked so that the lines stayed together.

Then, each time I want to apply the styles I created to more text in my letter, I simply have to place my cursor within the relevant paragraph, and click the style in the Style Gallery.
Don’t start writing the main content of your letter yet! Instead, create placeholders for your styles, and move to the next step.

3 Adding a Dynamic Date
All letters require a date somewhere near the top—I usually place mine underneath my address. While you can type the date manually, if you’re going to save your letter layout as a template, you can force Word to automatically update the date each time you open the document.
Place your cursor where you want the date to go, and choose the pre-defined style you want it to adopt. Then, click “Date And Time” in the Text group of the Insert tab on the ribbon to launch the Date And Time dialog box.
Now, in the Date And Time dialog box, choose the appropriate language and format, check “Update Automatically,” and click “OK.”

The date will then appear as though I typed it manually, where, in fact, it is an automatic field that will change according to the date on my computer.

If you don’t want the date to be dynamic (in other words, you want it to remain fixed), follow the same process, but don’t check “Update Automatically.”
4 Including a Signature
There are various ways to include a signature in a letter on Microsoft Word, including adding a digital signature through Word’s Signature Line tool. However, this tool is designed for more formal documents, such as a legal contract, and requires a digital signature certificate. You can also attempt to use Microsoft Word’s drawing tool, but this can look unnatural.
To keep things simple while ensuring my letter still looks the part, I prefer to sign on some paper by hand, and then upload it to my Word document.
First, use a black pen and white paper to create the signature, and take a photo using your phone. Then, send the signature to your computer—I use Microsoft Drop to do this in seconds, but you can also send it via email or another cloud platform, such as OneDrive.
Moving back to your PC, in Microsoft Word, click Insert > Pictures, and click “This Device.”

Once you have located and inserted your signature, use the Crop tool in the Picture Format tab to remove any extra space from the edges.

Then, use the Remove Background tool in the Picture Format tab to clear up any unwanted coloration around the edge of your signature.

When you activate this tool, Word will do most of the work for you, with the pink areas being the sections Word has identified as needing to be removed. You can also click “Mark Areas To Keep” and “Mark Areas To Remove” to further refine the image. When you’re happy, click “Keep Changes.”

When I first used this tool, I was skeptical of how successfully it would work, but I was pleasantly surprised by how intuitive it was (hence why I now use this method all the time!)

Right-click your finalized signature and click “Save As Picture,” so you can use it in future documents. Just make sure you save it somewhere safe, such as in your
OneDrive Personal Vault
.
5 Saving as a Template
If you’re happy with how everything looks, you’re ready to save your document as a template. To do this, press F12, and in the Save As dialog box, choose “Word Template” in the Save As Type drop-down menu. Then, after giving the template an appropriate name, click “Save,” and close the document.

Now, reopen open Word, and click New > Personal. When you click the saved template, it will open as a new document, ready for you to adjust as necessary.
6 Proofreading the Letter
When you’ve finished typing your letter, it’s ready for proofreading. There are two tools I always use to do this—Read Aloud and Editor, both of which are accessed through the Review tab on the ribbon.
Make sure you place your cursor at the start of your document before activating the Read Aloud tool.

The Read Aloud tool is useful because you’re likely to pick up on anything that doesn’t sound quite right when your letter is read back to you. Microsoft Editor is equally useful, as it’ll double-check your work for spelling and grammar errors, identify any non-inclusive language, make suggestions for style improvements, and more. You could also use Coaching with Copliot, but you’ll need to have purchased a Copliot license to do so.
Once you’re done, there are some other steps you can take to improve your Microsoft Word formatting.


