Windows File Explorer is a program that PC users are pretty familiar with. It’s fairly intuitive and unassuming and gets the job done. But it actually has a lot of nifty hidden little features that many users don’t know about. Windows doesn’t tell you about them, but I will.
There are a lot of differences between Windows 10 and Windows 11, but some are more minor than others. User interface things like menus and whatnot tend to change, and though some people will argue that the newer UI is better somehow, some of us like to stick with what we’re used to.
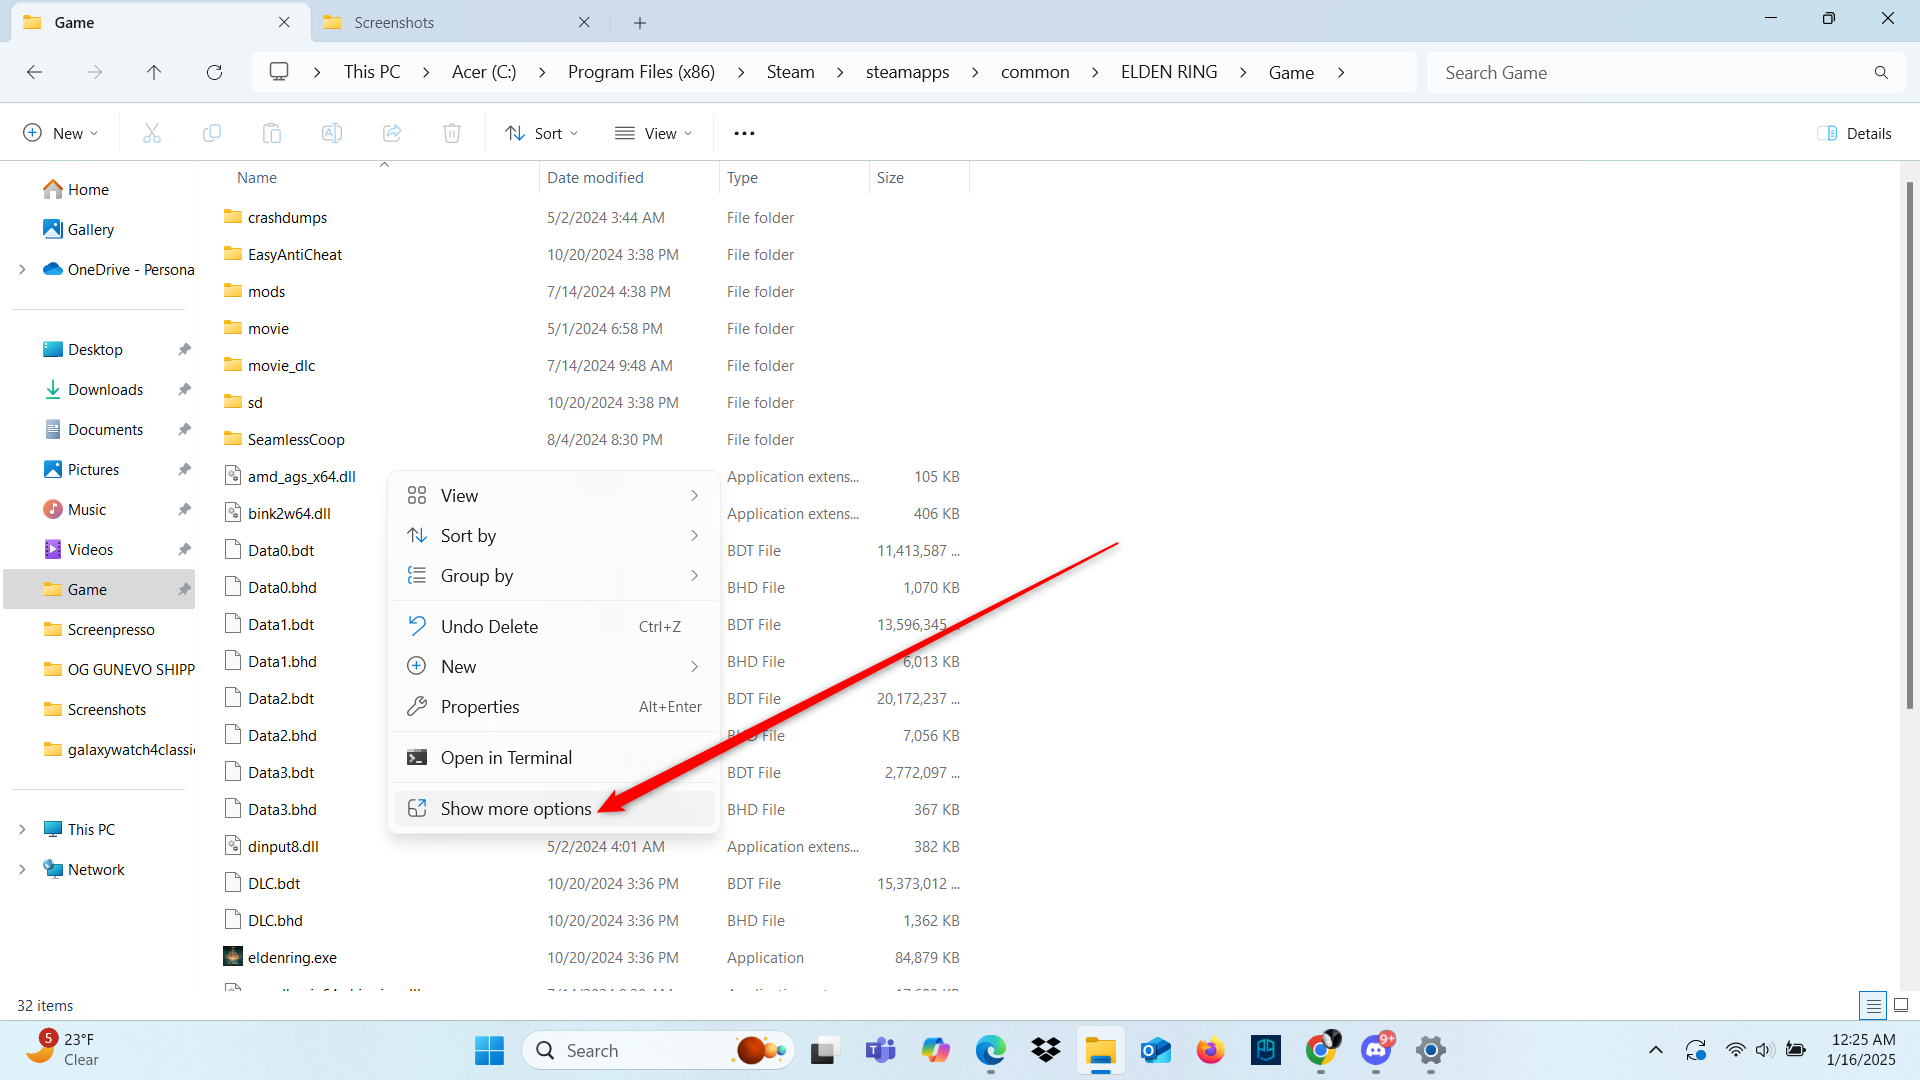
The context menu, which appears when you right-click on a file in File Explorer, was updated between Windows 10 and Windows 11, but if you prefer the older Windows 10 context menu, you can still access it in Windows 11’s File Explorer.
Once you’ve opened up the regular Windows 11 context menu, simply click on the “Show More Options.” Or, if you want to do things even more quickly, you can just right-click on the item in question while holding the Shift key. It’s a small thing, but one feature that most people aren’t even aware of.
If you want, you can also tweak the registry to make the Windows 10 context menu default in Windows 11.
Keyboard Functions For Selecting Multiple Files
There are plenty of times when you need to select multiple files at once. There’s the old “drag your mouse cursor” option, but that one is clunky and doesn’t help when your files aren’t all next to each other. Thankfully, there are a number of keyboard functions you can use to do this instead. Some of these functions are common knowledge. A lot of people know that you can hold the Shift key while moving your arrow keys to select files as you travel across them, or by Shift-clicking the first and last items in a list of files (or folders) you want to select.
Fewer people know about the fact that you can hold the Control key while using the arrow keys, and instead of automatically selecting files as you move, you can press the Spacebar when you want to select another file. Personally, I think the easiest thing to do is just to hold “Control” while left-clicking each file you want with the mouse, but if you want to select multiple files using just your keyboard, these other functions are the way to go.
Optimizing Folder Properties to Display Content Differently
If you’ve paid close attention to the Windows 11 File Explorer, you may have noticed that different files are displayed a little differently.
For example, your Pictures folder displays larger thumbnails which show off your pictures, while your Documents folder will display everything as a list, with the most recently edited documents prioritized by default. There are also unique ways that music and downloaded files are displayed and filtered, though the differences are slight in many cases.
At any rate, the point is that you can set your file types to display however you want them to. Just right-click on a folder and choose “Properties,” then click on the “Customize” tab. From there, you can optimize your folders to display however you want them to.
You can also click “View” at the top of the File Explorer window to change how files and folders are displayed.
Changing the Default Launch Folder
Whenever you open File Explorer, it pulls up the “Home” folder by default. I don’t know about you, but I don’t often do anything from the Home folder. Instead, you can set File Explorer to open to another location instead, though you’ve only got a few options to choose from. There’s a button on the far right of the File Explorer menu bar that looks like an ellipsis. Click on that, and then select “Options.”
From there, you can change the default opening location to a folder like “OneDrive” or “This PC”. You can actually disable the “Home” folder from these options too, if you really want to.
Clearing File Explorer History
File Explorer keeps track of what you do, kind of like a web browser. It does this so it can provide suggestions when you use the search bar and put your frequently visited folders on your “Home” page. If you have folders you no longer use that keep showing up in these locations because you used to frequent them, you can clear your File Explorer history to set everything back to zero.
To do this, click on the ellipsis icon that’s on the far-right of the menu bar, then click on the “Options” tab. In the folder options tab that appears, select the section labeled “Privacy,” and click the option there that says “Clear File Explorer History.” There are also some options there to choose whether or not File Explorer even shows recent folders, if you want to disable it entirely.
Creating and Extracting Archives
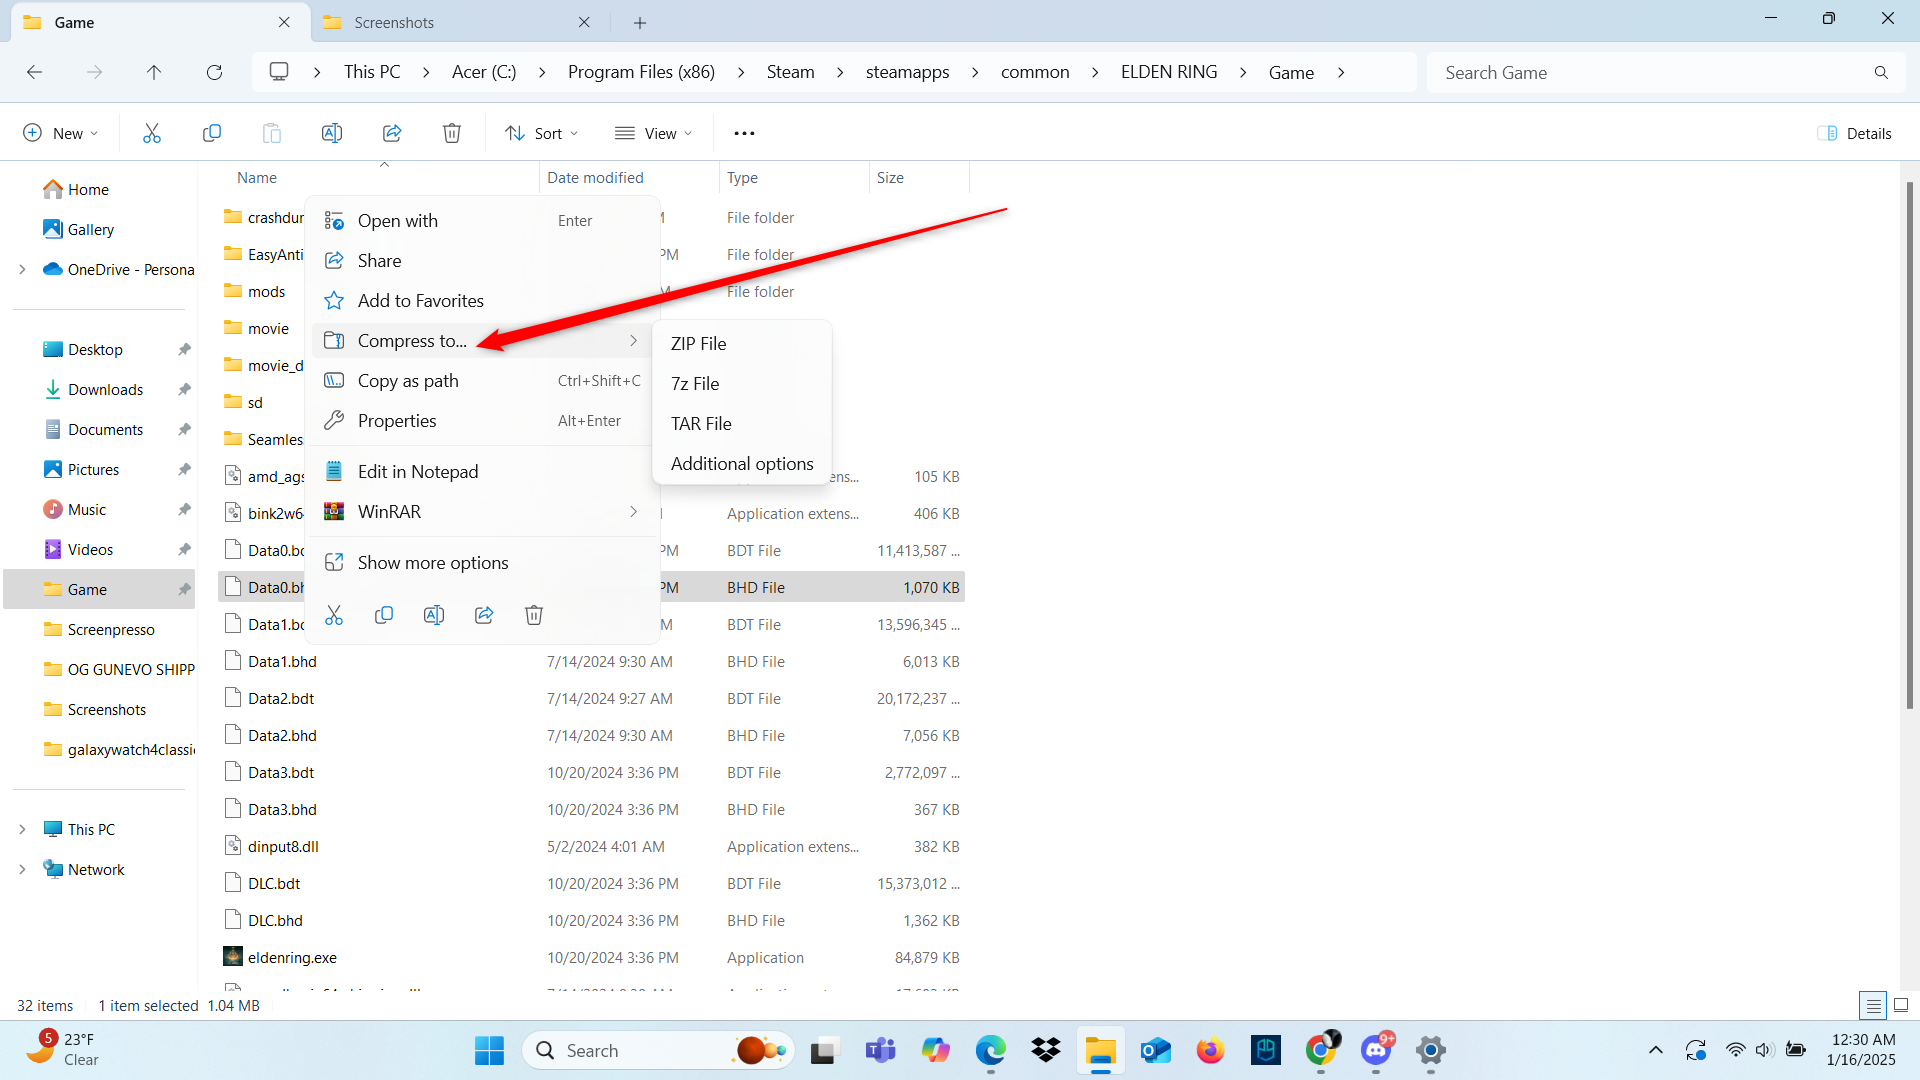
Windows File Explorer has long given its users the ability to extract and create ZIP archives. But if you’ve updated to Windows 11 version 24H2, you can now create and open archive files of other types, including RAR and 7z. All you have to do is right-click on a file, then click on “Compress To” in the menu that comes up. Then you can just click on the type of archive you want to create.
You can also go into “Additional options” from that menu and configure things like the compression level and the method. At any rate, you no longer need to download third-party tools like 7-Zip or WinRAR to interact with these types of files.
Renaming Multiple Files at Once
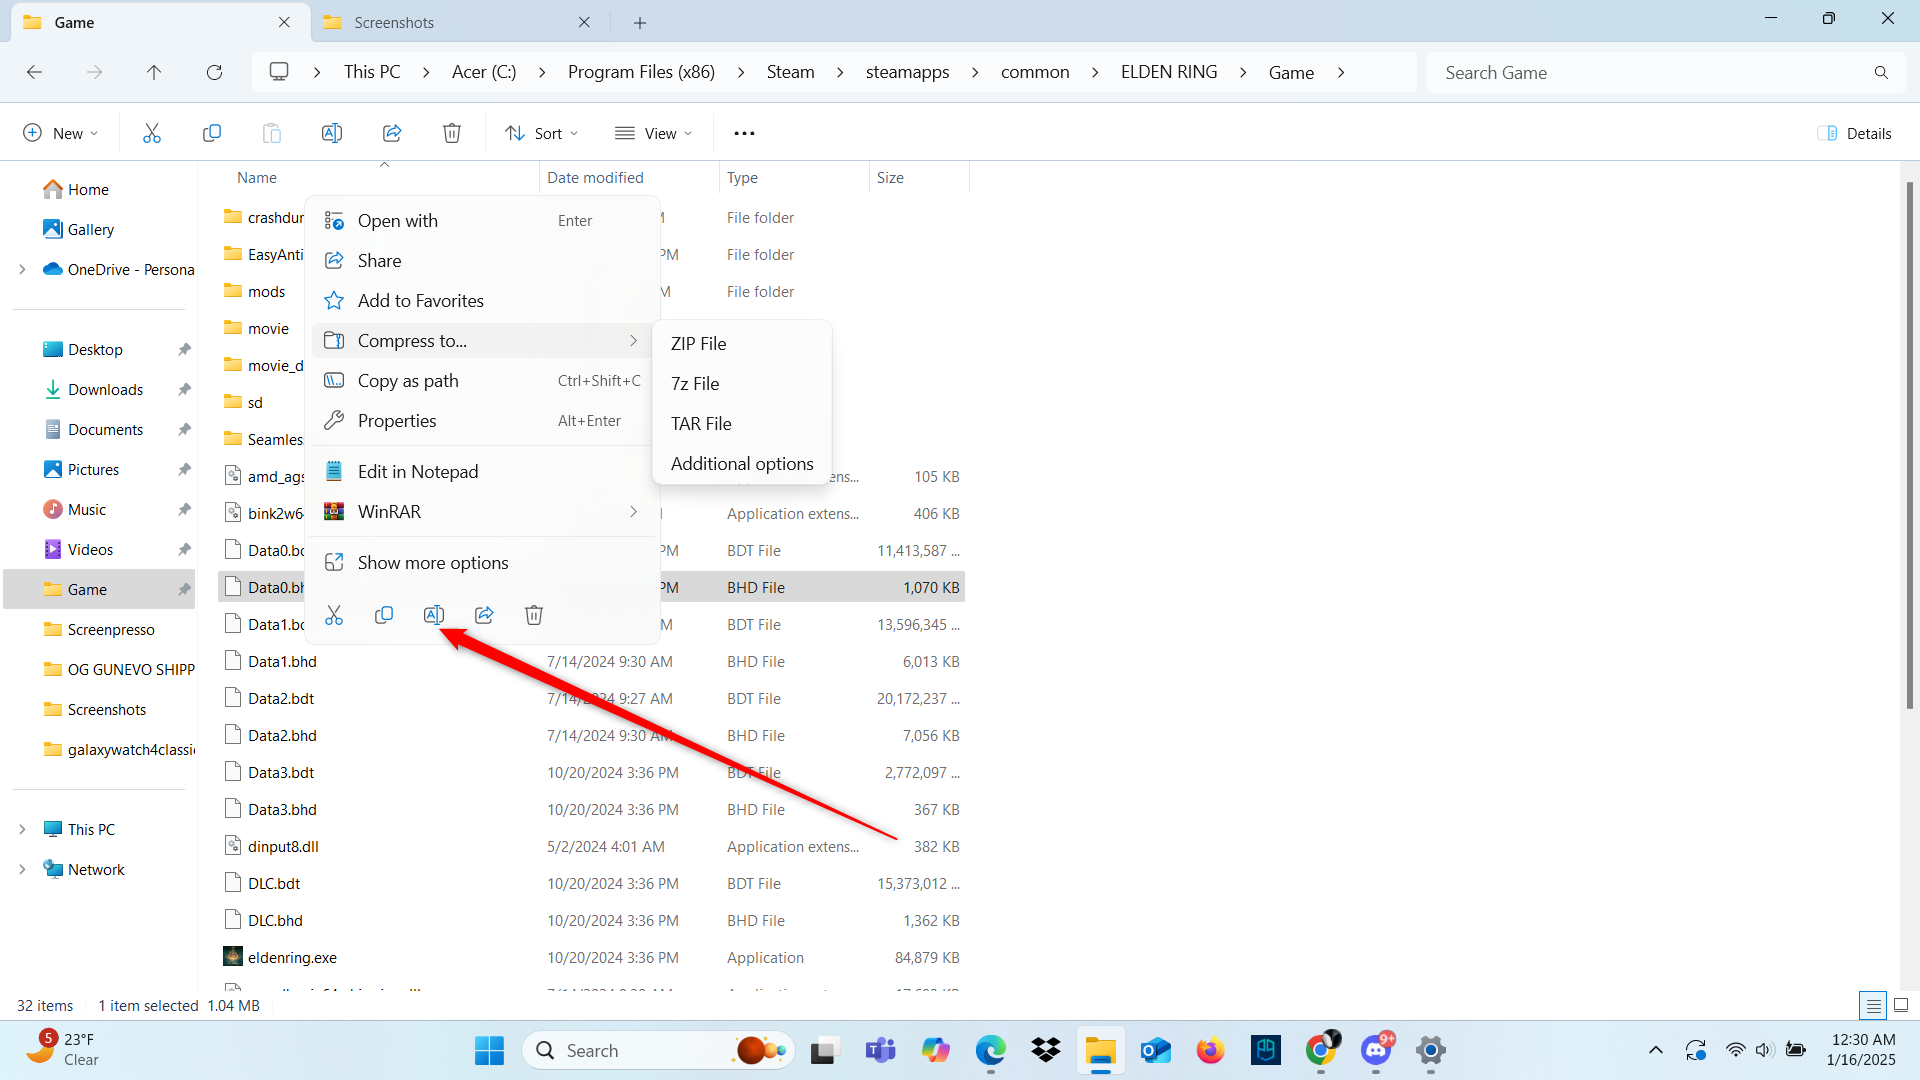
When you need to rename a bunch of files, doing it one at a time can be a real chore. Luckily, you can easily rename files in bulk. First, select all of the files that you want to rename. Then, right-click on one of them and choose the “Rename” option from the pop-up menu. Type the name you want for all of those files.
It may appear as if only one file is being renamed when you do this, but once you confirm it, all of your selected files will be renamed. After doing this, all of the files will have the same name, with a number at the end to differentiate them.
If you need to rename files with a more complex naming scheme, you can use Microsoft’s PowerToys to batch rename files instead.
I wouldn’t be surprised if there were more hidden or little-known features hiding in the Windows 11 File Explorer. These nifty features do make it a bit more useful, but there’s even more you can do to customize the program and make it fit your needs.


